Section 4.4. Modifying Objects
Besides arranging objects' size and placement on the page, you can also adjust the way each object looks by adjusting its various properties . Object properties include things like fill color, line color and style, drop shadows, and object opacity. The Graphic Inspector and the Color Picker are your command center for making these adjustments.
4.4.1. Choosing Colors
You can add or change the color of shapes , backgrounds, shadows, table cells , and chart elements. You can fill these objects with solid colors, gradientsin which two colors blend gradually into each otheror images.
Any time you need to adjust the color of shapes, text, backgrounds, lines, or shadows, select the object and click one of the Inspectors' color wells to call the Color Picker to the fore. (Alternatively, you can click the toolbar's Colors button, or choose View  Show Colors.)
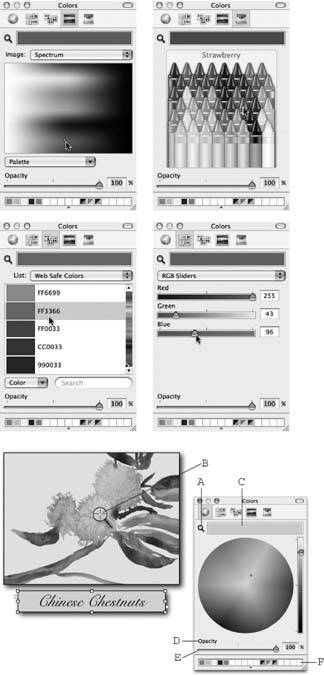
The Color Picker is a part of OS X, and comes into play in many different programs when you need to adjust colors. The Color Picker provides five different approaches to choosing colors through the buttons at the top of its window (Figure 4-24). But whether you choose the color wheel or the crayons for picking colors, the options in the rest of the window stay the same. Select a color using any of the five Color Picker displays and see the color in the swatch box.
Slide the Opacity slider to the left to make the color more transparent (or enter an opacity percentage directly in the % box). As you adjust opacity, the color swatch takes on a diagonally split-screen appearance, with the reduced opacity color displayed on the bottom of the swatch. The upper part of the swatch box displays shades of grayactually the mask that Pages applies to the selected color to reduce its opacity (or increase its transparency). In other words, if you set the opacity to zero, the upper part of the swatch shows pure black, masking out all the color and resulting in no color. Increase the opacity, and that black turns into lighter and lighter gray, letting more of the color show through, resulting in more opaque colorsuntil you reach 100 percent opacity, or pure color.
Instead of mixing up your own colors with the Color Picker, you can just find a color in any document or any object on your screen (even outside of Pages), and load it into the Color Picker's swatch. For this trick, click the magnifying glass icon next to the color swatch. Pages turns your cursor into a magnifying glass icon with a crosshair in the middle. The magnified view through this magnifying glass allows you to choose individual color pixels. Maneuver the magnifying glass over any part of your screen until the color you want appears as the central pixel in the crosshairs. Click the mouse to load that pixel's color into the Color Picker's swatch.
|
If you mix up a color you like or swipe one with the magnifying glass, you can save it for future use as a favorite in the color palette. Whether it's a pure color or a reduced-opacity color, drag from the swatch down to one of the squares in the color palette at the bottom of the window. By saving your favorite colors in the color palette, you can use them in different parts of your document for different types of objects, text, or backgrounds. And since the Color Picker is a system-wide feature, you can use them in other documents or other programs. This ability's especially useful if you want to maintain a consistent look across several documentsfor example, a brochure, business card, or stationery. The color palette's standard display is one line of boxes at the bottom of the Color Picker window, but if you need more, grab the little dot on the bottom edge of the window and drag it down to reveal more storage spots. You can also widen the Color Picker window to increase the paletteup to a maximum of 300 spots. Click a saved color in the palette to load it in the Color Picker's swatch, or drag it directly to an object.
4.4.2. Using Colors
Pages provides the Graphic Inspector to control objects' colorsboth their fill (interior color), and their stroke (outline color). The Graphic Inspector also lets you add a shadow to an object and adjust the object's opacity.
You can add a fill color to any shape, text box, table cell , or chart element. Select one of these objects. From the Fill pop-up menu, choose Color Fill, and then click the color well that appears beneath the pop-up menu to bring up the Color Picker. Click any color in the Color Picker or any color you've saved in its color palette, and Pages applies it to the selected object. As you adjust the Color Picker's opacity slider, you can see its effect on the object's fill.
Note: The Opacity slider in the Graphic Inspector window adjusts opacity for the entire object , fill, stroke, andif you've added oneshadow.
4.4.3. Gradient Fills
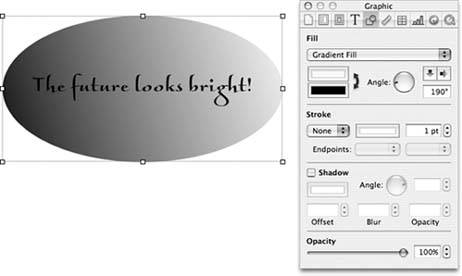
Instead of filling an object with a solid color, Pages can create a gradient fill , a fill color that gradually blends one color into another. From the Graphic Inspector's Fill pop-up menu, choose Gradient Fill, and Pages displays two color wells beneath the menu: one for the starting color and one for the ending color. Click the upper color well and choose a starting color with the Color Picker; then click the lower color well and choose an ending color. You could choose, for example, red and yellow to create a gradient that transitions from red through all the shades of orange to yellow.
A gradient starts at one side of an object and ends at the opposite side. Click the arrow buttons to set the gradient direction from top to bottom or left to right. Use the Angle knob or enter an angle directly in the angle field to set any other gradient direction. Click the double-headed arrow to invert the gradient, swapping the starting and ending colors (Figure 4-25).
|
4.4.4. Filling with Images
Pages lets you use images as well as colors to fill objects. This is how you apply a background image to the text box, an assortment of images to table cells, or add a picture to a large arrow shape.
|
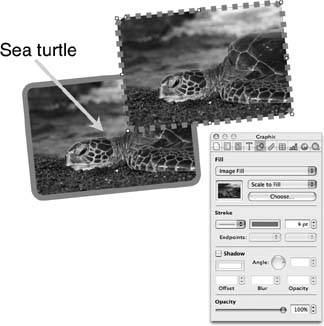
Select a shape or text box, for example, and, from the Graphic Inspector's Fill popup menu, choose Image Fill. Drag an image file from the finder, or a picture from the Media Browser, into the well below the pop-up menuor click the Choose button and select an image file from your hard drive. (The first time you use Image Fill, Pages forces you to use the Choose method by displaying the file-choosing dialog box.) Pages adds the image to your selected object and scales it according to your choice in the Scale pop-up menu (Figure 4-26):
-
Scale To Fit . Pages attempts to fit the entire image into the object when you choose this option. This way often results in some empty space within the object where its shape doesn't match the proportions of the image.
-
Scale To Fill . Choose this option and Pages resizes the image just enough to completely fill the object's shape.
-
Stretch . Pages stretches the image when you choose this option, distorting it a little or a lot as it transforms the image's proportions to conform to the object's shape.
-
Original Size . Choose this menu item and Pages places the image into the object in its exact original size. If the image is largelike a high-resolution photographyou see only a tiny portion of the picture. Pages crops into the center of a large original when you choose this option; you can't choose which part of the picture to display.
If the original's smaller than the object you're filling, Pages places it in the center of the shape; you can't shift the position of a small image within the object.
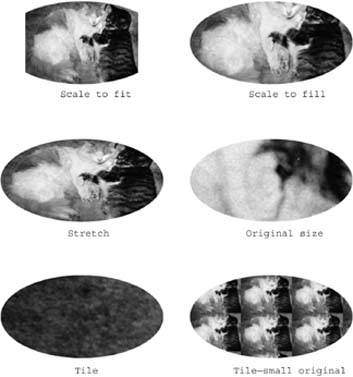
Figure 4-26. You can fill a shape or text box with an image if you choose Image Fill from the Graphic Inspector's Fill pop-up menu. Choose the image you want, and then select one of the five fill variations from the Scale pop-up menu. Pages crops or stretches the image, or inserts it into the shape at full size. If the original image is smaller than the shape you're filling, the Tile option displays a repeating pattern of your image.
-
Tile . Choose this option and Pages fills the object with multiple copies of the image (like tiles on a countertop) only if the image is much smaller than the object. If the image is larger than the object, Pages cuts a section from the upper-right corner of the image (as if it were preparing to cut the image into mosaic tiles, perhaps?) and pastes it into the object at the original size. As you can see in Figure 4-26 (lower left), when this happens, you often end up with just a big splotch of fuzzdepending on what's in the upper-right corner of your image.
4.4.5. Adding Tinted Image Fills
You can add a color tint to an image you use as an object fill to impart, for example, a rosy glow or a ghoulish green overcast to a picture or graphic. From the Graphic Inspector's Fill pop-up menu, choose Tinted Image Fill, select an image and a scaling style, and then click the tint color well (Figure 4-27). Pages displays the Color Picker, ready for you to choose your tint color. Select a color and adjust its opacity as Pages applies the filter to your image. If you want to tint several objects with a matching filter, drag the swatch to the color palette to use later.
|
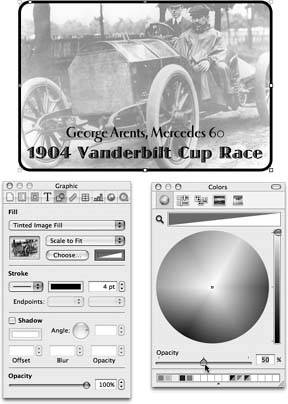
Tip: Use tinted image fills to adjust the density of an image without affecting the opacity of the image's container. For example, decrease the density of an image you're using as a table background without affecting the opacity of the table; or reduce the density of the image you're using as a shape fill without affecting the shape's stroke or shadow opacity.Achieve this effect by using white for the image tint color and adjusting the Color Picker's Opacity slider to produce the desired image density. Since you're adding an overlay of white, images adjusted in this way don't become transparentthough they look the same as a reduced opacity image on a white background.
4.4.6. Adjusting Line Styles
Pages uses lines (or strokes ) as standard or optional components in most objects. Shapes have an outline, for example, table cells and chart elements have borders, and you can add borders to pictures or text boxes. The Graphic Inspector's Stroke section is the toolbox for making line adjustments (Figure 4-28).
|
To adjust an object's line style, first select a shape, image, or text box. Open the Graphic Inspector and, from the Stroke pop-up menu, choose a line style: a solid line, three styles of dotted lines, or None for no line. Click the Stroke color well to open the Color Picker; select a stroke color and adjust its opacity. Set the line width or thickness using the up and down arrow buttons or by typing a point measurement into the width field.
Note: You can apply strokesor borderlinesaround an image or text box, but not around a movie or sound.
If you're formatting one of the three line shapesthe plain line, arrow, or double-headed arrowthe Endpoint pop-up menus come into play. The arrow-style lines are just plain lines with one or two preselected endpoint options. Use these pop-up menus to choose from various arrow or endpoint styles for each end of the line.
4.4.7. Adding Shadows
You can add a shadowalso known as a drop shadowto any object. Shadows give your document a sense of three-dimensionality: the objects appear to float above the page. Open the Graphic Inspector to get to the shadow controls.
Tip: If you add a drop shadow to a text box, you probably want to add a fill color (perhaps just white). Otherwise the text casts the shadow, not the text box. (Add text shadows using the Font Panel, as described on Section 2.1.1.1.)
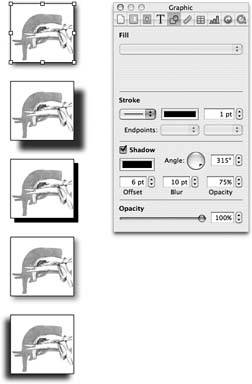
Select an object and, in the Graphic Inspector, turn on the Shadow checkbox. Click the Shadow color well to open the Color Picker, and then choose the shadow's color. The standard angle for a drop shadow is to the lower right of the object315 ° on Pages' Angle control. If you'd like the virtual light to strike your object from a different direction, adjust the Angle knob, use the up and down arrow buttons, or just type a number in the angle field.
Use the Offset, Blur, and Opacity fields to adjust the character of the shadow (Figure 4-29):
-
The Offset setting determines how far Pages displaces the shadow from the original object. A setting of zero offset results in the kind of shadow you'd cast at high noon on the equator. The virtual light source is directly overhead, casting an equal shadow on all sides and rendering any angle setting moot. Any number greater than zero offsets the shadow in the direction of the angle setting.
-
The blur setting controls how much Pages blurs the shadow behind the object. A minimum setting of one point creates a hard-edged shadow with a very slightly soft edge. Higher numbers increase the virtual cloud cover, blurring the shadow and eventually producing an indistinct haze beneath the object.
-
The Opacity setting determines the intensity of the shadow's color, from a nearly invisible 1 percent to a solid color at 100 percent. This opacity setting affects only the shadow. The Opacity slider at the bottom of the Graphic Inspector controls the opacity of the entire object, shadow included.
4.4.8. Adjusting Opacity
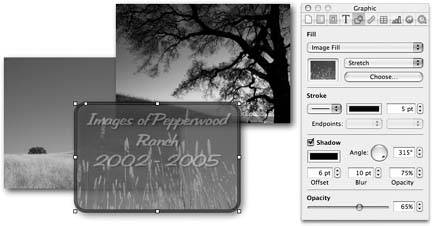
When you add objects to a Pages document, they begin life opaque, completely obscuring anything underneath them. But Pages gives you the ability to reduce the opacity of any objectin other words, you can make it partially transparent. People often use this technique to create a pale background image on the page behind the text. You might also use reduced opacity to de- emphasize certain images, directing the reader's attention to the completely opaque one; or when layering objects in order to show the complete shape of partially obscured objects.
|
To adjust opacity, select an object and drag the Graphic Inspector's Opacity slider to the left to make the object less opaquein other words, more transparent (Figure 4-30).
Note: Pages includes three opacity controls, all with separate functions. The Graphic Inspector's Opacity slider affects entire objects. You can use the Color Picker's Opacity slider to adjust opacity of an object's fill; a line or stroke; or the text color. The Graphic Inspector's Shadow section contains an opacity control strictly for shadows.
4.4.9. Adding Movies and Sound
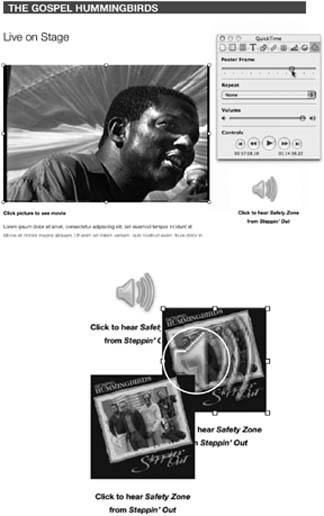
If people are going to see your document onscreeneither as a Pages document or a Web pagePages lets you easily add movies and sounds. Insert them by dragging them from the Media Browser (Section 4.2.1), and then adjust their appearance and position as you would with any other object. The QuickTime Inspector holds audio-and video-specific controls for adjusting sound and movie playback options (Figure 4-31).
|
Select a sound or movie in your document and use the Volume slider to adjust its playback volume. You can use this volume control only to reduce the playback volume of a sound or movieyou can't make it louder than normal. This volume setting affects only the selected sound or movie; you still have to adjust the computer's volume with the master volume control at the right end of the menu bar (or by choosing Apple menu System Preferences Sound, and, in the Output tab, adjusting the volume slider).
Use the Repeat pop-up menu to determine the playback style. Use None for normal playbackthe sound or movie plays through to the end and then stops. Choose Loop if you want the sound or movie to play continuously over and over, starting over immediately at the beginning after it reaches the end. People often use this technique for a background video that doesn't really have a beginning or end, or for a sound loop to provide continuous background music, for example.
If you select the Loop Back and Forth option, the sound or movie reverses direction when it reaches the end, playing backwards to the beginning and then repeating. You might find this technique useful for a training film showing how to assemble parts of a machine, or how to do a magic trick.
When you add a movie to your document, Pages displays the first frame of the movie on the page as a Poster Frame . Often, however, the first frame of a movie is blackor you prefer to show a frame from another part of the movie that's more representative of its subject. Use the Poster Frame slider to scroll through a selected movie to determine which frame Pages displays in your document. No matter which frame you select, when you double-click the movie in the document, Pages plays it from the beginning.
|
Note: You can choose whether Pages creates links to sound and movie files or actually imports them into the Pages document. Since movie and sound files are usually quite large, importing them into the document can make for a huge file size. But if you need to transfer your document to another computer, you need to include those files.When you save the document, click the flippy triangle next to the document name to reveal the Advanced Options section. Turn off the checkbox for "Copy audio and movies into document" to create links to those files; turn on the checkbox to import them into the Pages document.
The buttons in the Controls section at the bottom of the QuickTime Inspector window allow you to play, pause, fast forward, rewind, move to the end, or move to the beginning of a selected sound or movie. Pages lets you use these controls only while you're editing in the QuickTime Inspector windowyou can't add playback controls to your document.
Always choose Arrange Lock when youre done editing a movie or sound, to prevent resizing or repositioning by your viewers as they click it to play or pause.
| POWER USERS' CLINIC Editing in iTunes |
| You can use iTunes to edit out just a part of a song or sound file to use in Pages. You'll find this technique handy when you discuss sections of songs in your essay on the birth of bebop, for example.
The newly edited song appears in Pages' Media Browser, ready for you to drag into your bebop document, Deconstructing Diz . |
EAN: 2147483647
Pages: 134