Forms
Forms provide a way to allow the user to quickly and easily enter or edit many items of data in one process. Forms can have a number of fields, displayed in a similar way to a list, which the user can scroll up and down. Unlike list items, form lines are editable when they are in focus.
Forms have either a view mode and an edit mode, or just an edit mode. Use of a view mode implies that there is some existing information to display in the form, which the user can then edit. For example, in a game application a form could be used in view mode to display information about existing details for an opponent , and then in edit mode to change the details.
If a form has a view mode, then that will be its default mode. In view mode, the focus appears as a solid block, as shown in Figure 6-6. Switching to the edit mode is achieved by selection of Edit from the Options menu.
Figure 6-6. Form in view mode.
Generally, a form will be used with just an edit mode to create a new piece of information ”for example, to create new details for an opponent in a game. As there are no previous details for the opponent, there would be little point in having a view mode. In edit mode, the highlight appears as an outline to the field, with a flashing cursor for text editors, as shown in Figure 6-7.
Figure 6-7. Form in edit mode.

Form Lines
Each line in a form dialog must have a label and a control for editing the value of the item. The label can contain text, an icon, or both. The most common controls used are sliders, editors and pop-up fields, as shown in Figure 6-8, Figure 6-9, and Figure 6-10. As with other dialogs, custom controls can be used in forms.
Figure 6-8. Slider field in edit mode.
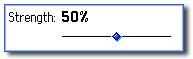
Figure 6-9. Editor field in edit mode.
![]()
Figure 6-10. Pop-up field in edit mode.

The label may occupy the same line as the control, as shown in Figure 6-9, or a separate one, as shown in Figure 6-11. This can also vary between modes, such that the view mode displays the label on the same line, and the edit mode displays it on a separate line.
Figure 6-11. Label and component on separate lines.

| | It is possible to make a form hide lines whose values are not currently set ”obviously, this makes sense only in view mode. It is done using the flags field in the resource definition ”use EEikFormHideEmptyFields to make empty data fields invisible. |
Form Soft Keys
The behavior of the soft keys and the contents of the Options menu depend on the mode of the form. In view mode, the Back key dismisses the form and returns to the previous screen. The Options menu, by default, contains an item to switch the form to edit mode ( Edit ). In edit mode, if no line values have changed, then the Back key returns the form to view mode ”if a view mode has been defined for the form. If the form has no view mode, then the Back key dismisses the form and returns to the application's previous screen.
If one or more line values have changed, the Back key displays a query asking the user if they wish to save their changes, as shown in Figure 6-12. Selecting Yes saves the form data, selecting No discards it. The form then returns to the view mode, if there is one, or to the previous screen if not.
Figure 6-12. Save changes query.

In edit mode, the Options menu contains a number of items by default, as shown in Figure 6-13.
Figure 6-13. Options menu for a form in edit mode.
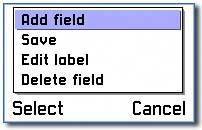
The basic meaning of all these items is self-explanatory, but for clarity a more detailed description is given here:
-
Add Field ” Adds a line to the form and redraws the display. The application developer determines the exact behavior of this item.
-
Save ” Saves the form's data and returns to the view mode if there is one, or to the previous screen if not.
-
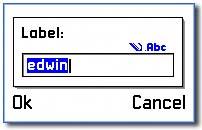
Edit Label ” Displays a pop-up window, which allows you to change the label for the current item, as shown in Figure 6-14.
Figure 6-14. Form label editor.
-
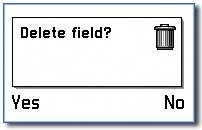
Delete Field ” Displays a query to check with the user whether or not to delete the field, as shown in Figure 6-15. If the answer is "Yes," the field is deleted and the form redrawn; if "No," the query is dismissed.
Figure 6-15. Form delete field query.
| | You can suppress or replace the default menu items, as you can with all other menu items. See the Menus section in Chapter 5 for details of how to do this. The enumeration for the items is in avkon.hrh under the heading " FORM default menu constants ". |
Editing Forms
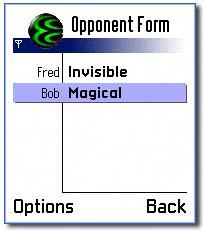
The example application OpponentForm has a form that allows the user to enter and edit details for opponents in a multiplayer game. It displays brief details of the opponents in a list, as shown in Figure 6-16.
Figure 6-16. List of opponents.
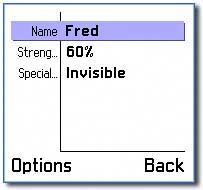
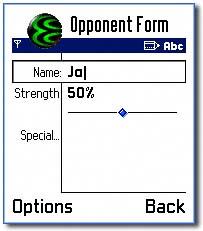
Selecting New from the Options menu allows the user to add a new opponent, by filling in a form. Selecting Open allows editing of an existing opponent's details, as shown in Figure 6-17.
Figure 6-17. Form edit screen.
With the exception of Save , all the default items have been removed from the Options menu. Table 6-1 details the methods that are called when invoking the other default commands. These methods can be overridden in your code if required.
Table 6-1. Default Options Menu Items for Forms in Edit Mode
| Item | Enumeration | Method Called on Invocation |
|---|---|---|
| Add Field | EAknFormCmdAdd | AddItemL |
| Edit Label | EAknFormCmdLabel | EditCommandLabelL |
| Delete Field | EAknFormCmdDelete | DeleteCurrentItemL |
Creating a Form in an Application
The OpponentForm example demonstrates how to add a form to an application. This subsection discusses that application and shows how to define a form in resource, create a derived form class, and initialize form values. Additionally, it demonstrates how to save changes to a form, cancel changes, and finally execute a form.
Since forms are a specific type of dialog, the general process for creating them should be familiar. First, the layout of the form is specified in a resource file, and then a class derived from CAknForm should be created to initialize it and handle the form's data. The form is then executed using CAknDialog::ExecuteLD() .
In the OpponentForm example, the form uses a slider to set the strength of an oppponent, an editor to set the name , and a pop-up field to select a special power. The form data is validated on saving to ensure that both a user name and power have been set for the player.
Defining a Form in a Resource
Forms are contained within a DIALOG resource, specifying the form components .
[View full width]RESOURCE DIALOG r_opponentform_form_dialog { flags = EEikDialogFlagNoDrag EEikDialogFlagFillAppClientRectEEikDialogFlagNoTitleBar EEikDialogFlagWait EEikDialogFlagCbaButtons; buttons = R_AVKON_SOFTKEYS_OPTIONS_BACK; form = r_opponentform_form; }
Set the flags to indicate the following about the dialog:
-
EEikDialogFlagWait ” the dialog is waiting
-
EEikDialogFlagNoDrag ” cannot be moved
-
EEikDialogFlagNoTitleBar ” has no title
-
EEikDialogFlagFillAppClientRect ” fills the whole screen
-
EEikDialogFlagCbaButtons ” uses soft keys
As usual, the buttons field determines the soft keys ”in this case Options and Back . The form field refers to a FORM resource.
RESOURCE FORM r_opponentform_form { flags = EEikFormEditModeOnly; items = { DLG_LINE { type = EEikCtEdwin; prompt = NAME_TEXT; id = EOpponentFormDlgCIdEdwin; control = EDWIN { width = KMaxNameLength; maxlength = KMaxNameLength; }; }, DLG_LINE { type = EAknCtSlider; prompt = STRENGTH_TEXT; id = EOpponentFormDlgCIdSlider; control = SLIDER { layout = EAknFormSliderLayout1; minvalue = 0; maxvalue = 100; step = 5; minlabel = MIN_TEXT; maxlabel = MAX_TEXT; valuetype = EAknSliderValuePercentage; }; }, DLG_LINE { type = EAknCtPopupFieldText; prompt = POWER_TEXT; id = EOpponentFormDlgCIdPopup; itemflags = EEikDlgItemTakesEnterKey EEikDlgItemOfferAllHotKeys; control = POPUP_FIELD_TEXT { popupfield = POPUP_FIELD { width = KMaxPowerLength; }; textarray = r_opponentform_power_popup_field_textarray; active = 0; }; } }; } As a minimum, the FORM resource should define the flags and items components. In the OpponentForm example, the flags used are:
-
EEikFormEditModeOnly ” indicates that the form should have an edit mode only.
-
EEikFormHideEmptyFields ” hides empty fields.
-
EEikFormShowBitmaps ” displays bitmaps in labels.
-
EEikFormUseDoubleSpacedFormat ” splits labels and controls onto two lines.
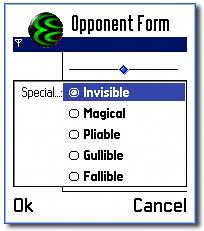
The items field refers to an array of dialog lines ( DLG_LINE ), which are the fields in the form. Each dialog line should contain a minimum of type , prompt , id and control . In the OpponentForm example, the third dialog line contains a pop-up field text control ”this has the optional itemflags indicating that it should open the pop-up window when the Selection key is pressed, as shown in Figure 6-18.
Figure 6-18. Pop-up field control.
Creating a Form-Derived class
In order to use the form dialog defined in the resource file, it is necessary to derive from CAknForm and override some of its methods. In OpponentForm , the class COpponentFormForm illustrates this process.
class COpponentFormForm : public CAknForm { public: // Constructor static COpponentFormForm* NewL(TOpponentFormOpponent& aOpponent); ... private: // Constructor COpponentFormForm(TOpponentFormOpponent& aOpponent) : iOpponent(aOpponent){}; ... On construction, it is usual to provide a reference to the data the form is to modify. In the OpponentForm example, a reference to a T -class, TOpponentFormOpponent , is passed through. This class has member data for the name, strength (defaulting to 50 ), and power of an opponent. A public method, IsValid() , determines whether the object contains valid data.
As with all dialogs, the form values can be initialized in PreLayoutDynInitL() , using ControlOrNull() to obtain a handle on each control as required. In COpponentFormForm , PreLayoutDynInitL() calls a private convenience method, LoadFormValuesFromDataL() , to perform the initialization. This is convenient , as it means LoadFormValuesFromDataL() can also be used to discard any changes if the user cancels a save.
When changes to the form data are to be saved ”for example, if Save has been selected from the Options menu ”the framework calls SaveFormDataL() . Therefore, this function must be overridden in the derived form class to ensure that the values in the controls are saved back into the form's member data.
TBool COpponentFormForm::SaveFormDataL() { CAknSlider* slider = static_cast<CAknSlider*>(ControlOrNull(EOpponentFormDlgCIdSlider)); if (slider) { iOpponent.SetStrength(slider->Value()); } ... return ETrue; } As usual, the ControlOrNull() method provides access to the form's controls. The data in each control can then be obtained. If all saves have been successful ”for example, if valid values have been entered ”then SaveFormDataL() should return ETRue , otherwise it should return EFalse .
If the user chooses to cancel the changes made to the form ”for example, when selecting No in the save query ”the framework calls DoNotSaveFormDataL() to discard any changes. Override this function in the derived form class to ensure that the values of the form's controls revert to those in the form data. This is done in the same way as when initializing the form values. In COpponentFormForm it is achieved by simply calling the private convenience method, LoadFormValuesFromDataL() , which resets the values.
Executing a Form
To construct and execute a form, use the standard dialog methods ”for example, ExecuteLD() . In OpponentForm this is performed in COpponentFormContainer::NewOpponentL() , shown below, and also in COpponentFormContainer::OpenOpponentL() . The AppUi calls these functions in response to the New and Open commands, respectively.
void COpponentFormContainer::NewOpponentL() { TOpponentFormOpponent opponent; COpponentFormForm* form = COpponentFormForm::NewL(opponent); form->ExecuteLD(R_OPPONENTFORM_FORM_DIALOG); ... EAN: 2147483647
Pages: 139
- Chapter II Information Search on the Internet: A Causal Model
- Chapter VI Web Site Quality and Usability in E-Commerce
- Chapter IX Extrinsic Plus Intrinsic Human Factors Influencing the Web Usage
- Chapter X Converting Browsers to Buyers: Key Considerations in Designing Business-to-Consumer Web Sites
- Chapter XV Customer Trust in Online Commerce