Touring the Visio Window
3 4
When you first start Visio, you see the menus and toolbars across the top, stencils along the side, rulers around the page, and the status bar below. In fact, a great deal of visual information is presented all at once, and all of it has built-in help in the form of ScreenTips. Pause your mouse over a toolbar button or a shape, and a small box or balloon containing a helpful tip appears, as shown in Figure 1-6.
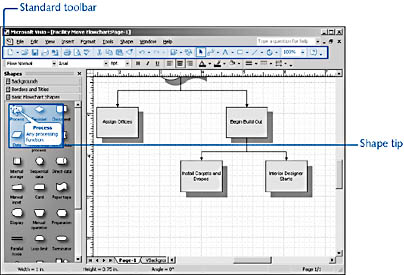
Figure 1-6. Many screen elements include tips that appear when you pause the mouse over an item. A shape's tip describes a shape's purpose.
newfeature! If you've upgraded from a previous version of Visio to Visio 2002, one of the biggest changes you'll notice are the new, personalized menus, which may be disorienting at first. Commands you expect to see may not appear. By default, Visio displays only the most commonly used commands. To see the complete list, point to the double-arrow at the bottom of the menu, and after a moment, the full menu appears. As you use commands, Visio adds them to the menu. To work with the full menus all the time, click Tools, Customize. On the Options tab, select the Always Show Full Menus check box.
Another important element of the Visio window is the status bar. As you work, changes you make to shapes are reflected on the status bar, as Figure 1-7 shows.
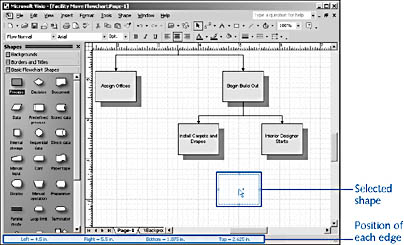
Figure 1-7. As you drag a shape on the drawing page, the status bar tells you its exact position.
Tip - Customize the Visio Desktop
Stencils don't have to be green, pages don't have to be white, and the page background (or pasteboard) doesn't have to be light blue. To customize any of these colors, choose Tools, Options, and then click the View tab. Under Color Settings, you can choose different colors for stencils, pages, and other objects. Choices you make here change the Visio working environment until you choose different colors.
Using the Toolbars for Drawing and Formatting
Many of the most common editing tasks have a shortcut on the toolbars that Visio displays by default: Standard and Formatting. The Standard toolbar contains many of the same buttons that you see in other Microsoft Office programs. The Formatting toolbar contains style lists and options for formatting the appearance of text, lines, and fill—the interior color of shapes. You can use the Customize command on the Tools menu to add and remove commands from toolbars so that the shortcuts you use most are at hand.
Visio has a toolbar for most every task. To choose the toolbars you want to work with, click View, Toolbars. A check mark appears beside the toolbars that are displayed. Click to display the toolbar you want. If you want to turn off the display of a toolbar, click a checked toolbar.
What if you prefer to display toolbars vertically? You can dock and float toolbars (and other windows) by dragging them where you want. Toolbars are docked when they are attached to the side of the window. Usually they're docked along the top, but you can drag them to an edge or the bottom of the Visio window. When you float a toolbar mid-screen, it displays a title bar as you see in Figure 1-8.
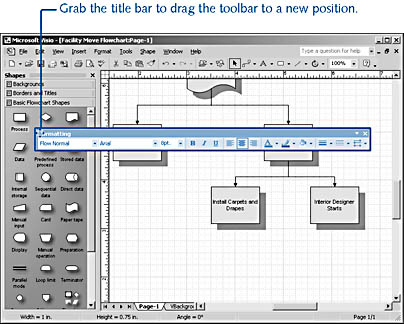
Figure 1-8. You can drag a toolbar to a more convenient location. To dock it again, drag it back to the top, bottom, or side of the Visio window.
Tip
To close any Visio window, right-click its title bar, and then click Close.
Working in the Visio Drawing Page
The quickest way to fill a blank drawing page is to drag shapes onto it. When you start a diagram with a template, Visio typically opens several stencils, which Visio docks on the left side of the screen. To bring a stencil to the top of the stack, click its name. The stencil that was on top is minimized, as Figure 1-9 shows. You can drag an individual stencil window to a new location on the screen, or you can drag the entire Shapes pane and dock it in a new location, as Figure 1-10 shows. To move the stencil back to its original position, drag the Shapes title bar to the left side of the window; Visio automatically docks it against the side of the window. Rather than drag a stencil, you can right-click the Shapes title bar, and then click Float Window. You can resize a floating stencil by dragging a side or corner.
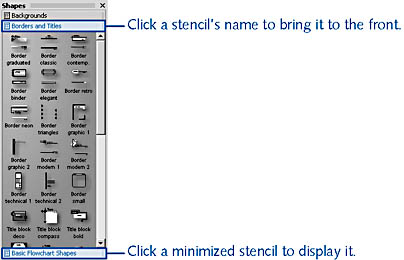
Figure 1-9. To display a stencil, click its name on the stencil window's title bar.
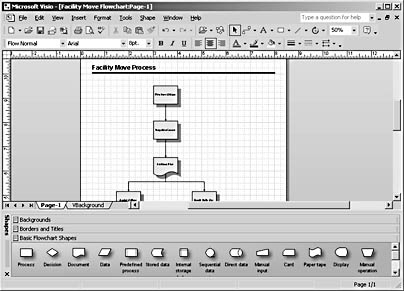
Figure 1-10. Dock your stencils in a new position by dragging the Shapes title bar to the top, side, or bottom of the Visio widow.
Stencils typically display three master shapes across and several down, although you can adjust this arrangement. The term master shape (or master) is used to differentiate between the shape as it appears in a stencil and the copy of it that you drag onto your page. You can resize the Shapes area to display more or fewer master shapes at a time: point to the gray area between the Shapes area and the drawing page. The pointer becomes a two-headed arrow, indicating that you can drag the window's right border to resize it.
Troubleshooting
The Shapes window split the stencil windows in two.
Because Visio can dock a window anywhere you drag it, if you inadvertently drag a stencil by its name, it can end up below the other stencils in a separate pane. To dock the stencil with the others, drag it into the middle of another stencil. At lower screen resolutions (such as 800×600), you may find it easier to use a two-step process: Drag the stencil into the middle of the drawing page, and then release the mouse button so that the stencil floats. Then, point to its title bar, drag it back into the Shapes window, and drop it in the middle of the open stencil.
Panning and Zooming
To get a good look at a diagram, you can zoom in close or zoom out to see the entire page. When you start a new diagram, Visio displays the full page. If you look at the Zoom list on the Formatting toolbar, you'll see the percentage of zoom. To get a close-up view, click the drop-down arrow on the Zoom list, and then choose a larger percentage. At 100% view, shapes appear on the screen at the same size they appear when printed.
When you're working in a large diagram, you can use the Pan & Zoom window to see where you are in the big picture, as Figure 1-11 shows. To display this window, click View, Pan & Zoom Window. Visio docks the window alongside the drawing page, but you can move it to a location or dock it with the stencils as you can do with any window in Visio. In the Pan & Zoom window, a red selection box highlights the area currently displayed on the drawing page. You can
- Drag a side or corner of the red box to resize it, thereby changing the level of zoom on the drawing page.
- Drag to create a new selection box in the Pan & Zoom window, which effectively displays a new area of the drawing page and zooms in.
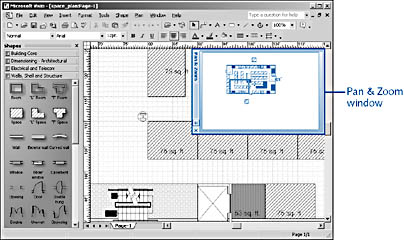
Figure 1-11. In a large diagram, you can get a close-up view of the drawing page by zooming and maintain a bird's-eye view in the Pan & Zoom window.
Note
Use the AutoHide icon (which looks like a pushpin) to allow windows to tuck out of sight when not in use. When you point to the window, it scrolls open again.
Although the Pan & Zoom window is great for providing the big picture, you can also use keyboard shortcuts for moving around a drawing page and quickly zooming in and out as Table 1-2 shows.
Table 1-2. Keyboard Shortcuts for Panning and Zooming
| Shortcut | Effect |
|---|---|
Press Shift+Ctrl+left mouse button | Zooms in |
Press Shift+Ctrl+right mouse button | Zooms out |
Press Shift+Ctrl+drag with the left mouse button | Zooms in on a selected area |
Press Shift+Ctrl+drag with the right mouse button | Pans the drawing page |
Note
In Visio, the zoom level at which you view and work on a drawing is independent of the scale you set for a drawing page. Whatever your drawing scale, you may still need to zoom in on a portion of a drawing to move shapes exactly or do other precise work. For example, you can change the magnification from 50% to 200%.
Viewing Shapes and Pages in the Drawing Explorer
Another useful tool in Visio that provides an alternative view of your diagram is the Drawing Explorer, as Figure 1-12 shows. For some diagram types, it helps to see a hierarchical list of shapes and other objects sorted by page. The Drawing Explorer provides this view. To display it, click View, Drawing Explorer Window. In the Drawing Explorer, you can add, delete, and edit items in your drawing. You can even use it to locate shapes—when you double-click a shape that's listed in the Drawing Explorer, Visio also selects it on the drawing page, making it more visible.

Figure 1-12. The Drawing Explorer provides a hierarchical view of the shapes, pages, and other objects in your diagram.
You can display the Drawing Explorer for any diagram type in Visio. However, some solutions include their own explorer windows for organizing information on the page. For example, a piping and instrumentation diagram includes a Component Explorer that works specifically with that solution's shapes. These special-purpose explorer windows are described elsewhere in this book.
Tip - Play Sounds in Visio
If you find audible feedback amusing, you can have a sound play when a Visio window, such as the Drawing Explorer or Pan & Zoom window, opens and closes. To do this, use the Sounds And Multimedia (Windows 2000) or Sounds (Windows 98) option in the Windows Control Panel. In the Sound Events or Events box, select Restore Up or Restore Down under Windows. Click the drop-down arrow on the Name box, select a sound, and then click OK.
Merging Windows
If you work with drawing types that require the use of several view windows, consider taking advantage of a great new feature. You can merge windows, such as the Drawing Explorer and Pan & Zoom windows, which means to tuck one window inside another. Visio displays page tabs so that you can switch between windows, as Figure 1-13 shows. To merge windows, drag a window by its title bar into the center of a docked window. You can merge any anchored window, which includes the Custom Properties window, Drawing Explorer window, Pan & Zoom window, Size & Position window, and some template-specific windows. To display any of these windows, choose a command from the View menu.

Figure 1-13. To conserve screen real estate, you can merge docked windows.
Tip - Dock Windows
The Shapes window where stencils are stored is a handy location for docking other windows while you work. For example, point to the title bar of a window, such as the Pan & Zoom window discussed previously. Drag to the Shapes window, and then release the mouse. Visio arranges the window above or below the stencils so that all the tools you work with appear together.
EAN: 2147483647
Pages: 211