Defining Spaces in a Floor Plan
3 4
For Visio Professional to track data in a space plan, you must uniquely identify each space with which you want to associate assets, equipment, people, and other resources. Even if your floor plan shows walls and rooms, you also need it to show space, as Figure 26-7 shows. This is a unique requirement of the Space Plan template that doesn't necessarily make intuitive sense, but it's how Visio keeps track of what goes where. The useful thing about tracking assets and people by space rather than by rooms or cubicles is that you can designate any area you want as space regardless of what your floor plan looks like.
Your drawing must include space, but what does that mean? In Visio terms, space in a floor plan is a shape—the Space shape. There are two general methods of adding space to a floor plan: either import it, or use space shapes. If you used the information in Chapter 18, "Laying Out Floor and Site Plans," to create a floor plan, you know that you can draw a floor plan in Visio that already includes spaces for every room. If, however, you imported a graphic or CAD file to use as a floor plan, you'll have to add space to the drawing. You can add space by dragging space shapes on top of rooms, or you can import a list of room numbers or other similar data to designate space in your floor plan.
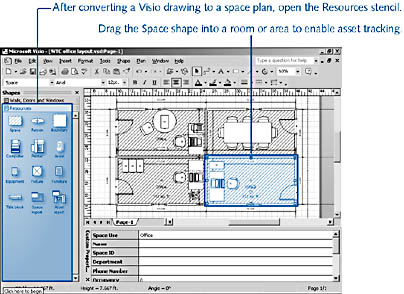
Figure 26-7. Visio tracks information in a floor plan by space, which is actually a separate shape that includes the custom properties used in associating resources with a location.
The easiest method is to know from the outset that you need both rooms and space and then create a floor plan in Visio using wall and room shapes that include space shapes automatically. That method is described in "Using Space Shapes to Start a Floor Plan." But that information doesn't particularly help you after the fact. The sections that follow describe how to add space to an existing floor plan that doesn't already have it.
Once your drawing includes space, each space must be uniquely identified. A unique identifier isn't anything fancy; typically, it's a room number. For example, to uniquely identify the space associated with a particular office, you could use 12-117 to specify office 117 on the 12th floor of a building. Depending on the method you used to add space to your drawing, you might need to manually identify each one. If you imported data, the space might already include a unique identifier. The value of unique identifiers for spaces is that they allow you to associate assets, people, and equipment with a given space.
Tip
If areas in your floor plan don't have room numbers, give them unique names that will make sense to people using the space plan, such as "Kitchen 1" or "Kitchen West."
Troubleshooting
The Plan menu does not appear on the menu bar, or commands on the Plan menu seem to be missing.
When you start a new drawing with the Space Plan template, Visio adds the Plan menu to the menu bar. The Plan menu includes all the commands needed to work with space and resources in a facility model. If you start a drawing with a different template, or open an existing floor plan that was based on a different template, the Plan menu might not appear, or, if it does, it might include only the Convert To Walls and Set Display Options commands. To add the Plan menu and all the space planning commands to a drawing, choose Tools, Macros, Building Plan, Enable Space Plan.
Adding Space to a Floor Plan by Importing Information
If you already have a floor plan drawing, but haven't yet designated the spaces for which you want to track resources, you can import that information. If you have a spreadsheet, database, or other external data source that includes a column or record of room numbers or other unique identifiers, you can import that information with the Import Data Wizard. Visio adds the information to the floor plan in the Explorer window, as Figure 26-8 shows, and then you can choose which spaces to show in the floor plan drawing.
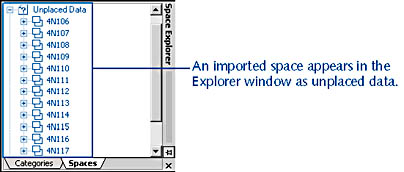
Figure 26-8. You can define the spaces in a floor plan by importing room numbers or other information that uniquely identifies each space you want to track. To place a space in the floor plan, drag it from the Explorer window onto the drawing page.
The space data you import is stored as part of the facilities model that Visio maintains. This means that the information about a space is available and Visio can track assets for it whether or not it appears on the floor plan. The spaces are listed in the Explorer window under the Unplaced Data category. By dragging a space listed in the Explorer window onto the drawing page, you add a space shape to the floor plan.
Visio also tracks other attributes of a space as custom properties associated with the space shape. When you import room numbers or other space identifiers from a spreadsheet or database, you can also choose to import other information from your data source. Visio can create new custom property fields that store the values from your data source, or you can map the values to existing custom property fields. For example, space shapes already include a field called Space Use. If your data source includes a field or column of information about how a space is used—for example, Room Name—you can map the Room Name information from your data source to the existing Space Use field.
To import space information into a floor plan, follow these steps:
- Choose Plan, Import Data to start the Import Data Wizard.
- In the Category list, select Space, and then click Next.
- Follow the instructions on each screen to link to your data source and specify the fields containing space information.
For details about each wizard screen, see "Using the Import Data Wizard."
- Click Finish. Visio imports the data. If you checked Show Report, Visio opens your browser and displays the Import Data Report, which lists all the spaces it imported and the action it took. "Unplaced" means that the spaces were added to the Explorer window but not placed on the drawing page.
- In Visio, click the Categories tab in the Explorer window.
Tip
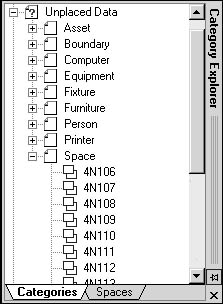
If you don't see the Explorer window, choose Plan, Explorer to open it. - Click to expand Unplaced Data, and then expand Space. The column data or fields you imported as space identifiers are listed.
- Drag a space from the Explorer window onto the drawing and drop it on top of the room, office, or area that the space information corresponds to. Visio creates a space shape and sizes it to fit the room if the room was created with Visio shapes. If you're dropping space on top of non-walled areas or an imported floor plan drawing, the space shape is not sized to fit.
- If a space shape doesn't fit in an office or area, select the space, and then drag a selection handle to resize it manually. Make sure that space shapes don't overlap.
- To see the properties that you imported with the space, choose View, Custom Properties Window, and then select a space on the drawing.
Tip
If the Custom Properties window is open, you can see the properties associated with each space as you select it. Then you can verify that the data you imported was added correctly.
Troubleshooting
After adding space shapes to a floor plan, all the furniture and other shapes have green stripes.
If you drop space shapes on top of an existing floor plan, the space shapes will be displayed on top of existing shapes. You can move the space shapes behind other shapes so that their stripes don't obscure furniture, walls, and so on. To do this, select a space shape, and then select Shape, Order, Move To Back.
Using Shapes to Add Spaces to a Floor Plan
Your floor plan probably already includes space if you see areas with green diagonal lines (the default fill style for the space shape), as Figure 26-9 shows. If your Visio floor plan doesn't have space shapes, though, or if you're using a CAD drawing or graphic for your floor plan, you can add space shapes to the drawing manually. The technique is simple but can be time-consuming, particularly if your floor plan contains many rooms or offices. After you've added a space shape for every room in the floor plan, you need to assign a room number or other unique identifier to each space. You use the space shape's custom properties to do this. That means manual data entry, another time-consuming process, but you do it only once.
InsideOut
If you're using a Visio floor plan, you might already have a space shape for each room in the floor plan. To verify, select a shape, and then choose Format, Special. If it is a space shape, you'll see Master: Space at the top of the Special dialog box. Visio adds a space shape automatically when you use the Room shape to create a room. In addition, when you start a floor plan by designating spaces, you have the option to create space shapes when you convert the spaces to walls.
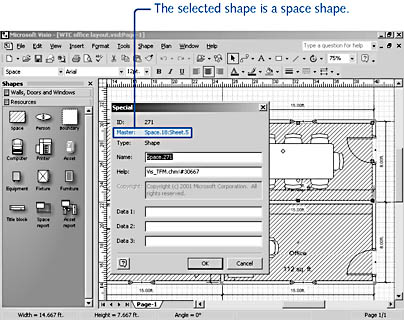
Figure 26-9. The Special dialog box reveals the name of the master used to create the shape shown in the Name box. By default, space shapes in a Visio floor plan look like areas with green diagonal lines.
Follow these steps to manually add space to a floor plan:
- Drag the Space shape from the Resources stencil onto a room.
If you're using a Visio floor plan, the Space shape snaps to the room's dimensions. However, Visio doesn't recognize the static vector lines in the background on a CAD drawing or graphic, so you'll have to resize the space shape for rooms in each of those types of drawings yourself.
Note
Don't overlap space shapes. Visio can't track assets for overlapping areas. - To adjust the size of a space, drag a selection handle on the space shape. For example, you can trace a CAD floor plan in this way to create a mosaic of space shapes on top of it.
- Repeat steps 1 and 2 to add a space shape to every room in the floor plan.
Tip
Rather than use a space shape, you can draw with one of the drawing tools and convert the results into space. Select the shape, select Plan, Assign Category, and then choose Space from the Category list. Click OK. - If the Custom Properties window is not already open, choose View, Custom Properties Window.
- To add an identifier to a space shape manually, select a space shape on the drawing page to display its properties in the Custom Properties window.
- In the Space ID field, type a unique name or identifier for the space, and then press Enter. For example, type the office room number. The value for Space ID for each space must be unique within the drawing file, particularly in a multiple-page drawing where each page represents a different floor in a building.
- Select the next space in the drawing, and then repeat step 6 until all the spaces are identified.
You can type in the other fields for each space shape, but the Space ID is the one field that Visio requires to associate assets and resources with spaces. If you type a value for the Name field, the text is displayed on the space shape unless you've specified different display options with the Label Shapes command on the Plan menu.
Tip - Hide Background Images in a Floor Plan
After you position space shapes on an imported CAD or graphic floor plan, you can hide the layer that contains the CAD or the graphic image so that your drawing is less cluttered. To hide the layer, choose View, Layer Properties, and then uncheck the Visible column for the graphic or CAD drawing layer.
Defining Boundaries Around Areas
When you're setting up space in a floor plan, you can designate special areas by using the Boundary shape on the Resources stencil. The Boundary shape is useful for calculating square footage for areas that include multiple rooms or spaces. You can also use it to denote spaces that belong to a particular department or function. The Boundary shape just gives you another way to track information in your space plan. It's listed in the Categories view of the Explorer window and appears on the page as a dotted line that encloses the spaces you specify, as Figure 26-10 shows.
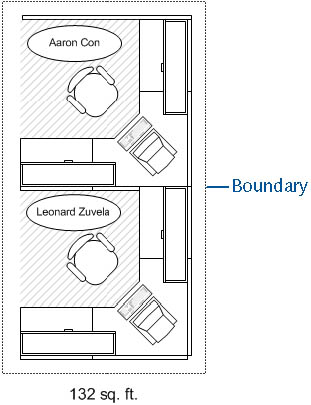
Figure 26-10. You can use the Boundary shape to visually identify multiple spaces as a unit in a floor plan.
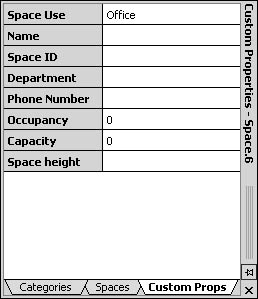
You can't associate people or assets with a boundary, but you can use it to track space usage. Boundary shapes include custom properties for space use, name, department, phone number, occupancy, and capacity. In addition, you can give a boundary a unique space identifier.
To add a boundary around spaces in your floor plan, follow these steps:
- Drag the Boundary shape from the Resources stencil onto the drawing page near the offices or areas you want to put a boundary around.
- Drag a selection handle on the boundary shape to stretch the shape so that it encloses the area you want.
- If the area you want to enclose isn't rectangular, edit the boundary shape. To do this, select the Pencil tool, Ctrl+click the edges of the boundary to add vertices, and then drag the vertices to reshape the shape.
For details about editing with the Pencil tool, see "Editing Shapes with the Pencil Tool."
- If you want to indicate the purpose of the bounded space, display the boundary's custom properties, and then type in the Space Use field. To display the boundary's properties, you can either open the Custom Properties window (choose View, Custom Properties Window), or right-click the boundary, and then click Properties.
- To enter a name for the bounded area that appears in the Explorer window, type in the Name box.
- To display a name on the boundary shape, select the boundary, choose Plan, Label Shapes, and then select a property to use for the name.
For details about labeling shapes, see "Displaying Labels on Shapes."
Troubleshooting
Text looks fuzzy after adding Boundary shapes to a floor plan.
The Boundary shape includes a 70% transparent fill that is barely discernible but has the side-effect of making shapes underneath look somewhat washed out. If shape text looks less readable after adding a Boundary shape to your floor plan, you can try one of the following:
- Move the shape behind the others. Select the Boundary shape, and then choose Shape, Order, Send To Back.
- Remove the fill. Select the Boundary, click the Fill Color button on the Standard toolbar, and then click No Fill.
EAN: 2147483647
Pages: 211