Displaying a Floor Plan in a Space Plan
3 4
Whether or not your space plan includes facilities data from a database, it must include a floor plan. You can create one in Visio, of course, or import an architectural drawing created in another program, such as a CAD (computer-aided design) program. You can also use a graphic file in any format that Visio can import. For example, if you have a hand-drawn version of your floor plan, you can scan that into your computer, save it as a TIFF or BMP file, and import that into Visio.
The floor plan doesn't have to be especially detailed to be used for tracking facilities information. You can even draw rectangles and other shapes using Visio's drawing tools and use the results as a rough space plan. If your space occupies more than one floor, display each floor on a separate page of the same drawing file. You can also split floors across pages for easier viewing. However, if your space occupies more than one building, use separate drawing files for each building.
Whether you use a Visio floor plan or an imported one, you must add Visio shapes to take advantage of the space plan features, as Figure 26-5 shows. Visio can store facilities and asset information for rooms in the floor plan only if you attach a space shape to each room. The space shape provides a unique identifier, such as a room number, which Visio requires for tracking information. The identifier is a custom property of the space shape.
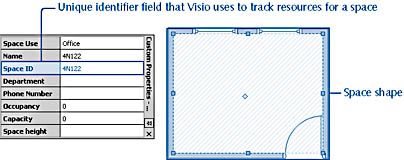
Figure 26-5. To track information in a floor plan, rooms must be uniquely identified and associated with a space shape.
Starting a Space Plan from Scratch
Although any Visio Professional drawing can be converted into a space plan, you can start a new space plan from scratch with the Space Plan template in the Building Plan folder. This template creates a new, scaled drawing on standard letter-sized paper with a drawing scale of 1/8 inch = 1 foot. The drawing includes the Plan menu, which features commands specific to managing facilities information as well as the commands included with all of the Building Plan templates for working with rooms and walls. The template also opens the following stencils, many of which are familiar if you've used any of the other templates in the Building Plan folder:
- Annotations
- Building Core
- Cubicles
- Dimensioning - Architecture
- Electrical And Telecom
- Office Equipment
- Office Furniture
- Walls, Shell And Structure
- Resources
InsideOut
You'll notice that the Space Plan template opens many of the same stencils as other building plan templates. However, the Resources stencil contains shapes that are unique to space plans. You use these shapes to represent the resources (people and physical assets) that you want to track in the plan.
For details about creating a floor plan in Visio, see Chapter 18, "Laying Out Floor and Site Plans." Follow the instructions for retaining space shapes with rooms.
Using a CAD Drawing
To use a drawing created in a CAD program as your floor plan, you need to insert it into an existing drawing. The simplest way is to start a new drawing with the Space Plan template, which sets up a standard, letter-sized page. Depending on the size of the CAD drawing you're using, you might want to enlarge the drawing page before you import. In addition, it's best to specify a drawing scale in Visio that matches the one used by your CAD drawing. When you import the CAD drawing, Visio provides options for you to set the page size and scale so that everything will fit.
InsideOut
Although you can convert a CAD drawing into a Visio drawing, so that each CAD object becomes a Visio shape, the Visio designers don't recommend it. Each line segment or arc in a CAD drawing becomes a separate Visio shape, which causes long redraw times that can make working with the drawing quite tedious. Before you import or convert a CAD drawing, review the information in Chapter 17, "Using CAD Drawings in Visio."
To start a space plan and insert a CAD drawing, follow these steps:
- In Visio Professional, choose New, Building Plan, Space Plan.
Visio opens a new, scaled drawing page where 1/8 inch = 1 foot. The page size is 8.5 by 11 inches, which allows for a space of 68 feet by 88 feet. The Plan menu is added to the menu bar.
- Choose Insert, CAD Drawing. Select the CAD drawing you want to use, and then click Open.
- Review the settings for your CAD drawing, and then click the Page Setup button if you want to change the Visio page settings to match.
For details about the options in the CAD Drawing dialog box, see "Importing CAD Drawings in Visio."
Tip
If the CAD drawing includes more details than you need for a space plan, consider displaying only the layers or levels that contain the outline of offices and other spaces in the floor plan. - Click OK. If the drawing scale of the CAD drawing doesn't match the scale set for the page, the CAD Drawing dialog box appears.
- In the CAD Drawing dialog box, choose the option you want for fitting the CAD drawing to the Visio page, and then click OK to insert the drawing.
Note
If you don't get the results you want, you can delete the inserted image and then start over using different settings in the CAD Drawing Properties dialog box. For details about your options, see "Importing CAD Drawings in Visio." - In the inserted CAD drawing, outline each office or area with the Rectangle tool, and then convert the rectangles to space shapes using the Assign Categories command on the Plan menu.
For details, see "Using Shapes to Add Spaces to a Floor Plan."
Using an Existing Visio Drawing
If you've created a floor plan or rough space sketch in Visio Professional, it's easy to create a space plan from it. You can go about it in either of two ways:
- Run a macro that converts the existing floor plan to a space plan.
- Copy the existing floor plan, and then paste it into a new drawing created with the Space Plan template.
It doesn't particularly matter which way you do it. Converting an existing plan entails adding the space planning tools to the drawing, which is a simple, one-step process, but then you have to open the space plan stencils manually. When you copy and paste a floor plan, you have the added security of retaining the original drawing, plus you get all the space plan stencils.
If you created a floor plan with the Floor Plan, Home Plan, Plant Layout, Reflected Ceiling Plan, or Site Plan template, the Plan menu already appears. When you use the Enable Space Plan command, Visio adds asset management and other commands to the Plan menu and provides access to the Explorer window, which displays information about the space plan.
Follow these steps to convert an existing drawing to a space plan:
- Choose Tools, Macros, Building Plan, Enable Space Plan.
Visio adds the space planning commands to the Plan menu, as Figure 26-6 shows.
- To open the Resources stencils, click the Open Stencil button on the Standard toolbar, and then select Building Plan, Resources.

Figure 26-6. After you use the Enable Space Plan command, the Plan menu includes commands for working with space and assets.
You may want to open additional stencils as well. The Space Plan template automatically opens several stencils, many of which are included with other building plan drawing types. The Resources stencil, however, is unique to space plans.
To create a space plan and add an existing Visio drawing to it, follow these steps:
- Choose File, New, Building Plan, Space Plan.
Visio opens a new, scaled drawing page where 1/8 inch = 1 foot. The page size is 8.5 by 11 inches, which allows for a space of 68 feet by 88 feet. The Plan menu is added to the menu bar.
- Choose File, Page Setup. On the Page Size tab, verify that the drawing uses the size settings you want, and make any changes. Then click the Drawing Scale tab, and verify that the scale is the one you want, and make any changes. Click OK.
For details about setting up page size and drawing scale, see "Setting Up Measurements in a Diagram."
- Choose File, Open, and then locate and select the existing Visio drawing containing the floor plan you want to use. Click OK to open the drawing in a new window.
- With the existing floor plan drawing open, choose Edit, Copy Drawing.
- Select Window, and then click Drawing1:Page-1 (or click the name of the new space plan drawing you created in step 1).
- To paste the shapes on the current page, choose Edit, Paste.
- Choose File, Save As to save your changes to the new space plan diagram.
Importing a Graphic to Use as a Floor Plan
A space plan can use just about any type of picture of your facility. If you don't have time to draw a floor plan in Visio, or don't have access to the original CAD drawings of the building, you can use any picture of a floor plan that comes in a Visio-compatible graphic format. You can even scan a drawing directly into Visio. For example, you can scan a floor plan sketch, save it in a graphic format such as GIF or JPEG, and then import the file into Visio. Make sure you know the name of the graphic and where it's stored on your computer or network.
Follow these steps to import a drawing for use in a space plan:
- Choose File, New, Building Plan, Space Plan.
Visio opens a new, scaled drawing page where 1/8 inch = 1 foot. The page size is 8.5 by 11 inches, which allows for a space of 68 feet by 88 feet. The Plan menu is added to the menu bar.
- Choose File, Page Setup. On the Page Size tab, verify that the drawing uses the size settings you want, and make any changes. Then click the Drawing Scale tab, and verify that the scale is the one you want, and make any changes. Click OK.
For details about setting up page size and drawing scale, see "Setting Up Measurements in a Diagram."
- Choose Insert, Picture, From File.
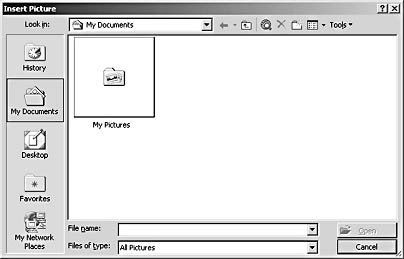
- In the Insert Picture dialog box, locate and select the graphic you want to use, and then click Open.
After you import a graphic file, you must identify each office or area as a space. For details, see the following section.
For details about importing graphic formats into Visio, see "Importing Graphics."
EAN: 2147483647
Pages: 211