Displaying Custom Measurements
3 4
You could say that all Visio shapes "know" how big they are. Width and height are among the many properties that Visio records for every object. In addition, many shapes include custom properties. For example, a desk shape in an office layout can have the property Manufacturer, and the valve shape in a piping diagram can have the property Design Pressure. You display these properties automatically in a custom callout shape. Like dimension line shapes, custom callouts have control handles that you can drag to attach the line to a shape. Once glued to a shape, the custom callout can "read" that shape's custom properties. You can choose which properties will appear on the callout line.
For example, in an office layout, you could use custom callout shapes to display inventory properties for furniture in the drawing, as Figure 16-34 shows. After you set up one custom callout to display the information you want, you can copy the callout and glue it to other shapes that contain the same property.
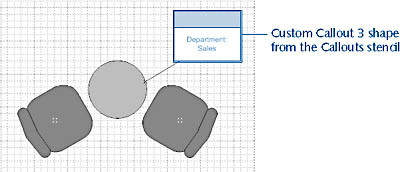
Figure 16-34. You can use a custom callout shape to display any custom property for a shape, not just dimensions. Here, the callout displays the Department property for the table shape.
Displaying Width, Height, or Angle on Shapes
A shape can display its own dimension when you add a geometry field to its text block. For example, you can add a text field to a sofa shape that displays the shape's width, making it easier to move in a floor plan, as Figure 16-35 shows. A geometry field is one of several dynamic fields that you can add to a shape. Geometry fields can display the width, height, or angle of a shape. Visio automatically calculates and updates values whenever you resize or rotate the shape.
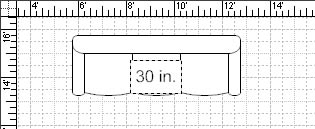
Figure 16-35. By adding a geometry field to a shape like this sofa, you can display the shape's dimensions.
You can format the geometry field to display the level of precision you need. The dimensions are displayed using the drawing's units of measure, so in a scaled drawing, shape width and height reflect real-world dimensions. If you display shape angle, you can display the value in radians or degrees.
InsideOut
If you display the angle in degrees, you can add the degree symbol instead of displaying the label "deg." To do this, choose General under Format, and then click OK. With the text pointer still in the shape, make sure NumLock is on, and then press Alt+0176.
To insert a geometry field into the text of a shape, follow these steps:
- Click the Text tool, and then click the shape. If the shape already has text, position the insertion point where you want the field to appear.
- Choose Insert, Field, and then in the Category list, click Geometry.
Geometry fields appear in the Field list.

- Select the field you want to display.
In the Format list, options appear for formatting the field's value. For example, if you select Width, choose 0.000 units to display the width to three decimal places with the drawing's units of measure (such as 5.398 in.)
- Click OK.
Tip
You can insert more than one geometry field into a text block, just as you can include other text fields and text that you type. However, you can insert only one field at a time.
For details about using callouts and text fields, see "Annotating Diagrams with Callout Shapes," and "Creating Text Fields to Display Information."
Calculating Perimeter and Area
Only Visio Professional includes the tool for calculating perimeter and area automatically—Visio Standard does not. Visio Professional can calculate the total perimeter and area of any closed shape, including shapes from a stencil or those you draw. For example, you can calculate the area of a room for which you want to order carpeting, or the perimeter of an entire building for security equipment planning. The Shape Area And Perimeter dialog box works something like the Size & Position window. It displays the total area and total perimeter for the shape or shapes you have selected, as Figure 16-36 shows. By default, the measurement is displayed in inches (perimeter) and square inches (area), but you can select other units of measure.
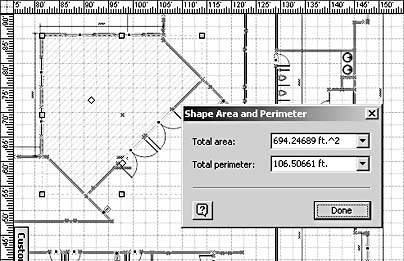
Figure 16-36. The Shape Area And Perimeter dialog box displays values for selected shapes.
To display this dialog box, choose Tools, Macros, Visio Extras, Shape Area And Perimeter. To select the measurement unit you prefer, choose an option in the Total Area and Total Perimeter lists.
You don't have to select shapes before opening the Shape Area And Perimeter dialog box, nor do you have to reopen it each time you want to calculate the area and perimeter of a different shape. Like the Size & Position window, the Shape Area And Perimeter dialog box displays the area and perimeter for shapes as you select them. If you select multiple shapes, the Total Area and Total Perimeter values reflect all the shapes combined.
Note
The Shape Area And Perimeter dialog box does not report the area for open shapes—that is, shapes without a seamless border or boundary. For open shapes, it displays only the perimeter. You also cannot measure the area or perimeter for an imported ("foreign") object.
Measuring Multiple Shapes
If you want to measure the perimeter and area of a drawing that contains multiple shapes, you don't have to measure each separate shape, and then add them up. Instead, use the Pencil or Line tool to trace the boundary of all the shapes, and then find the area and perimeter of the simple boundary shape. Choose Tools, Macros, Visio Extras, Shape Area And Perimeter.
What if you want to measure the perimeter or area of multiple, separate areas? For example, in a floor plan, you might need to calculate the area of several, nonadjoining rooms so that you can order the same flooring for all of them. In this case, you can select all of the objects and then choose Tools, Macros, Visio Extras, Shape Area And Perimeter. The dialog box calculates the totals for the selected shapes.
Measuring Area with Empty Space
In architectural drawings and floor plans, you frequently need to know the total area of a space without including an empty space contained within it, such as a stairwell. Here's a tricky way to do this using Visio's drawing tools instead of your calculator:
- Click the Line tool, draw a shape around the floor perimeter, and then draw a shape around the stairwell.
- Select both shapes, and then choose Shape, Operations, Combine.
The Combine command creates a hole in the floor shape equal in size to the stairwell shape.
- Choose Tools, Macros, Visio Extras, Shape Area And Perimeter.
The Total Area and Total Perimeter values reflect the total floor area minus the hole.
EAN: 2147483647
Pages: 211