| To insert text or graphic links for navigating through the records in a recordset, you can add Recordset Paging server behaviors, including Move to First Page, Move to Previous Page, Move to Next Page, and Move to Last Page. Alternatively, you can add a graphic recordset navigation bar using the Recordset Navigation Bar application object. This application object inserts, all at one time, an HTML table that includes either text links or graphic links using Dreamweaver's builtin navigation graphics, Recordset Paging server behaviors, and Show Region server behaviors. The Show Region server behaviors include Show Region If First Record, If Not First Record, If Last Record, and If Not Last Record. When the Show Region behaviors are used with Recordset Paging behaviors, you can specify conditions. For example, you can specify that the previous page doesn't display on the first page of records. In the same way that it's easier and faster to use the Dynamic Table application object to create a dynamic table, it's also easier and faster to create a recordset navigation bar using the Recordset Navigation Bar application object than it is to add each Recordset Paging behavior to existing text or graphics. However, you may want to edit an existing navigation bar or create a custom navigation bar from scratch, so it's useful to be familiar with both techniques and with both sets of server behaviors (Recordset Paging and Show Region). For example, we'll use the Show Region server behaviors in the section "Displaying and Hiding Regions," later in this chapter. Adding record counters To insert a record counter that shows users where they are within a set of records, you can also add Display Record Count server behaviors, including Display Starting Record Number, Display Ending Record Number, and Display Total Records. Alternatively, you can add a Recordset Navigation Status application object to insert a line of text that displays the record counter status using Display Record Count server behaviors. Your page needs to have a recordset navigation bar before you can add a record counter. Again, it's easier to create a record counter using the Recordset Navigation Status application object instead of adding the Display Record Count behaviors. However, you may want to edit an existing record counter or create a custom record counter from scratch that's more elaborate than the line of text that's inserted with the application object, so it's useful to be familiar with both techniques. In the following tasks in this section, you'll use the employees1.cfm page you created in the previous section and add server behaviors to create text links for navigating through all the records in the employees recordset. Then you'll use the Recordset Navigation Bar application object to automatically create a graphic recordset navigation bar. Finally, you'll add server behaviors to create record counters, and then insert the Recordset Navigation Status application object to automatically add record counters to the pages. To add recordset navigation links: 1. | Open the employees1.cfm page you created in the previous section, or any dynamic page that includes a recordset.
| 2. | Place the insertion point at the location on the page where you want to insert the navigation links.
| 3. | If you want to add text or a graphic for the navigation link, add it to your page now and then select it.
Otherwise, Dreamweaver will automatically add text for the link at the insertion point when you insert the Recordset Paging server behaviors.
| 4. | In the Application panel group, click the Server Behaviors tab to access the Server Behaviors panel.
| 5. | Click the plus (+) button.
The Server Behaviors menu appears.
| 6. | Select Recordset Paging > Move to First Page (Figure 9.18).
Figure 9.18. Select the Move to First Page server behavior from the Recordset Paging menu. 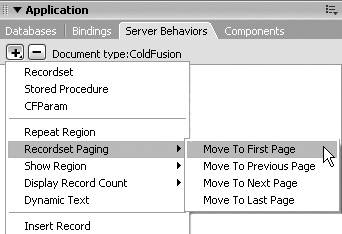
The Move to First Page dialog appears (Figure 9.19). In the Link field, Create New Link: "First" displays (unless you have selected other text or a graphic before adding this behavior). In the Recordset field, employees displays.
Figure 9.19. Add a link to the first page of records in the Move to First Page dialog. 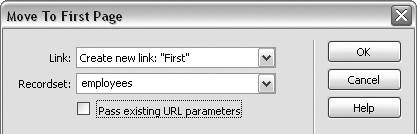
| 7. | Uncheck the Pass Existing URL Parameters box unless this link will include URL parameters. (For more information on URL parameters, see "Using URL and Form Parameters" in Chapter 8.)
| 8. | Click OK to close the dialog and add the link.
| 9. | Repeat Steps 4 through 8 to add Move to Previous Page and Move to Next Page server behaviors.
Do not insert the Move to Last Page server behavior unless your recordset is small, as it may take a long time for the last page to display after the user clicks this link.
| 10. | On the Server Behaviors panel, Move to First Page, Move to Previous Page, and Move to Next Page appear in the Server Behaviors list (Figure 9.20).
Figure 9.20. The Recordset Paging behaviors are added to the list on the Server Behaviors panel. 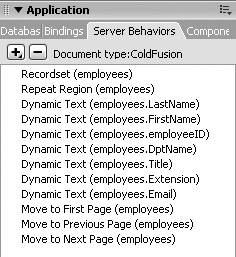
Dreamweaver automatically inserts First, Previous, and Next links on your page (Figure 9.21).
Figure 9.21. Dreamweaver adds navigation links to your page with the Recordset Paging behaviors. 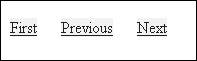
| 11. | Save the page as employees2.cfm, and then choose File > Preview in Browser.
| 12. | Test your dynamic links by navigating through the recordset.
|
In "Displaying and Hiding Regions," later in this chapter, you'll use employees2.cfm to add Show Region server behaviors to hide or display records based on navigation links and whether the recordset is empty.  Tips Tips
If you want to change the appearance of the links, select the link text. Open the Property inspector by choosing Window > Properties, and add HTML or CSS formatting to the link text. Dreamweaver includes an additional Recordset Paging behavior (Go to Specific Page) for ASP pages that is not available for ColdFusion or PHP pages. This behavior includes a URL parameter. For more details on the Go to Specific Page behavior, see Dreamweaver Help (F1). For more information on URL parameters, see "Using URL and Form Parameters" in Chapter 8.
To add a graphic recordset navigation bar: 1. | Open the employees1.cfm page from the previous section, or any dynamic page that includes a recordset.
| 2. | Place the insertion point at the location on the page where you want to insert the navigation bar, then select Insert > Application Objects > Recordset Paging > Recordset Navigation Bar. The Recordset Navigation Bar dialog appears, with employees displayed in the Recordset field (Figure 9.22).
Figure 9.22. Choose text or images for your navigation bar in the Recordset Navigation Bar dialog. 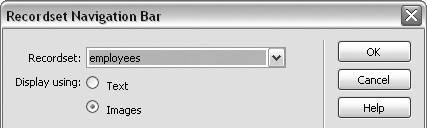
| 3. | In the Display Using section, select the Images radio button to create a graphic navigation bar. Click OK to close the dialog and insert the navigation bar.
| 4. | In the Application panel group, click the Server Behaviors tab to access the Server Behaviors panel. The Show Region (Show If Not First Page and Show If Not Last Page) and Recordset Paging (Move to First Page, Move to Previous Page, Move to Next Page, and Move to Last Page) behaviors that have been added to the page appear in the list of Server Behaviors (Figure 9.23).
Figure 9.23. The Recordset Navigation Bar application object automatically inserts Recordset Paging and Show Region server behaviors. 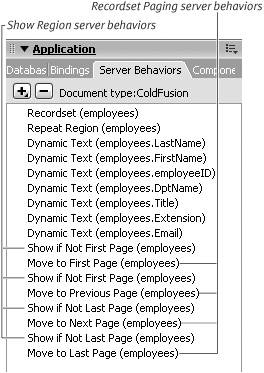
| 5. | Your page now includes a graphic navigation bar using Dreamweaver's built-in navigation graphics (Figure 9.24).
Figure 9.24. Dreamweaver's built-in navigation graphics are used in the recordset navigation bar. 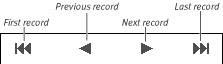
| 6. | Save the page as employees3.cfm, and then select File > Preview in Browser.
| 7. | Test the navigation bar by navigating through the recordset.
You may notice that some links appear and disappear, depending on the page you're viewing. This is because the Recordset Navigation Bar application object adds Show Region behaviors as well as Recordset Paging behaviors. For more details on Show Region behaviors, see "Displaying and Hiding Regions," later in this chapter.
|
Tips The navigation bar is contained in an HTML table. You can change the navigation bar's appearance by selecting this table and then changing any of the table properties in the Property inspector (Window > Properties), or by inserting your own graphics in place of the navigation graphics supplied by Dreamweaver. You can insert the Recordset Navigation Bar application object using the Application Insert bar rather than the Insert menu. Click the Recordset Paging button on the Application Insert bar, and then select Recordset Navigation Bar from the contextual menu.
To create a custom record counter: 1. | Open the employees2.cfm page from "To add recordset navigation links," earlier in this section.
| 2. | In Design view, enter text for the counter. This text can be anything you choosegenerally something like Displaying records [record number] through [record number] of [total records number]. Leave the insertion point at the end of the text string.
The record numbers will be added dynamically when you add the server behaviors, so the text that displays on the page will include the record numbers, such as "Displaying records 1 through 10 of 85."
| 3. | In the Application panel group, click the Server Behaviors tab to access the Server Behaviors panel.
| 4. | Click the plus (+) button. The Server Behaviors menu appears. Select Display Record Count > Display Total Records (Figure 9.25).
Figure 9.25. Select the Display Total Records behavior from the Display Record Count menu. 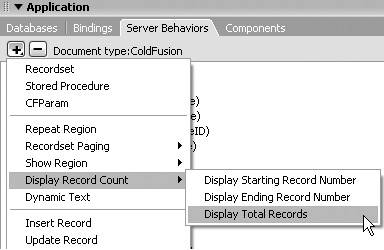
The Display Total Records dialog appears (Figure 9.26). In the Recordset field, employees is displayed.
Figure 9.26. Add the Display Total Records behavior to your page with the Display Total Records dialog. 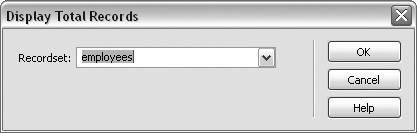
| 5. | Click OK to close the dialog and insert the total records placeholder.
| 6. | In Design view, place the insertion point after the word records (or the equivalent in your text). Repeat Step 4 to access the Server Behaviors menu, and select Display Record Count > Display Starting Record Number.
The Display Starting Record Number dialog appears.
| 7. | Click OK to close the dialog and insert the starting record number placeholder.
| 8. | In Design view, place the insertion point between the words through and of (or the equivalent in your text). Repeat Step 4 to access the Server Behaviors menu, and select Display Record Count > Display Ending Record Number.
The Display Ending Record Number dialog appears.
| 9. | Click OK to close the dialog and insert the ending record number placeholder.
In Design view, the three placeholders for the three Display Record Count server behaviors appear on the page (Figure 9.27). The placeholder formats are StartRow_recordsetName, EndRow_recordsetName, and recordsetName.RecordCount. On the Server Behaviors panel, the three Display Record Count behaviors appear in the list of Server Behaviors (Figure 9.28).
Figure 9.27. Placeholders for the Display Record Count server behaviors display on the page in Design view. 
Figure 9.28. The Display Record Count behaviors are added to the list on the Server Behaviors panel. 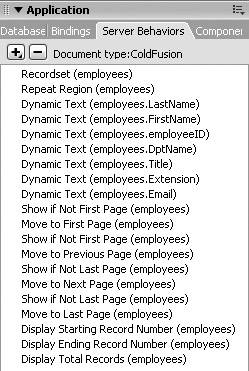
| 10. | Save the page, and select File > Preview in Browser.
| 11. | Test the record counters as you navigate through the pages of records.
|
To add a record counter using an application object: 1. | Open the employees3.cfm page from "To add a graphic recordset navigation bar" earlier in this section, or any dynamic page that includes a recordset and a recordset navigation bar.
| 2. | In Design view, place the insertion point at the location on the page where you want to insert the record counter, and then select Insert > Application Objects > Display Record Count > Recordset Navigation Status.
The Recordset Navigation Status dialog appears (Figure 9.29). In the Recordset field, employees is displayed.
Figure 9.29. Add record counters to your pages with the Recordset Navigation Status dialog. 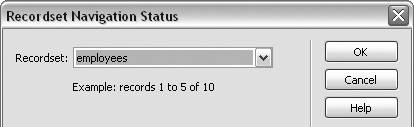
| 3. | Click OK to close the dialog and insert the record counter.
In Design view, the three placeholders for the three Display Record Count server behaviors appear on the page (Figure 9.30).
Figure 9.30. The Recordset Navigation Status application object automatically adds placeholders for the Display Record Count behaviors to your page. 
| 4. | Save the page, and select File > Preview in Browser.
| 5. | Test the counters as you navigate through the records.
|
|