| Just as text can be formatted depending on the context (such as paragraph style, poetry stanzas, and outline), music notation can be displayed in a variety of formats, depending on the instrument, transposition, number of voices, and so on. Logic allows you to format notes using Score Styles, which assign multiple attributes to notes within a MIDI Region, such as clef, staff size, instrument transposition, and various other voice-display parameters. A Score Style acts like a notation-display filter and can be changed or adjusted at any time. Let's try out a few Score Styles to observe their effects on the part you just input. 1. | At the far left of the Score Editor, click the disclosure triangle to show the Display Parameter box.
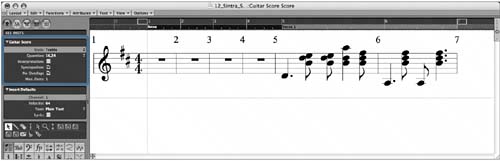
The Display Parameter box contains parameters that affect the display of the currently selected MIDI Region. The Style parameter designates the Score Style assigned to the Region currently displayed in the Score Editor.
| 2. | Click-hold the Style parameter.
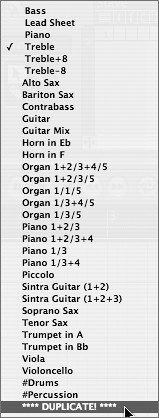
The Score Style list is displayed.
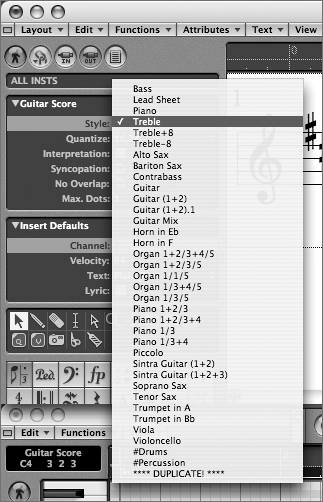
Logic comes with many Score Styles that each contain several attributes, such as clef assignment and display transposition.
NOTE Score Styles are saved in a song file and can be imported from one song to another using File > Song Settings > Import Settings. | 3. | Choose Alto Sax from the Score Style list.
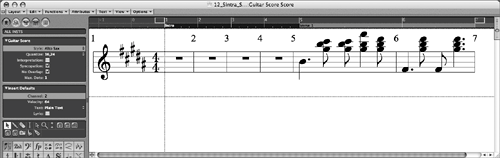
The notation in the Score Editor changes because the Alto Sax is an  -transposing instrument. As a result, the part is transposed up nine semitones and notated in the key of B major. -transposing instrument. As a result, the part is transposed up nine semitones and notated in the key of B major.
 | 4. | Click-hold the Style parameter and choose Guitar from the list.
The notation in the Score Editor changes to display guitar tablature.
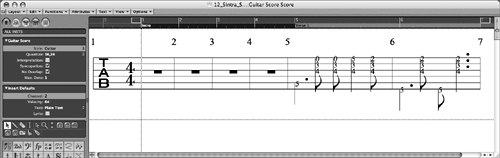 As you can see, Score Styles are extremely versatile in their display of the note data. As you can see, Score Styles are extremely versatile in their display of the note data.
| 5. | Click-hold the Style parameter and select Treble, returning the notation to its default setting.
|
NOTE Logic automatically assigns a default Score Style (Treble, Bass, Piano) to a MIDI Region based on its octave and range.
Creating a Polyphonic Score Style You probably noticed that the three bass notes you created by step input are displayed incorrectly in the Score Editor. The notes do not appear to sustain for the full amount of time and are cut off by the notes that follow. However, if you look at the notes in the Matrix Editor (in the bottom half of the screen), you'll notice that the lengths of those notes are displayed correctly. Our guitar part was input as a single voice, and therefore the note lengths are cut off because there is no voice independence. To solve this problem, you need to create a polyphonic Score Style that can display multiple independent voices at once. 1. | Shift-click the three notes you just created via step input (D2, A1, A1) to select them.
The corresponding notes are highlighted in the Matrix Editor.
 Notice the difference in the representation of the notes in the Matrix and Score editors. The reason for this display discrepancy lies in the established system for notation of a polyphonic instrument. A polyphonic instrument that is notated on a single staff, such as guitar, needs to have rhythmically different melodic lines displayed in the same staff. These voices, in turn, must be able to display length, stem direction, and rests independently of each other. Notice the difference in the representation of the notes in the Matrix and Score editors. The reason for this display discrepancy lies in the established system for notation of a polyphonic instrument. A polyphonic instrument that is notated on a single staff, such as guitar, needs to have rhythmically different melodic lines displayed in the same staff. These voices, in turn, must be able to display length, stem direction, and rests independently of each other.
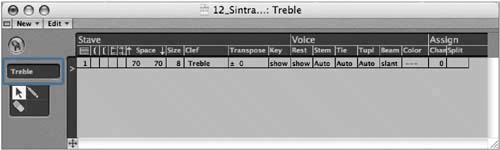
| 2. | Double-click the Style parameter.
The Score Styles window opens, displaying the contents of the default Treble Score Style.
 The data displayed in the Treble Score Style depicts a single voiced staff with various display attributes. The data displayed in the Treble Score Style depicts a single voiced staff with various display attributes.
| 3. | Click-hold the name box.
 | 4. | Choose ****DUPLICATE!**** from the menu.
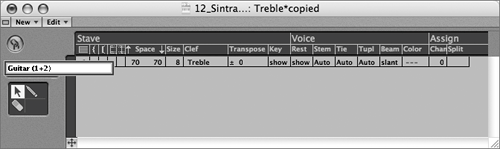
A new Score Style is created with the attributes of the Treble Score Style. Let's rename it.
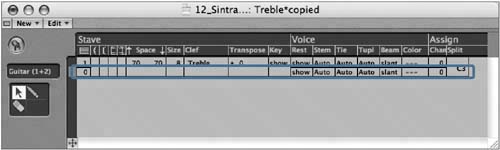
| 5. | Double-click the Score Style name in the name box and enter Guitar (1+2), then press Return.
 | 6. | In the Score Style window's local menu, choose New > Insert Voice.
A new voice is created below the previous staff voice, indicated by the number 0 at the far left of the line.
NOTE Score Style may have multiple staves (such as one of the Piano styles), with each staff containing its own set of voices. In guitar notation, when more than one voice is displayed at the same time, the stems, ties, and tuplets of the top voice always point upward. You can reflect this in the Score Style by modifying the Voice attributes for the top voice.
| 7. | In the top voice, click the Stem field and choose Up.
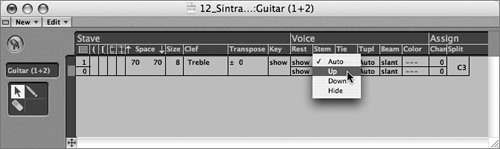 | 8. | Do the same for the Tie and Tupl (Tuplet) fields.
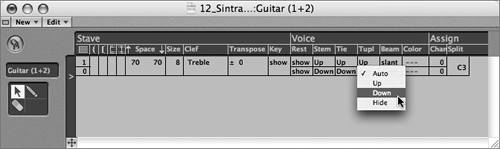
| 9. | In the bottom voice, click the Stem, Tie, and Tupl (Tuplet) fields one at a time and choose Down.
 By default, each voice in a Score Style can display rests. This can create multiple rests in a staff, which are appropriate for divisi (divided) parts but are not appropriate for a solo part. By default, each voice in a Score Style can display rests. This can create multiple rests in a staff, which are appropriate for divisi (divided) parts but are not appropriate for a solo part.
| 10. | Click the Rest field for the bottom voice and choose hide.
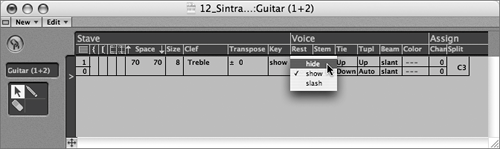 This will hide the rests for the bottom voice. This will hide the rests for the bottom voice.
TIP Rests can be inserted manually by dragging them into the score from the Part box. These are graphic only and have no effect on the playback of the MIDI Region. The last thing to consider is how to assign individual notes in the Region to each voice. By default, a Score Style will identify a split note to do this. Pitches that fall above the split note are assigned to voice one, and pitches that fall below the split note are assigned to voice two. This split note can be changed in the Assign column in the Score Style window.
However, this technique usually won't work for Guitar notation because voices are assigned primarily to represent melody (or bass lines) and accompaniment, and can consist of any range of pitches. Instead, voices can be assigned in a Score Style using the individual notes' MIDI channel numbers.
NOTE Each note can have its own MIDI channel within Logic. This setting is applied on input by the MIDI Out channel setting of the MIDI controller, or it can be applied after the fact using Logic's editors. | 11. | In the Assign area (far right), double-click the Chan field for the top voice and enter 1. Press Return.
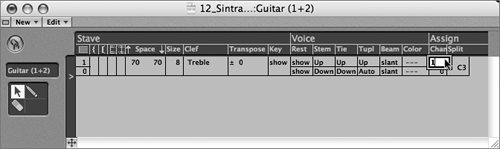 | 12. | Double-click the Chan field for the bottom voice and enter 2. Press Return.
With these settings, all notes using MIDI channel 1 will be assigned to the top voice, and all notes using MIDI channel 2 will be assigned to the bottom voice.
Now that you have created the polyphonic Guitar Score Style, it's time to apply it to the displayed Region.
| 13. | Close the Score Style window.
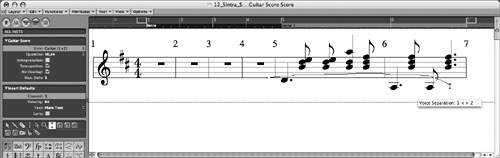
| 14. | Click-hold the Style parameter in the Display Parameter box and choose Guitar (1+2).
The notation changes slightly, displaying the notes with all stems pointing up. When notes are inserted manually, the same default MIDI channel is assigned to all notes (in this case, channel 1). When you applied the Score Style, all notes in the Region were assigned to the top voice.
Rather than manually changing the MIDI channel for each note that you want to assign to the bottom voice, you can quickly assign notes to adjacent voices by using the Voice Separation tool. The Voice Separation tool works by allowing you to draw a line between voices that need to be separated. Notes below the line are bumped to the adjacent voice below their current assignment, while notes above the line will be bumped up a voice.
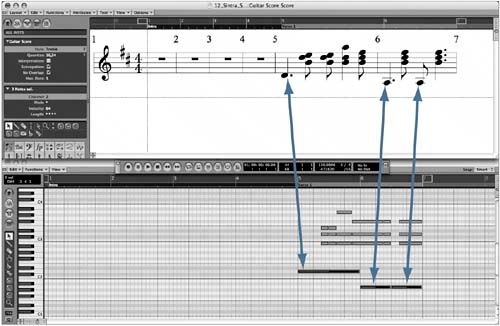
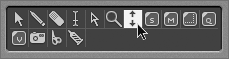
| 15. | Select the Voice Separation tool.
| 16. | Using the Voice Separation tool, draw between the bass notes and the chords in one continuous line.
 The bass notes are assigned to the bottom voice and now display correctly. The bass notes are assigned to the bottom voice and now display correctly.
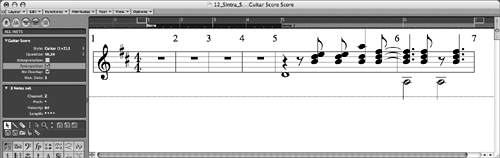 |
NOTE You can continually adjust voice assignment with the Voice Separation tool by drawing lines above and below individual notes or entire passages.
|