| There are a variety of methods of inputting notation, including graphic input, step input, and real-time transcription. In this exercise you will focus on the first two techniques, entering notes directly into the Score Editor. Let's start by opening the song file you will be using for this chapter: the composition "Sintra," which you worked on in the Advanced Editing section of this book. This time, you will be notating the rhythm guitar part, transcribing the audio file into notation. 1. | Select File > Open.
| 2. | In the file selector, open ~ > Music > Advanced Logic 7_Song Files > Lesson 12 Project Files > 12_Sintra_Start.lso.
| 3. | Play the song if you need to familiarize yourself with the material that you'll be working with.
As you can see in the Arrange window, the song mainly consists of Audio Instrument tracks outputting to Logic's EXS24 software sampler, mixed with audio recordings of nylon string guitar. Because the Score Editor interprets MIDI data to create notation, you will be working with a transcription of the main nylon string guitar part (Track 11), inputting and adjusting notes where needed.
| 4. | If the Guitar Score track (Track 11) is not already selected, click it to select it.
| 5. | Bring up Screenset 3.
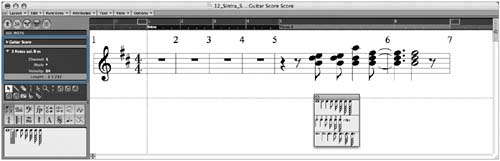
 This screenset places the Score Editor in the top half of the screen and the Matrix Editor in the bottom half. Both editors display the contents of the selected Guitar Score track. This screenset places the Score Editor in the top half of the screen and the Matrix Editor in the bottom half. Both editors display the contents of the selected Guitar Score track.
You are viewing a blank Region that was created as a place for you to input notational data. Notice that Logic rests are automatically displayed.
|
NOTE Like any other editor, the Score Editor can be opened as an independent window by choosing it from the Windows menu.
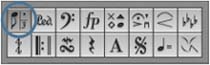
Entering Notes Using Graphic Input You can graphically input notes and other notational elements in the Score Editor by selecting them from the Part box, a palette of notational symbols at the far left of the Score Editor. 
1. | Select each object group (represented by each square button) in the Part box.
The object group's contents are displayed just below the Part box. The most recently selected object group appears at the top.
| 2. | Select the key signature object group in the Part box.
| 3. | Select the Pencil tool.
| 4. | Since the song is in the key of D major, click D in the key signature object group.
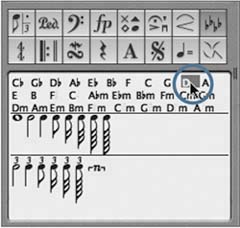
| 5. | Click the staff between the treble clef and the time signature.
A D major key signature is inserted.
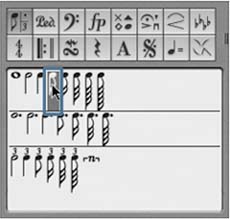
 Look at the notes object group within the Part box and you'll see that it contains three areas, represented by an eighth note, a dot, and a triplet symbol. When you click these symbols, you open palettes of notes with different rhythmic lengths. Look at the notes object group within the Part box and you'll see that it contains three areas, represented by an eighth note, a dot, and a triplet symbol. When you click these symbols, you open palettes of notes with different rhythmic lengths.
| 6. | Click the triplet, dot, and eighth-note symbols on the notes object group in the Part box to view those palettes.
Various rhythmic lengths are displayed in each palette depending on the notes object group that it represents.
| 7. | If the eighth note is not already selected, select it in the palette.
| 8. | Select the Pencil tool in the toolbox.
| 9. | In the Score Editor, click-hold the B line in the middle of measure 5, using the help tag to position an eighth note at 5 2 3 1. Then release the mouse button.
 NOTE As you drag the note around the staff, you get aural as well as visual feedback. The note is played by the EXS24 plug-in (using a classical guitar sampler instrument) on the current track. An eighth note is inserted on the B line at 5 2 3 1.
 NOTE The inputted note is reflected in the Matrix Editor as well, and it provides a good reference, especially for length. | 10. | Use the same technique to insert a note on the D line above the first note you created.
 TIP Setting up the Pencil tool as the alternate tool works especially well when graphically entering notation. Doing so allows you to switch between selecting the note duration with the Arrow tool and inserting the note into the staff with the Pencil tool. You might find it a little tricky to land on the correct pitch when graphically inserting a note. If your composition falls into a consistent key, you can make input easier by turning on the Diatonic Insert feature. With this feature activated, you are limited to entering only notes within the current key signature.
| 11. | Choose Options > Diatonic Insert.
| 12. | Still using the Pencil tool, click-hold anywhere above the D eighth note you created, and drag up and down while looking at the help tag.
The pitch choices are limited to diatonic pitches (so in D major, your pitch choices will not include C natural or F natural).
| 13. | While still dragging, place an eighth note at E above the D eighth note you previously created.
NOTE The note heads automatically change position, correctly notating adjacent pitches.  Just as in any of the other MIDI editors in Logic, note data can be copied and pasted. Just as in any of the other MIDI editors in Logic, note data can be copied and pasted.
| 14. | Select the Arrow tool.
| 15. | In the Score Editor, rubber-band select the chord you just created.
| 16. | Option-drag the chord to 5 3 1 1.
 A copy of the chord is created at the new position. A copy of the chord is created at the new position.
 |
NOTE When data is moved and inserted, notes automatically snap to the division value set in the Transport.
Dragging Notes into the Score Another way to graphically input notes is by dragging elements directly from the Part box palettes. 1. | Drag a quarter note from the notes object group's palette, and drop it onto the B line at 5 3 3 1.
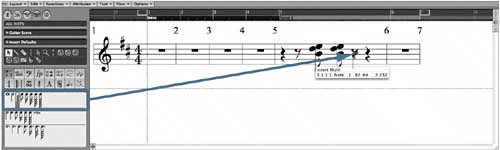 A quarter note is created where you dropped the note. A quarter note is created where you dropped the note.
While this can be a good way to input notes with a variety of durations, journeying back and forth across the screen can get tedious. Fortunately, you can open the Part box's notes object group as a floating palette and position it anywhere on the screen.
| 2. | Double-click the notes object group.
A floating notes palette opens, including the dotted and triplet versions.
| 3. | Drag the palette near the measure you are working on.
 | 4. | Drag two more quarter notes from the floating palette, dropping them on the D and A above the B you just input to create a chord.
 | 5. | Create another chord at 5 4 3 1 by dragging half notes to B on the same line as the previous B, and to D and F#, above the previous B.
A chord lasting two beats is created, tied across the barline between measures 5 and 6.
 |
NOTE Ties cannot be inserted graphically in Logic. They are created and displayed automatically (including tie placement), according to the length of the MIDI note.
Adjusting Note Length Musical notation depicts note length by using a specific set of symbols (sixteenth notes, eighth notes, and so on). Therefore, note length must be edited in a different way than one would edit note length in the Matrix Editor (by graphically dragging the length, for example). To change the length of a note (or group of notes) in the Score Editor, it is necessary to make an adjustment in the Event Parameter box. 1. | Rubber-band select the final chord, and Option-drag it to 6 2 3 1.
 | 2. | Click the disclosure triangle at the far left of the Score Editor to display the Event Parameter box.
 The Event Parameter box displays the parameters for the selected chord (indicated by 3 Notes sel. displayed in the header). The Event Parameter box displays the parameters for the selected chord (indicated by 3 Notes sel. displayed in the header).
Notice that Logic also supplies a chord analysis of the selected notes (identifying these notes as a B-minor chord).
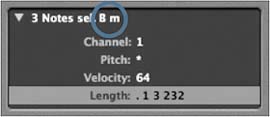
| 3. | In the Event Parameter box, double-click the numbers next to the Length parameter and enter 0.0.2.0 (signifying an eighth note). Press Return.
The lengths of the selected notes change from half notes to eighth notes.
NOTE When notes are graphically input into the Score Editor, they are given lengths that are slightly less than the full value (hence the high tick numbers), to avoid overlaps in note length. | 4. | Option-drag the chord to 6 3 3 1.
A copy of the chord is placed at the new position and is selected, making it ready for editing.
| 5. | In the Event Parameter box, double-click the numbers next to the Length parameter, and enter 0.1.2.0 (a dotted quarter note). Press Return.
NOTE When entering numbers into the Event Parameter box, you can also use spaces, instead of periods, to separate the digits. The note lengths of the chord change to dotted quarter notes.
 | 6. | Close the floating notes palette.
|
Entering Notes Using Step Input While graphic input allows precise entry of notes, it can be slow. A faster technique is step input, which allows you to insert notes at the current song position while Logic automatically moves the Song Position Line forward based on the selected rhythmic length. The notes' pitch and length can be entered by clicking an onscreen piano keyboard, pressing a key on your computer keyboard, or using MIDI input. To start step input, you need to locate to the song position where you want to begin. 1. | Option-click the staff at 5 1 1 1 (use the help tag) to locate the Song Position Line to the beginning of measure 5.
 TIP Option-clicking in the staff (not on notes or other symbols) is a quick way to locate the SPL in the Score Editor for playback or editing. | 2. | Choose Windows > Step Input Keyboard.
The Step Input Keyboard window opens. Buttons in this window can be used to set the pitch, length, and dynamic of a note.
 TIP The Step Input Keyboard can be used in any of Logic's editors, and it is especially effective when controlled with an extensive set of key commands (including commands for specific note pitches). This allows you to quickly input notes entirely from your computer's keyboard, for non-real-time purposes such as creating notation. | 3. | If necessary, reposition the Step Input Keyboard so it does not cover up the score.
| 4. | Click the whole-note button at the left side of the window.
| 5. | Click the D2 key on the Step Input Keyboard.
 A D note is inserted just below the staff, and the Song Position Line jumps to the end of the inserted whole-note value. A D note is inserted just below the staff, and the Song Position Line jumps to the end of the inserted whole-note value.
NOTE Don't panic! The note you just input is displayed as a dotted quarter note for a reason that is explained in an upcoming exercise: "Creating a Polyphonic Score Style". Step input can also be used in conjunction with a MIDI controller to insert notes (instead of clicking the note on the Step Input Keyboard) by enabling the MIDI In button in any editor. When MIDI In is enabled, Logic "listens" for MIDI note input.
| 6. | Click the MIDI In button in the Score Editor.
| 7. | Click the half-note button on the Step Input Keyboard.
| 8. | Press the A1 key twice on your MIDI controller.
An A is created at 6 1 1 1 and 6 3 1 1 (a half-note interval).
 NOTE The Score Editor will automatically display the Region contents at the current song position. Chances are, Logic located to measure 7 after you input the second half note, displaying an entirely different Region. Back up the Song Position Line by clicking Stop to return to the beginning of the song and to the beginning of the Region you have been working with. As long as the MIDI In button is enabled, Logic assumes that you are using step input, and it will create notes based on MIDI input. For this reason it is necessary to deactivate the MIDI In button when you are finished using MIDI for note input.
| 9. | Click the MIDI In button to deactivate it.
| 10. | Close the Step Input Keyboard.
|
|