| Sculpture, one of the new instruments offered in Logic Pro 7, represents a truly unique approach to synthesis. It uses sophisticated algorithms to re-create the way sound is generated in the natural world. Specifically, it simulates the characteristics of a vibrating string or bar. This technique is called component modeling, and it closely mirrors the sound generation found in the Vintage Keyboard instruments we looked at earlier (EVP88, EVD6, and EVB3). One way to wrap your head around Sculpture is to imagine a synthesizer that lets you control how all the components within a real "physical" instrument interact with the others, and what materials they are made from. In effect, you are building a physical instrument from scratch! Because Sculpture is so innovative, many people have difficulty approaching it, not knowing how to begin designing sounds and editing presets. In the next exercise you will walk through the key components of Sculpture and create a sound from scratch. 1. | Choose File > Open.
| 2. | From the file selector, go to ~/Music/Logic/Advanced Logic 7_Song Files/Lesson 05 Project Files/05_Sculpture Logic Tutorial, and open the 05_Sculpture_Start.lso song.
You will be using this song for the exercise.
|
Understanding the String In Sculpture, the central synthesis element is called the String. This is a bit of a misnomer, as the basic physical material can also be similar to a bar (solid mass). The physical principle is the same, however; sound is generated only by performing a physical action on or stimulation of the raw materialstriking, picking, blowing, and so on. 1. | If you have not done so already, select the Inst 1 track.
| 2. | In the Arrange channel strip, click-hold the input field and choose Stereo Logic > Sculpture.
The Sculpture interface opens.
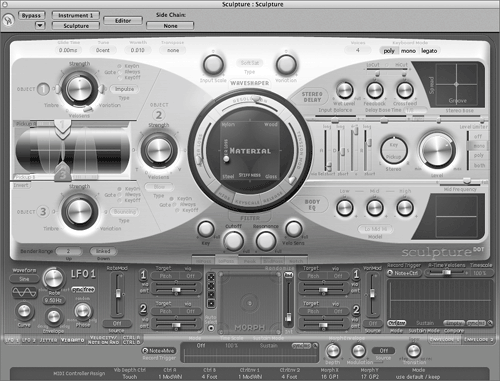 NOTE Even though Sculpture's synthesis model is unique, it still follows the Audio Instrument interface conventions we noted earlier; signal flow is from left to right, with modulation lying at the bottom. | 3. | Ctrl-click the String (the green line located at the far left) to activate string animation.
| 4. | Play your MIDI controller.
The String animates, depicting its vibration. This is an effective tool when programming sounds with Sculpture, as it provides visual feedback reflecting how your choices are affecting the String.
TIP When you are using Sculpture for playback (not editing or programming sounds), it is a good idea to have string animation disabled because it takes some CPU time to generate the animation. Disable (and enable) the animation by Ctrl-clicking the String (it is off by default). Using the Material Pad in the center of the interface, you can select the String's material by blending the properties of four basic materials: steel, nylon, wood, and glass.
| 5. | Click-hold the ball in the Material Pad and move it around the square while playing your MIDI controller. Note how the String animation changes.
The sound also changes as you move the ball, modifying the Inner Loss and Stiffness of the material.
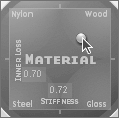
| 6. | Position the ball about halfway between the Nylon and the Steel materials at the far left edge of the Material Pad.
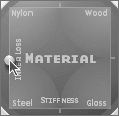
The outside ring of the Material Pad contains additional parameters that determine the selected material's sound-making properties.
| 7. | Try dragging the Media Loss slider, listening to the sound by playing your MIDI controller, eventually settling on a value of about 0.25.
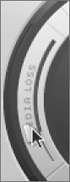
Media Loss controls the dampening of the environment surrounding the String material. Imagine a String vibrating in air, water, or pea soup to visualize what this parameter does.
| 8. | Drag the Resolution slider, listening to the sound by playing your MIDI controller, eventually settling on a value of about 0.55.

The material's Resolution has to do with the number of harmonics generated. The higher the value, the richer and more complex the sound, as more overtones are produced. Be aware that higher Resolution values carry a higher CPU load.
| 9. | Drag the Tension Mod slider, listening to the sound by playing your MIDI controller, eventually settling on a value of about 0.25.
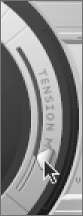
The Tension Mod control adds pitch displacement of the String to higher note velocities. This is similar to the slight initial pitch change that occurs when you strongly pluck a stringed instrument.
|
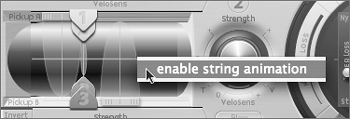
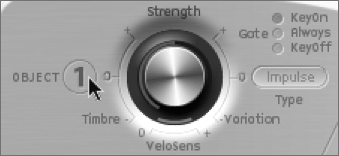
Using Objects in Sculpture Sculpture has three Objects that determine how the String is excited or disturbed (how it is played). Remember that physical instruments need an action applied to the sound-producing material in order to make a sound (that is, a guitar string needs to be plucked or picked, a violin string needs to be bowed, a marimba bar needs to be struck with a mallet, and so on). 1. | Click the 1 button next to Object (at the far left of the interface).
The button turns from blue to gray, indicating that the Object is off.
| 2. | Play your MIDI controller.
You shouldn't hear any sound.
Why is no sound produced? This illustrates the dependent physical interaction that occurs between Objects and Strings. Without an Object exciting the String, nothing happens, just like in the real world.
| 3. | Turn Object 1 on again by clicking the 1 button.
| 4. | Click-hold the Type button located to the right of Object 1's Strength knob.
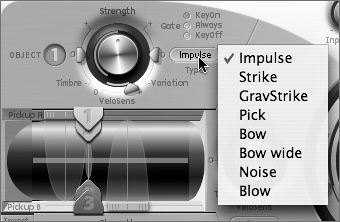
The menu that appears lists various exciters, or ways to excite the String.
| 5. | Try choosing each exciter, one at a time, testing each sound by playing your MIDI controller and observing the effect on the string animation.
| 6. | Conclude by choosing the Pick exciter for Object 1.
Object 1 is now set to simulate the action and sound of a guitar pick acting on a string. The parameters controlled by the Object's knob and surrounding sliders (Strength, Variation, and Timbre) are context sensitive, meaning that they control aspects of the selected exciter depending on choice. For example, the Timbre slider controls hammer mass when the exciter choice is Strike, and bow pressure when set for Bow.
MORE INFO See page 369 in the Logic Pro 7 Plug-in Reference Manual for a chart depicting the parameters for each exciter. | 7. | Click-hold the Strength knob and try different values, listening to the result while playing your MIDI controller.
In the case of Pick, the Strength parameter determines pick force and speed.
| 8. | Option-click the Strength knob to return the value to the default.
TIP You can Option-click most controls within Logic to return to default settings. | 9. | Drag the Variation slider, listening to the sound by playing your MIDI controller, eventually settling on a value of about 0.60.
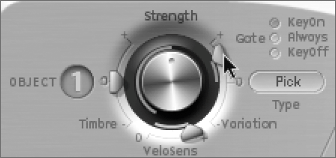
The Variation control determines plectrum stiffness when the exciter is set to Pick.
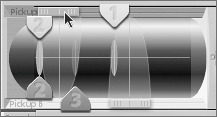
| 10. | Click the 2 button next to Object 2 to turn it on.
| 11. | Click-hold the Type button and choose Disturb.
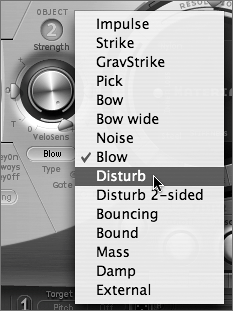
Note that this menu is considerably longer than the list of choices offered under Object 1. Object 2 offers all of the same exciters as Object 1 but contains a variety of other types, which we will refer to as disturbers. The nature of a disturber is not to start the String material vibrating (as with exciters) but to disturb the vibration in some way through physical interaction. Therefore, disturbers don't cause the String to begin sounding, as exciters do, but work in conjunction with exciters to produce a complex result.
| 12. | Play your MIDI controller to hear the result of the applied disturber.
With Disturb selected, you are introducing a physical object at a fixed distance from the String that keeps it from freely vibrating. Think of an object that is positioned close to the strings of a guitar so that it is nearly touching. When the guitar strings are plucked, the strings hit the object, creating a buzzing sound.
| 13. | Adjust the Strength of Object 2 to about 0.43, listening to the results by playing your MIDI controller.
Just as with the exciters, Strength, Variation, and Timbre modify aspects of the chosen disturber. In the case of Disturb, Strength sets the hardness of the object positioned near the String.
MORE INFO See page 370 in the Logic Pro 7 Plug-in Reference Manual for a chart depicting the parameters for each disturber. | 14. | Click the Always button under the Gate settings for Object 2, playing your MIDI controller to hear the result.
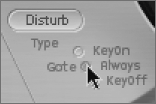
By choosing Gate settings for each Object, you determine when the Object interacts with the String in relation to the MIDI controller keystroke: upon depressing the key (and not when the key is let go), upon letting go of the key (and not when the key is depressed), or always.
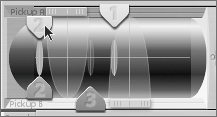
| 15. | Click Object 3, and choose Bouncing from the Type list.
Note that Object 3's Type choices are limited to disturbers only (no exciters). Bouncing simulates a loose object lying on the vibrating String. Imagine a piece of paper or small wood block lying directly on a guitar's strings to get an idea of what this produces.
| 16. | Set Strength to about 0.11, playing your MIDI controller to hear the results as you adjust.
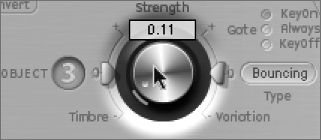
Strength controls gravity's effect on the bouncing Object.
| 17. | Adjust the Timbre control to approximately 0.22, listening to the results as you do so.
In the case of a Bouncing Object type, Timbre controls the stiffness of the Object.
Now that you determined the basic sound generation by choosing Object types, you can further work with the sound by determining where each Object interacts on the length of the String. This is similar to the sonic difference between picking a guitar string at the bridge and picking it at the neck. When you excite the String near the ends, you create a different timbre than you would exciting it at the middle.
You can position Objects by moving sliders representing each Object in the String window.
| 18. | Click-hold the Object 1 slider in the String window and drag it to the right, positioning it in the middle of the String.
| 19. | Click-hold the Object 2 slider in the string window and drag it to the left, positioning it slightly to the right of the left end (a value of 0.03).
| 20. | Click-hold the Object 3 slider in the String window and drag it to the left, positioning it between the Object 1 and Object 2 sliders.
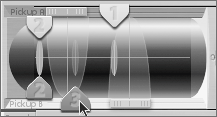
| 21. | Listen to the sound by playing your MIDI controller.
|
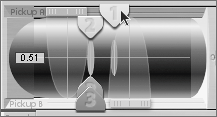
Adjusting the Pickups Sculpture utilizes pickups to sense vibrations from the String, functioning identically to an electric guitar's electromagnetic pickups. As with an electric guitar, the pickup's location is of importance; different positioning along the length of the String creates different timbres. TIP To hear these subtle differences, play your MIDI controller while you do the following adjustments.
1. | Click-hold the Pickup A slider and drag it left, roughly between Objects 2 and 3.
| 2. | Click-hold the Pickup B slider and drag it over Object 3.
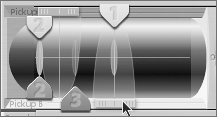
The resulting sound emphasizes the Pick exciter, similarly to using the neck pickup on an electric guitar.
|
Processing the Sound Sculpture's extensive processing options allow you to further shape the sound through a variety of means (multimode filter, Waveshaper, stereo delay, and Body EQ). Look at some of the choices, working with the sound you have constructed so far. 1. | Activate the Waveshaper by clicking the Waveshaper button above the Material Pad.
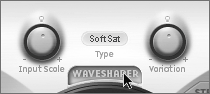
The Waveshaper provides interesting distortion effects, including tube simulation, for harmonically rich results.
| 2. | Click-hold the Input Scale control and set the value to around 0.39.
| 3. | Click-hold the Variation control and set the value to 0.69.
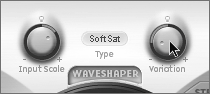
| 4. | Play your MIDI controller to audition the sound.
You have just applied soft, tubelike saturation to the sound.
Sculpture's Body EQ section utilizes a unique approach to equalization, providing some great sound-shaping possibilities. A standard EQ changes individual frequency bands, but Body EQ also offers spectral models that emulate the resonating properties of specific instruments. These models can be shaped by adjusting formant-related parameters.
| 5. | Turn on Body EQ by clicking the Body EQ button to the right of the Material Pad.
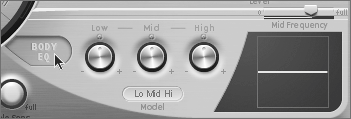
By default, Body EQ is set to the Lo Mid Hi model, emulating a standard three-band EQ.
| 6. | Click-hold the Model button to view the Model choices.
As you can see, the choices range from models of string instruments (guitars, violin, cello, double bass, and so on) to kalimba and various flutes (alto and bass).
| 7. | Choose Dobro Guitar.
The controls change to reflect the formant parameters of the resonating body (Dobro guitar), and the graphic display to the right now depicts a detailed spectrum.
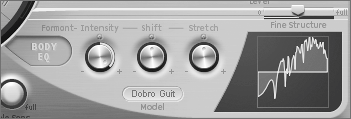
| 8. | Try playing your MIDI controller to hear the Dobro spectral model applied to your sound.
In effect, you are coupling the sound generator you constructed (through interaction between String and Objects) with the resonating body of a Dobro guitar (metal-bodied guitar with an acoustic speaker cone).
| 9. | Try changing the three formant controls, which are used to adjust the way the harmonics are emphasized (Intensity), the way they are spaced out (Stretch), and their frequency range (Shift).
|
Using Modulation in Sculpture Sculpture's Modulation section is extensive, offering everything from LFO-type modulators (including Jitter, which produces random variations) to random generators and user-created envelopes. Also of great interest is the Morph Pad, which enables you to morph between states of control settings for the entire instrument. The Morph Pad can be controlled manually, by MIDI controllers, or by its own time-based envelope. 1. | Turn on the Morph Pad by clicking under Mode (currently reads "Off") in the Morph Envelope, and choosing "Pad only."
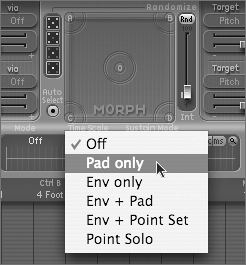
The Morph Pad utilizes five target points, represented by the center and the corner points (A, B, C, D). Each point can be thought of as a memory location that stores the control settings of everything from String material to Object and pickup placement.
Instead of setting each state manually, let's use one of Sculpture's useful features to randomly generate deviants of the original state in each point.
| 2. | Select the four-morph-point randomization button located to the left of the Morph Pad.
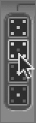
By selecting this, you are targeting only the four outermost points (A, B, C, D) for randomization, leaving the original (center point) sound alone.
| 3. | Drag the Intensity (Int) slider to the right of the Morph Pad to a value of 25%.

| 4. | Click the Rnd (Randomize) button above the Intensity slider.
To see what just happened, look at how the controls for the various states (points) were affected.
| 5. | Click, one at a time, each point in the Morph Pad, looking at how the Material and Object controls change.
NOTE The small red dot appearing in the controls' graphic readout represents the original state (at the center point within the Morph Pad). Each state, then, is a variation of these original settings, depending on how much randomization (Intensity) was applied. | 6. | Hold down a note on your MIDI controller and move the red ball (located within the Morph Pad) around to various points.
The controls (and the sound) change smoothly to reflect the various states.
|
Saving and Trying Presets As you can see, Sculpture is a truly exceptional instrument! Let's end this section on Sculpture's unique sound-generation properties by saving the sound you just made as a preset. 1. | Click-hold the preset menu and choose Save Setting As.
| 2. | In the Save As field, type a name that you feel suits the sound you just made.
| 3. | Click Save.
|
Let's conclude by taking a brief look at some of Sculpture's expertly programmed presets, which show off the diverse capabilities of the instrument. With each of these, try playing your MIDI controller, holding chords and single notes to hear the sound evolve over time. Also try playing with the Morph Pad (if active) and modulation wheel of the MIDI controller, as these are frequently deployed to control sound changes. Some Presets to TryPreset Location | Description |
|---|
Air Instruments > Attack Flute | Highly expressive modeled flute sounds | Pads > Organic Matter | Evolving harmonic pad | Rhythmic Motion Sounds > Pitch Disturber | Delayed rhythmical groove | Effects-Cinematic > Marble on a Journey | Randomly bouncing and rolling marble |
|