| Generally with Logic, you will be working with music that is based on a constant tempo or recorded to a metronome click. In this common situation, Logic's tempo and time-signature settings create a time grid in which you plot events. This enables data to be displayed musically, in relation to bars and beats. However, there will be instances when you want to record without a click, gaining the freedom to vary tempo and play with rhythmic flexibility (to play "rubato," in music parlance). In this situation, the trick is not only to maintain the performance interpretation, with its deviations in tempo, but also to display the musical data in correct time (bars/beats). This can be accomplished by aligning Logic's time grid to match these deviations through Beat Mapping. Once the time grid matches the performance, you can use Logic's compositional and arranging features (quantization, time-based effects, notation, Apple Loops, and so on) to work with data as if it had been recorded to a metronome click. For this exercise, you will use Logic's Beat Mapping track to create tempo changes for each event that deviates from a constant tempo. Using the Beat Mapping Track The Beat Mapping track, one of Logic's Global tracks, works hand in hand with related tracks such as the Signature and Tempo tracks. You can think about it as working like an adaptive ruler, letting you graphically tie events to particular bars and beats (derived from the Signature track). When events are defined according to their bar position in the Beat Mapping track, tempo changes are created in the Tempo track in order to align the grid. Both MIDI and audio tracks can form a basis on which to generate a beat map. Let's start by opening the song file used in this exercise, which contains both MIDI and audio versions of a rubato piano piece. 1. | Choose File > Open, and open Advanced Logic 7_Song Files > Lesson 04 Project Files > 04_The Only Light That's On > 04_The Only Light_Start.lso.
The file opens with an Arrange window containing a single MIDI track outputting through the EXS24 (using a piano sample instrument) and a muted audio track of the same material.
| 2. | Play the song to familiarize yourself with the material.
| 3. | Click the Toggle Metronome button in the Transport to turn on Logic's click.
NOTE If you changed the metronome to output to the headphones in Lesson 2, it might be necessary to set it to output to your control room monitors to hear it. Do this by selecting the main outputs (1-2) in File > Song Settings > Metronome. | 4. | Play the song again, this time listening to the tempo deviations of the piece compared with the click.
Things start off without too much deviation, but the click is really off by measure 4.
| 5. | Choose View > Global Tracks within the Arrange window's local menu.
The Global tracks appear, displaying only the ones used for this exercise: Signature, Tempo, and Beat Mapping.
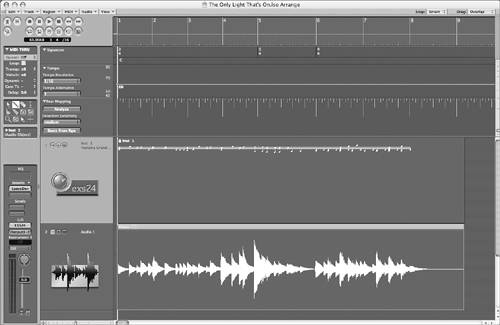 TIP You can choose to display any or all of the Global tracks by choosing View > Global Track Components and checking whatever you wish to view. This will be saved with the screenset and can be hidden or exposed at any time by key command or menu selection. As you can see by looking at the Signature track, the piece starts in 3/4 but contains bars of 5/4 and 4/4 as well. You can see these meters reflected in the Beat Mapping track with bars and beats displayed graphically as lines representing the time grid (not unlike the Bar Ruler above).
If this grid is to be used as a reference, Logic's Global Format (a freely definable part of a beat) must reflect the smallest rhythmic value (division) within the given piece of music. The music we are using is based on a triplet feel, so it is necessary to select a division of 12 instead of 16 (the default).
| 6. | In the Transport window, double-click the Division number and enter 12.

The grid now displays triplets.
|
Beat Mapping a MIDI Region In order to start aligning the grid to the music, you need to select the material you want to work with. NOTE The Beat Mapping track works with Regions, not tracks (which contain multiple Regions).
1. | If not already selected, select the MIDI Region on the Inst 1 track.
Light blue lines appear in the Beat Mapping track, depicting each event in the selected Region. You will use both these lines and the bars/beats lines above, "tying" them together to realign the grid.
| 2. | Zoom out horizontally until you can see about four bars in the Arrange window. This enables you to see greater detail when working in the Beat Mapping track.
| 3. | Click the line representing measure 1, beat 2 (1 2 1 1) in the top portion of the Beat Mapping track and drag downward, connecting it to the first light blue event (1 1 3 305) in the bottom portion of the track.
The line turns yellow as you are connecting it and displays a help tag (Set Beat To) displaying the event's position (before alignment).
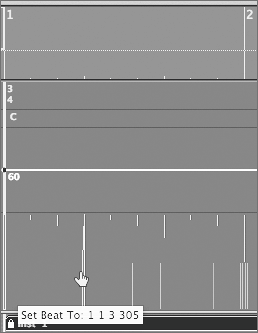
When you release the mouse button, the points are aligned, and a new tempo event is created (61.0066) in the Tempo track.
NOTE Logic uses very fine tempo increments (as small as 1/10,000 of a beat!) for accurate alignment. | 4. | Using the same technique, connect the line representing measure 1, beat 2, third division (1 2 3 1) to the light blue line located below and slightly to the left (1 2 2 294).
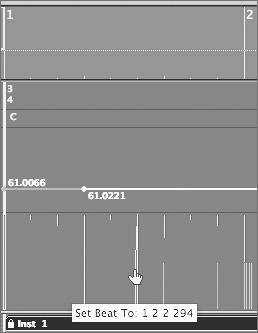
Another tempo event is created in the Tempo track (63.6942).
| 5. | Connect the line representing measure 1, beat 3 (1 3 1 1) to the light blue line located below and slightly to the right (1 3 1 34).
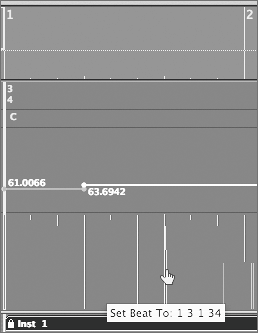
Another tempo event is created in the Tempo track (57.7200).
| 6. | Connect the line representing measure 1, beat 3, third division (1 3 3 1) to the light blue line located below and slightly to the left (1 3 2 294).
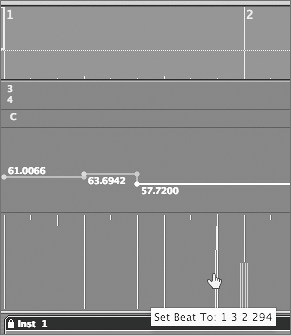
For every note event connected, a new tempo is indicated, creating an accurate depiction of the music's timing. Therefore, the more events that are beat mapped, the closer Logic's time grid will conform to the music.
For the rest of this exercise, you will finish Beat Mapping the entire piano part, creating an accurate time map of the piece.
A few areas to watch out for:
Position | Situation | Recommendation |
|---|
2 1 1 1 | The slur and slightly staggered chord entries create multiple possibilities to draw connections. | Try experimenting with what works best in representing the downbeat. | 3 1 2 1 | Deviates from triplet feel momentarily to eighth notes, lasts only for one beat. | Change the Division to /8 to work with the grid above the two eighth notes. |
| 7. | Continue connecting related lines together in the Beat Mapping track, moving from left to right for the entire Region.
TIP If you make a mistake, you can erase any beat allocation by double-clicking it or using the Eraser tool. | 8. | When finished, check your work by listening to the EXS24 piano part along with the metronome click, as you did previously.
For comparison, a beat-mapped Tempo track has been created for you to reference your results. You can access this through the Tempo Alternative menu in the Tempo track.
| 9. | Click-hold the Tempo Alternative pop-up menu and choose 2.
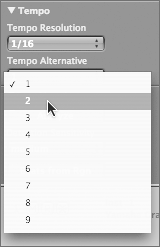
The Tempo track now displays the premade tempo events created from Beat Mapping.
| 10. | Play the song with the click to compare the premade Tempo track with your results, toggling back and forth between Tempo tracks by using the Tempo Alternative menu (1 and 2 slots).
|
Checking Your Results in the Matrix Editor You can check just how good a job you did at Beat Mapping by looking at the events graphically within the Matrix Editor. Here you can clearly see the individual events lined up on the time grid and compare results made from Beat Mapping with the original, non-beat-mapped track. 1. | With the MIDI Region highlighted, choose Screenset 2.
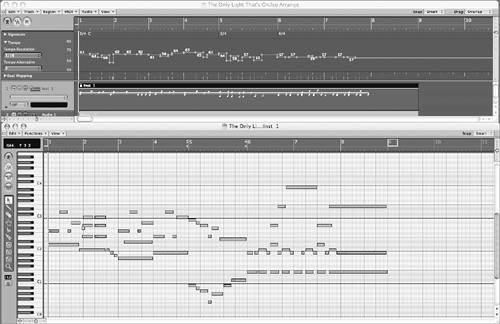 The view switches to an Arrange window at the top of the screen, with a Matrix Editor displayed below. The view switches to an Arrange window at the top of the screen, with a Matrix Editor displayed below.
| 2. | Using the Tempo Alternative menu, switch among the 1 (your beat map), 2 (the premade beat map), and 5 (not beat-mapped) slots, comparing how the note events align to the grid.
You can see major discrepancies between the beat-mapped (1 and 2) and non-beat-mapped versions (5), especially from measure 4 onward.
|
Beat Mapping an Audio Region Using an Audio Region as the source for Beat Mapping involves a technique similar to using a MIDI Region. Instead of using MIDI note events, however, the Beat Mapping track uses audio transients for alignment points. In order to do this, Logic needs to analyze the source to detect transients (similarly to the Apple Loops Utility). Let's start by muting the MIDI track and un-muting the audio track, in order to start working with the audio track version. 1. | Press the number 1 key to bring up Screenset 1.
The Global tracks are not displayed, as these were not saved to the original screenshot.
| 2. | Choose View > Global Tracks within the Arrange window's local menu.
| 3. | Mute the Inst 1 track by clicking the Mute button on the track.
The EXS24 piano track is muted.
| 4. | Un-mute the Audio 1 track by clicking the Mute button on the track.

| 5. | Select the Piano Audio Region in the Audio 1 track.
| 6. | Click-hold the Tempo Alternative pop-up menu and choose Tempo Alternative 3.
| 7. | Click in the Track List of the Beat Mapping track (but not the buttons and menus) to select everything in the track, and press Delete.
All beat events are erased, allowing you to continue with a "fresh slate."
NOTE Neither the work you performed with Beat Mapping nor the premade Tempo track is deleted when you do this, as they are saved to the first two Tempo Alternative slots. | 8. | Click the Analyze button in the Beat Mapping track.

A progress bar appears, indicating the transient-detection process. After the analysis of the selected audio is performed, the detected transients are displayed in the Beat Mapping track as light blue lines.
| 9. | Zoom out horizontally so that you can see the entire track.
Take a close look at the results displayed in the Beat Mapping track. In measures 5 and 8, most of the softer notes were not detected as transients. Fortunately, the detection sensitivity can be adjusted to pick up these softer transients.
| 10. | Click-hold the Detection Sensitivity pop-up menu and choose "high."

| 11. | Click the Analyze button to perform the detection process again.
New transients are detected, providing a better picture of the relevant timing events within the audio file.
TIP It is advisable to start with a lower Detection Sensitivity setting and only switch to a higher setting if important rhythmic events are not detected. Now that you have timing events in the Beat Mapping track, you are ready to begin the process of aligning the time grid.
| 12. | Connect related lines together in the Beat Mapping track as you did in the previous exercise, moving from left to right for the entire Region.
| 13. | When finished, play the track with the metronome click to check your results.
|
NOTE A premade Tempo track using the Audio Region as a guide has been provided for comparison within Tempo Alternative slot number 4.
|


 The view switches to an Arrange window at the top of the screen, with a Matrix Editor displayed below.
