| Before Logic 7 integrated Apple Loops, all tempo and pitch adjustments to audio files were done with the Time and Pitch Machine. The Time and Pitch Machine functions differently than Apple Loops. The most obvious difference is that Apple Loops work in real time, dynamically changing pitch and tempo in relation to the song, while the Time and Pitch Machine is an offline, file-based process that permanently alters pitch and tempo. Even so, the Time and Pitch Machine has its advantages, especially with regard to control. Apple Loops offer automatic adaptability, but they are locked to a given song's tempo or key and are not very useful when you want to shift audio material independent of the song's tempo or by small pitch adjustments (less than a semitone). Let's bring in another piece of material and use the Time and Pitch Machine to conform it to the arrangement. 1. | Select the Audio 7 track.
| 2. | Move the Song Position Line to the beginning of bar 2.
| 3. | Choose Audio > Import Audio File.
The Open dialog appears.
| 4. | From the file selector, choose ~ > Music > Advanced Logic 7_Song Files > Lesson 04 Project Files > 04_Time and Pitch Matching > Audio Files, and open Synth Layer.aif.
The nine-bar Synth Layer Region is imported to measure 2.
| 5. | Double-click the Synth Layer Region, opening the Sample Editor.
| 6. | Resize the window to display the file in its entirety, zooming out horizontally if necessary.
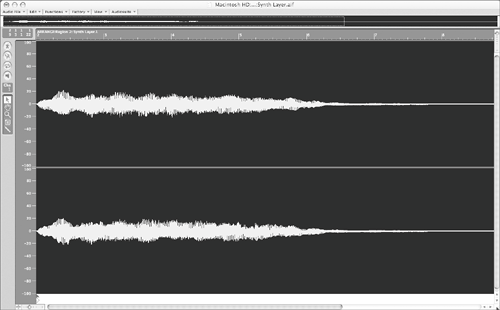 Start by listening to the imported file. The Sample Editor, like many of Logic's other editors, allows us to set the output channel to hear the content that is displayed in the editor. Start by listening to the imported file. The Sample Editor, like many of Logic's other editors, allows us to set the output channel to hear the content that is displayed in the editor.
| 7. | Double-click the output channel (below Cha on the far left of the Sample Editor), and enter 7.

This matches the audio channel for the track the Region plays through in the Arrange window.
TIP It is always advisable to set the audio output to the channel that the Audio Region resides on, especially if you are using plug-ins on the track. | 8. | Click the Play button to hear the Synth Layer audio file.

The audio file consists of a synth pad that slowly grows to a climax, then tapers off.
For this exercise, you will shorten the long synth pad to work better in the song. In this instance, the Apple Loops Utility is not suitable for a variety of reasons. The swelling sound of the synth pad has no beat-related transients on which to base the pitch and time shifting as in the earlier exercise. In addition, Apple Loops are geared toward repeated, rhythmically based material that always relates to the song's tempo. For this task, you only need to shorten the file's length, without taking into account the tempo. Creating an Apple Loop from the selection would have no effect unless you later changed the song's master tempo.
| 9. | Choose Factory > Time and Pitch Machine.
The Time and Pitch Machine opens.
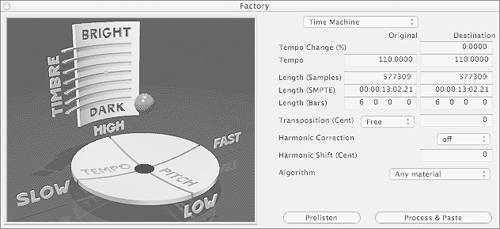 The Time and Pitch Machine utilizes two main interface areas: the graphical controls on the left and the data-input fields on the right. Both do essentially the same thing and reflect settings made on either side. While the graphical interface lends itself well to experimentation, for this exercise you will be using the right side, which allows exact numerical input. The Time and Pitch Machine utilizes two main interface areas: the graphical controls on the left and the data-input fields on the right. Both do essentially the same thing and reflect settings made on either side. While the graphical interface lends itself well to experimentation, for this exercise you will be using the right side, which allows exact numerical input.
| 10. | Double-click the Destination box in the Tempo Change (%) row and enter 50.

After you enter the value, note that the information displayed in the Destination column now reflects this change.
The Time and Pitch Machine offers six algorithms designed to work with different types of audio material, prioritizing certain musical aspects to better make decisions that affect the time and pitch shifting.
| 11. | Click-hold the Algorithm pop-up menu and choose Pads.
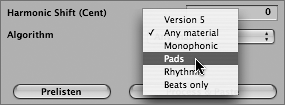
By choosing the Pads setting, you are indicating that the material has a minimum of transients and that it is a sustained sound.
TIP Even though operations in the Sample Editor are usually destructive (and affect the file permanently), different algorithms can be tried on material without destructive results. Logic Pro will cache changes to disk depending on the Number of Undo Steps set within the Sample Editor preferences (Preferences > Audio > Sample Editor). After an operation is completed, you can always undo by choosing Edit > Undo in the Sample Editor. | 12. | Click the Process and Paste button.
The operation is performed while Logic Pro displays the progress. This may take a few moments, depending on the speed of your computer.
| 13. | Close the Time and Pitch Machine window.
| 14. | Click the Play button to listen to the results.
The file plays back true to its original sound quality, but with a shorter length.
| 15. | Close the Sample Editor.
| 16. | Play the song file to hear the Synth layer within the context of the song.
This fits much better with the arrangement, building up until the drums and bass enter, then tapering off.
|
TIP Better results are usually achieved when contracting, instead of expanding, audio files. When the operation increases the speed of the audio, the computer must cut out material deemed nonessential, potentially removing important elements such as transients. Things get considerably trickier when you need to decrease the speed, as the computer must invent entirely new material based on the existing waveform, inserting it at appropriate places to fill the desired length.
Using Harmonic Correction with Pitch Transposition Pitch transposition usually involves shifting the complete frequency spectrum up or down by a constant value. In effect, everything within the sound source is shifted, including natural resonances (called formants). This works well for some material but can create unnatural results when working with material with harmonic structure that is integral to the sound (such as instruments or voices). A good example is the pitch shifting of a cello note. When all material is shifted upward (including formants), the pitch changes, but the "body" of the instrument changes, as well. What results is a higher pitch that sounds as if it were emanating from a smaller instrument (a viola or violin, in this case), rather than a higher pitch from the original instrument (cello). If your aim is to change the pitch of a given file and maintain these resonances, then the formants must be left unaltered when the pitch is changed. The Time and Pitch Machine can be set to use such a process, called Harmonic Correction, to achieve natural results when pitch shifting. Try this out by changing the pitch of the Synth Layer Region you have been working with and applying Harmonic Correction. 1. | While holding down the Option key, drag the Synth Layer Region to bar 13.
The Region is copied to the new location.
Since you will be transposing this copy, it is necessary to save it as a unique audio file rather than another reference of the original. This will allow you to make changes to the copied file without altering the Regions you worked with previously.
| 2. | With the newly copied Region highlighted, from the Arrange window's local menu choose Audio > Convert Regions to New Audio Files.
A dialog appears, prompting for a location to which to save the converted file.
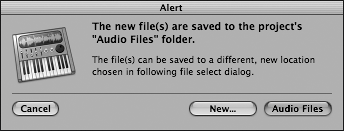
| 3. | Click the Audio Files button to save to the location of the original file.
The Region is saved as an independent audio file.
| 4. | Double-click the newly saved Region to open the Sample Editor.
| 5. | Open the Time and Pitch Machine by choosing Factory > Time and Pitch Machine.
The Time and Pitch Machine opens.
NOTE The Time and Pitch Machine opens with the last setting you input, so it is important to clear out the tempo change you performed in the last exercise before you perform an unrelated operation (unless you want to affect the file in similar ways again). | 6. | In the Tempo Change (%) row, double-click in the Destination box and enter 0, then press Return.
The goal is to change the pitch of the file up a fifth from C to G while retaining the inherent resonances of the sound.
| 7. | In the Transposition (Cent) row, double-click in the Destination box and enter 700, then press Return.
This will transpose the sound up 700 cents, or seven semitones (there are 100 cents in a semitone).

| 8. | Click-hold the Harmonic Correction pop-up menu just below the Transposition (Cent) row, and choose "on."
This tells the Time and Pitch Machine that you wish to retain the original formants of the file, altering the pitch independently.
| 9. | Click the Process and Paste button.
The operation is performed while Logic Pro displays the progress. This process takes a bit longer than the tempo alteration you did earlier, because the computations for Harmonic Correction are more extensive.
NOTE Tempo, pitch, and harmonic (formant) changes can be applied simultaneously or independently of each other. | 10. | Close the Time and Pitch Machine window, and play the file from within the Sample Editor.
The synth pad retains all of its original character but sounds a fifth higher.
| 11. | Close the Sample Editor.
| 12. | Play the song to hear the new Region within the context of the composition.
| 13. | Choose File > Save to save the song.
| 14. | Close the song by choosing File > Close.
|
|