Programming Controls with the Northwind Database
This section builds on the general background for Windows forms created in the previous two sections to highlight several kinds of chores that Access database developers are likely to perform with Windows forms. Because many readers will already have a working knowledge of ADO, the data samples use the COM Interop feature to reference the ADODB library for data access tasks . Chapter 7 and Chapter 9 focus on ADO.NET development techniques. In addition, Chapter 7 builds on the Jump Start sample from Chapter 2 to examine the use of ADO.NET techniques with Windows forms. However, learning to use the ADODB library via the COM Interop will give many Access developers a fast path to creating solutions with Visual Basic .NET and their existing Access databases.
Validating a Password with a TextBox Control
One common database programming chore is to validate a user. For example, an application can require the input of user ID and password data into a couple of TextBox controls. In forms processing, the password must not show as a user enters it. Common practice is to show an asterisk (*) for each typed character in the text box. After the form accepts the user ID and password data, one typical use for the data is to look up the entries in a database table to confirm the validity of the user ID and password.
The sample for this section demonstrates how to implement this kind of task with the CompanyName and CustomerID column values from the Customers table in the Northwind database serving as the user IDs and passwords. Because the application uses the Access Northwind database file, you need a way of connecting to it. The sample uses the ADODB library through the COM Interop feature. To use the ADODB library this way, you need to add a reference to your project to the ADODB library. (See Chapter 3 for a description of how to do this.) This sample uses Form1 in the FormControlSamples project. You can follow the next set of instructions for building the sample or go directly to that form in the sample materials for this chapter.
Figure 5-10 shows the layout for the form in the password application. The figure contains a couple of TextBox controls for the user ID and password fields and a button for submitting the user-supplied data for a validation check. Label controls identify the type of data for each text box. The PasswordChar property for a TextBox control allows you to designate any text character to appear instead of the typed input. You can set this property in the Properties window at design time, or you can assign the property at run time (for example, in a Load event procedure). You can optionally specify a maximum length for the text box holding a password, allowing your application to automatically invalidate entries that are longer than the maximum length. You can use the MaxLength property for a TextBox control to designate the maximum number of characters it will accept.
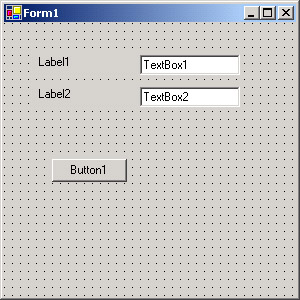
Figure 5-10: The form layout for the user ID and password validation sample
The code behind the form has three procedures. The Form1_Load procedure performs typical property assignment functions for the controls on the form. However, in this application, two of these assignments are critical because they designate how TextBox2 acts as a control for a password. By assigning a string character value to the PasswordChar property, you designate that character to appear in lieu of typed input to the control. The Load event procedure assigns an asterisk. The MaxLength property setting for TextBox2 is 5 because all the CustomerID column values in the Customers table are exactly five characters in length.
The Button1_Click procedure works in tandem with the IsCustomerIDValid function procedure. The function procedure does the work of connecting to the Northwind database, creating a recordset based on the Customers table and the CompanyName and CustomerID values passed to it. The function procedure returns a value of True or False , depending on whether the CompanyName and CustomerID values exist in the Customers table. The Button1_Click procedure merely passes the TextBox values to the function procedure for the CompanyName and CustomerID arguments and displays a message box with the return value from the function.
Private Sub Form1_Load(ByVal sender As System.Object, _ ByVal e As System.EventArgs) Handles MyBase.Load Set TextBox properties. TextBox1.Text = "" TextBox2.PasswordChar = "*" TextBox2.MaxLength = 5 Set other control properties. Label1.Text = "Company Name " Label2.Text = "CustomerID" Button1.Text = "Lookup" End Sub Private Sub Button1_Click(ByVal sender As System.Object, _ ByVal e As System.EventArgs) Handles Button1.Click Dim Cname As String = TextBox1.Text Dim CustID As String = TextBox2.Text MsgBox(IsCustomerIDValid(Cname, CustID).ToString) End Sub Function IsCustomerIDValid( _ ByVal CName As String, _ ByVal CustID As String) As Boolean Declare and instantiate ADODB objects. Dim cnn1 As New ADODB.Connection() Dim rst1 As New ADODB.Recordset() Open an ADO Connection object. cnn1.Open("Provider=Microsoft.Jet.OLEDB.4.0;" & _ "Data Source=C:\Program Files\" & _ "Microsoft Office\Office10\Samples\Northwind.mdb;", _ "Admin", "") Define SQL string for lookup. Dim str1 As String = "SELECT CustomerID " & _ "FROM Customers " & _ "WHERE CustomerID = " & CustID & " ˜ and " & _ "CompanyName = " & CName & " ˜" Perform lookup. With rst1 .ActiveConnection = cnn1 . Open (str1, , _ ADODB.CursorTypeEnum.adOpenKeyset, _ ADODB.LockTypeEnum.adLockOptimistic) End With Return True or False based on whether a match is found. If rst1.RecordCount > 0 Then Return True Else Return False End If End Function Figure 5-11 shows the user ID and password form with an entry of Around The Horn for the Company Name box that serves as the user ID in this sample. The CustomerID field serving as the password is filled with asterisks ”one for each of the five typed characters. A value of AROUP, which is incorrect, causes a click to the Lookup button to present a message box that reads False. Changing the CustomerID value to AROUT, which happens to be valid, returns a message box containing True.
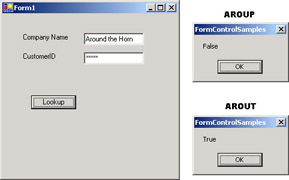
Figure 5-11: The user ID and password validation sample in action
Browsing the Shippers Table with TextBox Controls
Browsing data records with a form is a common database development application. You can optionally enable data manipulation (updates, inserts , and deletes) as well as data access. You need some type of control, such as a text box, to show field values from a record source. A browsing application typically has at least four controls for enabling the browsing function. These controls let users move to the first, previous, next, and last record in a record source. This record source supplies data to the controls on the form that show data.
Figure 5-12 shows the sample form for data browsing in the FormControlSamples project. The sample is on Form2 in the project. You will need to make Form2 the startup object for the project. In addition, you need a reference to the ADODB library in the project. If you successfully completed the prior sample, this reference already exists. The form contains three TextBox controls, three label controls to describe the TextBox controls, and four buttons for navigating through the form s record source. Button1 through Button4 enable browsing to the first, previous, next, and last record in the record source, which is the Shippers table in the Northwind database. However, you can readily modify the sample to work with any other table, query, or even a more complex Jet SQL SELECT statement, such as one that joined two or more tables and performed some aggregation. The code behind the form performs Text property assignments for the label and button controls as well as managing the values that the TextBox controls display.
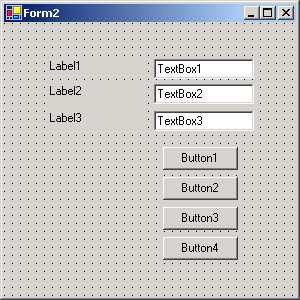
Figure 5-12: A Design view of the form for the data browsing sample
The code behind the form in Figure 5-12 includes six procedures and one module-level object declaration. The module-level declaration is for an ADO recordset object that points at the record source for the form. You must declare this object outside any one procedure because all the procedures have a need for it. The Form2_Load procedure starts with two related tasks. First, it instantiates and opens an ADO Connection object pointing at the Northwind database. Second, it opens a recordset for the Shippers table in the Northwind database. In database applications, it is common to specify the data source for a form in the Load event procedure. The third task is the formatting of the controls contained in Form2 . In this case, the formatting involves assigning strings to the Text property for the form s controls.
Each button control has a short Click event procedure that works directly with the AssignCurrentRecord procedure. The button Click event procedures contain just two lines. The first of these lines invokes a navigation method for the recordset object, such as MoveFirst or MovePrevious . The second line calls the AssignCurrentRecord procedure. The AssignCurrentRecord procedure performs two kinds of tasks. First, the procedure checks whether the navigation move is beyond the first record or the last record. If the procedure discovers that the user made either kind of move, the procedure displays a message box informing the user of the problem. In addition, the procedure moves the record to the first or last position, whichever is nearest . If the navigation is to a valid record, the procedure reads the data from the current record in the recordset and populates the Text property settings for the TextBox controls with the field values from the record.
Module-level declaration and instantiation for a recordset object Dim rst1 As New ADODB.Recordset() Private Sub Form2_Load(ByVal sender As Object, _ ByVal e As System.EventArgs) Handles MyBase.Load Open an ADO Connection object to Northwind database. Dim cnn1 As New ADODB.Connection() cnn1.Open("Provider=Microsoft.Jet.OLEDB.4.0;" & _ "Data Source=C:\Program Files\" & _ "Microsoft Office\Office10\" & _ "Samples\Northwind.mdb;", _ "Admin", "") Open recordset for Shippers table based on module-level declaration. Dim str1 As String = "SELECT * FROM Shippers" With rst1 .ActiveConnection = cnn1 .Open(str1, , _ ADODB.CursorTypeEnum.adOpenKeyset, _ ADODB.LockTypeEnum.adLockOptimistic) End With Initialize Form controls. TextBox1.Text = "" TextBox2.Text = "" TextBox3.Text = "" Label1.Text = "ShipperID" Label2.Text = "Company Name" Label3.Text = "Phone" Button1.Text = "First" Button2.Text = "Previous" Button3.Text = "Next" Button4.Text = "Last" End Sub Private Sub Button1_Click(ByVal sender As System.Object, _ ByVal e As System.EventArgs) Handles Button1.Click Display first record. rst1.MoveFirst() AssignCurrentRecord() End Sub Private Sub Button2_Click(ByVal sender As System.Object, _ ByVal e As System.EventArgs) Handles Button2.Click Display previous record. rst1.MovePrevious() AssignCurrentRecord() End Sub Private Sub Button3_Click(ByVal sender As Object, _ ByVal e As System.EventArgs) Handles Button3.Click Display next record. rst1.MoveNext() AssignCurrentRecord() End Sub Private Sub Button4_Click(ByVal sender As System.Object, _ ByVal e As System.EventArgs) Handles Button4.Click Display last record. rst1.MoveLast() AssignCurrentRecord() End Sub Sub AssignCurrentRecord() Check for BOF or EOF before assigning current record to text boxes. If rst1.BOF Then MsgBox("Already at first record.") rst1.MoveNext() ElseIf rst1.EOF Then MsgBox("Already at last record.") rst1.MovePrevious() Else TextBox1.Text = CStr(rst1("ShipperID").Value) TextBox2.Text = CStr(rst1("CompanyName").Value) TextBox3.Text = CStr(rst1("Phone").Value) End If End Sub When Form2 opens, its TextBox controls are empty. You can optionally program it to open the form so that the first record shows. In any event, a user can display the first record by clicking the First button. (See the top left form window in Figure 5-13.) Clicking the Previous button at this point generates the error message that appears to the right of the top form in Figure 5-13. However, clicking the Next button repopulates the TextBox controls with field values for the Shipper whose ShipperID value equals 2. (See the bottom left form window in Figure 5-13.) The Next and Last buttons work similarly to the Previous and First buttons.

Figure 5-13: An operational view of the data browsing sample for a move outside the recordset and a normal move to the next record
Navigating with a ComboBox and Showing Pictures
The previous sample browses through a record source along a sequential path with the Previous and Next buttons, but it allows users to jump to the first and the last record. Using a ComboBox control, you can let a user browse to any record in a record source. The next sample shows how to use a ComboBox control with category names as a basis for navigating to rows in the Categories table from the Northwind database. In addition, the sample uses a PictureBox control to display category pictures on the sample form, Form3 in the FormControlSamples project. Make Form3 the startup object for your current project, and then copy the controls from the sample form to your version of Form3 and copy the code behind the sample form to the module behind your sample form.
Adding Pictures to the Project Folder
You need to complete one more step before you can run the sample. This sample requires the .eps files for the category pictures in the root folder for your project folder. Within the Northwind database, the bitmap image representations reside in the Picture column of the Categories table. Although storing images in a database can be convenient , it can also slow down the performance of a database. Another approach that can make your application run faster is to store the images in your file system. As we ve discussed earlier, the Access 2002 version of the Northwind database follows this approach for its employee pictures. Therefore, this sample depends on the category image files residing in files within the root project folder.
You can copy the image representations from the Picture column in the Categories table to the root folder of your current project folder by performing the following steps:
-
Select the Bitmap Image for the first row in the Categories table.
-
Right-click the image and choose Bitmap Image Object, Open; this opens the image in Microsoft Paint or your default processor for .eps files.
-
Save the image in the root folder for the current project directory with the filename catimp1.eps. For example, on the computer that I used for this sample, the path and filename is c:\pawvbnet\FormControlSamples\catimp1.eps.
-
Close the bitmap reader to return to the Categories table.
-
Repeat the process for the second and subsequent rows in the Categories tables while successively naming the file for each new image catimp2.eps, catimp3.eps, and so on.
-
Close the Categories table when you no longer need it open for copying image files.
The Design View of Form3
After completing the previous steps, you will be ready to demonstrate the application. However, before running the sample, I want to preview Form3 in Design view as a point of reference for the form in operation because the code behind the form edits the layout in interesting ways. Figure 5-14 shows Form3 in Design view with the PictureBox1 control selected. You can see from its Properties window that the size of PictureBox1 is 100 by 50 pixels. This is the default size of a PictureBox control dragged from the Toolbox to a form. However, this size will clip the category images because they have pixel width and height dimensions of 172 by 120. Although it is possible to alter the size at design time in the Properties window, this sample demonstrates the technique of using the code behind a form. This latter approach enables your applications to change a PictureBox size dynamically when the sizes of different images become available along with the image. Also note that Form3 contains a couple of TextBox controls of default size. Regardless of whether it is obvious that the TextBox controls are of default size, the controls are clearly of the same size. Finally, Form3 is a form of default dimensions (300 by 300 pixels).
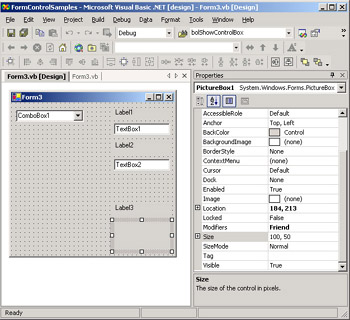
Figure 5-14: The Design view for Form3 with a ComboBox control to specify the display contents for a couple of TextBox controls and a PictureBox control
How Form3 Operates
When Form3 opens, it automatically shows the Category name for CategoryID equal to 1 in the ComboBox control because the code behind the form designates an initial selection for the ComboBox control. The two text boxes display the CategoryID value and the category description. (See Figure 5-15.) These text box values are also dependent on the specification of an initial selection for the ComboBox control because an event procedure for the ComboBox control determines Text property assignments for the TextBox controls. To display the full category description, you need to enlarge the size of TextBox2 . In addition, the PictureBox control enlarges in the operational view of Form3 as opposed to the Design view. The code behind Form3 grows the PictureBox size dimensions to 172 by 120 pixels, the size of the category images. For the PictureBox to fit on Form3 without clipping, its dimensions must grow as well. In this case, the code behind the form grows Form3 s dimensions to 375 by 375 pixels from the default size of 300 by 300 pixels.
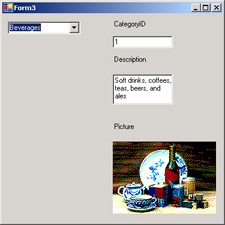
Figure 5-15: An operational view of Form3 after it initially opens with a resized form as well as PictureBox and TextBox controls
The point of this application is to enable a user to change the values displaying in the CategoryID and Description text boxes as well as the image showing in the PictureBox control. By clicking the down arrow in the combo box, a user can see the names of categories in a drop-down list. Selecting any name from the drop-down list updates the display in the TextBox and PictureBox controls to reflect the selected item.
The Code Behind Form3
The code behind Form3 consists of a module-level declaration for an array object and two procedures. The array object, ary_Cats , stores the Categories table column values. This design feature allows the application to release its connection to the Northwind database after populating the array with Categories table column values. The application declares the array at the module level because the array gets used by both procedures in the application.
The Form3_Load procedure begins by making a connection to the Northwind database and creating a recordset based on the Categories table. If you have run either of the two preceding samples in this section, your project already has a reference to the ADODB library. If not, you might need to create a reference to the ADODB library. Next, the procedure iterates with a For Next loop through the records of the recordset and copies their contents to the ary_Cats array declared at the module level. On each iteration through the loop, the code also uses the Add method for the Items collection of the ComboBox object ( ComboBox1 ) to add category names to the combo box. This step enables the drop-down box in the combo box to show the category names. After the loop relinquishes control, the procedure closes and marks for removal the Recordset and Connection objects.
The remaining lines in the Form3_Load procedure format the form. These lines start by assigning Text property values for the label controls on Form3 . Next, the code sets the SelectedItem property for ComboBox1 to 0. This step (in coordination with the ComboBox1_SelectedIndexChanged procedure) causes the form to open, showing the data for the first category. SelectedItem index values are zero-based so that for a set of eight items, such as that in the Categories table, the index values range from 0 to 7.
Next the Load event procedure sets three properties for TextBox2 so that it can display multiple lines and wrap the text. To display more than one line, the event procedure s MultiLine property must be True and its height (the second Size argument) must be greater than the default value of 20 pixels. A height setting of 50 pixels is sufficient for displaying three lines of text, which accommodate all the descriptions in the Categories table. When setting the height property of a TextBox control and selected other items, such as a PictureBox and a Form object, you need to designate the height setting along with the width setting as part of a Size specification. The next two lines show the same syntax for enlarging PictureBox1 and Form3 ( Me ). The specification for Form3 shows the full name for the Size class. Because a Windows application already has a reference to the System.Drawing namespace, the full name for the Size class is not strictly necessary. However, some developers might prefer to designate it for the sake of clarity.
The second procedure, ComboBox1_SelectedIndexChanged , runs whenever the SelectedIndex value for ComboBox1 changes. This happens whenever a user makes a selection or the program explicitly assigns a value to the SelectedIndex property for ComboBox1 . The procedure uses the SelectedIndex value to designate items from the ary_Cats array to display in the two text boxes on Form3 . The procedure also designates a filename that points at one of the image files, which in turn designates the image to display in PictureBox1 .
Dim statement for array Dim ary_Cats(7, 3) As System.Object Private Sub Form3_Load( _ ByVal sender As System.Object, _ ByVal e As System.EventArgs) _ Handles MyBase.Load Dim statement for database Dim cnn1 As New ADODB.Connection() Dim rst1 As New ADODB.Recordset() Make connection to Northwind database. cnn1.Open("Provider=Microsoft.Jet.OLEDB.4.0;" & _ "Data Source=C:\Program Files\" & _ "Microsoft Office\Office10\" & _ "Samples\Northwind.mdb;", _ "Admin", "") Open recordset for Categories table. Dim str1 As String = "SELECT * FROM Categories" With rst1 .ActiveConnection = cnn1 .Open(str1, , _ ADODB.CursorTypeEnum.adOpenKeyset, _ ADODB.LockTypeEnum.adLockOptimistic) End With Declare array for Categories column values and For...Next loop. Dim int1 As Integer Populate ary_Cats array and ComboBox1. For int1 = 0 To rst1.RecordCount - 1 ary_Cats(int1, 0) = CInt(rst1(0).Value) ary_Cats(int1, 1) = CStr(rst1(1).Value) ComboBox1.Items.Add(ary_Cats(int1, 1)) ary_Cats(int1, 2) = CStr(rst1(2).Value) rst1.MoveNext() Next Get rid of objects. rst1.Close() rst1 = Nothing cnn1.Close() cnn1 = Nothing Assign label text property values. Label1.Text = "CategoryID" Label2.Text = "Description" Label3.Text = "Picture" Initialize ComboBox1 to show first category item. ComboBox1.SelectedIndex = 0 Set TextBox2 to show category description. TextBox2.Multiline = True TextBox2.WordWrap = True TextBox2.Size = New System.Drawing.Size(100, 50) Size PictureBox control for category pictures; use the full name for Size, including its namespace. PictureBox1.Size = New System.Drawing.Size(172, 120) Resize form for PictureBox control. Me.Size = New Size(375, 375) End Sub Private Sub ComboBox1_SelectedIndexChanged( _ ByVal sender As System.Object, _ ByVal e As System.EventArgs) _ Handles ComboBox1.SelectedIndexChanged Assign array values matching selected combo box item to text boxes. TextBox1.Text = _ ary_Cats(ComboBox1.SelectedIndex, 0).ToString TextBox2.Text = _ CStr(ary_Cats(ComboBox1.SelectedIndex, 2)) Compute address for category picture matching selected combo box item and assign the picture to the Image property for the PictureBox control. Dim str1 As String = _ "..\catimp" & _ ((ComboBox1.SelectedIndex) + 1).ToString & _ ".eps" PictureBox1.Image = Image.FromFile(str1) End Sub Using One Form to Designate Data for a Second
All the database form samples to this point in the chapter involve a single form, but it is common to use multiple forms in database applications. For example, many database samples have what I refer to as a pick-one form , which allows a user to specify a value and then open a second form that lets him perform some task with the selected item, such as viewing detailed information about it on the preceding form, selecting from a subset according to the choice made on the first form, or changing some data for the selected item.
The sample in this section gives you a chance to see yet another control in operation. The pick-one form in this sample is Form4 in the FormControlSamples project. This form contains a single combo box that lets a user pick a category by name. After the selection, Form4 opens an instance of Form5 and passes the SelectedIndex value for the category a user chose in the combo box. Form5 shows a ListBox control populated exclusively with product names that belong to the category selected from Form4 . When a user picks one of the products in the list box, the application uses three text boxes to show a subset of items from the Products table for that product.
Before attempting to run the sample, follow the standard steps described for the preceding samples. If you are running the application from the FormControlSamples project, remember to designate Form4 as the startup object and make sure the project has a reference to the ADODB library on the computer used to run the application. If you are creating the sample from scratch, one easy approach is to use the Project, Add Windows Form command to add Form4 and Form5 to your project. Then, copy the controls from the versions of Form4 and Form5 in the FormControlSamples project to your project. Next, copy the code behind each form in the FormControlSamples project to the code modules in your project for the corresponding forms.
Figure 5-16 shows Form4 as the left window after the selection of the Condiments category. This selection from the combo box automatically opens Form5 , which will have its list box populated with products from the Condiments category. The right window in Figure 5-16 illustrates the TextBox control Text property settings after the selection of a product from the list box. You can open the Products table in the Northwind database to confirm that the three text boxes show the UnitsInStock, UnitsOnOrder, and ReorderLevel column values for the row with a ProductName column value equal to Grandma s Boysenberry Spread. Notice that the full name for the product does not display in the ListBox control. However, an optional horizontal scroll bar allows a user to scroll right to view the end of a product name. Two conditions need to be met for the horizontal scroll bar to appear. First, you have to set the HorizontalScrollbar property for the ListBox control to True . Second, an item in the list box has to exceed the maximum width of the list box.
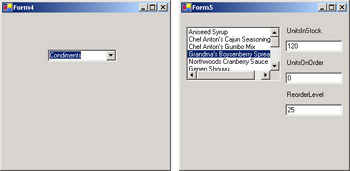
Figure 5-16: Form4 and Form5 work together in a single application within the FormControlSamples project so that a selection on Form4 determines the entries in the list box on Form5 .
The Code Behind the First Form
The code behind Form4 is generally similar to that behind Form3 , but the behavior of Form4 is distinctive from that of Form3 in several areas. For example, this code module uses a Boolean variable, bolFirstTime , to track whether this is the first time the form opened in a session. This is because the first time that the ComboBox1_SelectedIndexChanged procedure fires, this application needs to exit the procedure without executing all its code. However, on all subsequent invocations of the ComboBox1_SelectedIndexChanged procedure, the application needs to execute all the code in the procedure. In addition, an array does not need to store column values from the Categories table. In this application, only a single column of values is needed, and it is convenient to store these as items in the ComboBox control.
Under normal circumstances, the ComboBox1_SelectedIndexChanged procedure has two special roles that were not required in the application for Form3 . First, the procedure passes the SelectedIndex property value from the ComboBox control to a field on Form5 . Second, the procedure opens a form instance based on the Form5 class.
Declare a variable monitoring whether this is the first time the form opens in a session. Dim bolFirstTime As Boolean = True Private Sub Form4_Load(ByVal sender As System.Object, _ ByVal e As System.EventArgs) Handles MyBase.Load Dim statement for database Dim cnn1 As New ADODB.Connection() Dim rst1 As New ADODB.Recordset() Make connection to Northwind database. cnn1.Open("Provider=Microsoft.Jet.OLEDB.4.0;" & _ "Data Source=C:\Program Files\" & _ "Microsoft Office\Office10\" & _ "Samples\Northwind.mdb;", _ "Admin", "") Open recordset for Categories table. Dim str1 As String = "SELECT CategoryName " & _ "FROM Categories" With rst1 .ActiveConnection = cnn1 .Open(str1, , _ ADODB.CursorTypeEnum.adOpenKeyset, _ ADODB.LockTypeEnum.adLockOptimistic) End With Declare array for Categories column values and For...Next loop. Dim int1 As Integer Populate ary_Cats array and ComboBox1. For int1 = 0 To rst1.RecordCount - 1 ComboBox1.Items.Add( _ CStr(rst1("CategoryName").Value)) rst1.MoveNext() Next Get rid of objects. rst1.Close() rst1 = Nothing cnn1.Close() cnn1 = Nothing Initialize ComboBox1 to show first. category item ComboBox1.SelectedIndex = 0 End Sub Private Sub ComboBox1_SelectedIndexChanged( _ ByVal sender As System.Object, _ ByVal e As System.EventArgs) _ Handles ComboBox1.SelectedIndexChanged If this is the first time the procedure opens, toggle bolFirstTime and exit. If bolFirstTime = True Then bolFirstTime = False Exit Sub End If Open an instance of Form5 and pass the combo box SelectedIndex value from this form instance. Dim frm1 As New Form5() frm1.MainSelected = ComboBox1.SelectedIndex frm1.Show() End Sub The Code Behind the Second Form
The code behind Form5 in this application is again similar to the code behind Form3 , but distinct differences also exist. For example, this form must accept a value from Form4 and properly use it. Form5 accepts a value from Form4 by declaring a public variable, MainSelected , which Form4 sets before showing Form5 . Form5 uses an array to store selected column values from the Products table, but Form5 initially declares the array, ary_Products , without designating a specific number of rows and columns for the size of the array. This is because the application can specify only the number of rows in the array after populating a recordset based on the passed value to Form5 from Form4 and counting the rows in the recordset. A ReDim statement dynamically assigns the size of the ary_Products array when the information is available to accomplish the task.
Just one more distinctive feature of the code behind Form5 exists, and it has to do with form layout issues as opposed to data issues. The ListBox control has a couple of lines specifying its properties. One of these is a statement assigning a width to the control. You want to use a wider setting than the default Width property value for the ListBox control to reduce as much as possible the need to scroll to view the end of product names. You do not need a Size setting when changing the width of a ListBox control. You can directly assign a scalar value representing the number of pixels over which you want the ListBox control s width to extend. The HorizontalScrollbar property takes a Boolean variable value to specify whether to show an optional horizontal scroll bar when at least one item in the list box exceeds the Width property setting for the list box.
Aside from these differences, Form5 operates similarly to Form3 . Instead of using a combo box to let a user make a selection, Form5 offers a selection through a list box. However, the ListBox and ComboBox controls both have a SelectedIndex property value that operates the same way. Therefore, the application uses this property value to designate values to display from the array object in the text boxes on the form. In addition, both the ComboBox and ListBox controls share a SelectedIndexChanged event that can be used to determine when to revise the values showing in the text boxes.
Public MainSelected As Integer Dim ary_Products(,) As System.Object Private Sub Form5_Load(ByVal sender As System.Object, _ ByVal e As System.EventArgs) Handles MyBase.Load Dim statement for database Dim cnn1 As New ADODB.Connection() Dim rst1 As New ADODB.Recordset() Make connection to Northwind database. cnn1.Open("Provider=Microsoft.Jet.OLEDB.4.0;" & _ "Data Source=C:\Program Files\" & _ "Microsoft Office\Office10\" & _ "Samples\Northwind.mdb;", _ "Admin", "") Open recordset for subset of Products table. Dim str1 As String = "SELECT ProductName, " & _ "UnitsInStock, UnitsOnOrder, " & _ "ReorderLevel " & _ "FROM Products " & _ "WHERE CategoryID = " & _ (MainSelected + 1).ToString With (rst1) .ActiveConnection = cnn1 .Open(str1, , _ ADODB.CursorTypeEnum.adOpenKeyset, _ ADODB.LockTypeEnum.adLockOptimistic) End With Iterate through selected recordset and assign values to array; also, add Product names to the list box. Dim int1 As Integer ReDim ary_Products(rst1.RecordCount - 1, 3) For int1 = 1 To rst1.RecordCount ary_Products(int1 - 1, 0) = _ CStr(rst1("ProductName").Value) ListBox1.Items.Add( _ ary_Products(int1 - 1, 0)) ary_Products(int1 - 1, 1) = _ CStr(rst1("UnitsInStock").Value) ary_Products(int1 - 1, 2) = _ CStr(rst1("UnitsOnOrder").Value) ary_Products(int1 - 1, 3) = _ CStr(rst1("ReorderLevel").Value) rst1.MoveNext() Next Get rid of objects. rst1.Close() rst1 = Nothing cnn1.Close() cnn1 = Nothing Set width and optional horizontal scroll bar for the list box. ListBox1.Width = 165 ListBox1.HorizontalScrollbar = True Initialize text boxes and labels. TextBox1.Text = "" TextBox2.Text = "" TextBox3.Text = "" Label1.Text = "UnitsInStock" Label2.Text = "UnitsOnOrder" Label3.Text = "ReorderLevel" End Sub Private Sub ListBox1_SelectedIndexChanged( _ ByVal sender As System.Object, _ ByVal e As System.EventArgs) _ Handles ListBox1.SelectedIndexChanged Assign array values to text boxes. TextBox1.Text = _ ary_Products(ListBox1.SelectedIndex, 1) TextBox2.Text = _ ary_Products(ListBox1.SelectedIndex, 2) TextBox3.Text = _ ary_Products(ListBox1.SelectedIndex, 3) End Sub Building a Switchboard Form with the LinkLabel Control
A switchboard form is a common type of application many Access database developers use. This form contains no database connections; instead, it passes control (or focus) to other forms in an application. This type of form acts as a switchboard to which applications can return control after completing a task so that users can switch to another task. Visual Basic .NET introduces a new type of control, a LinkLabel, that is particularly well suited for switchboard forms.
The LinkLabel control acts similarly to a hyperlink on a Web page, but you can use it to pass control to other forms within an application. Therefore, a collection of LinkLabel controls on a form can enable a form to serve as a switchboard form. A LinkLabel control can also start up the default browser on a computer and open a designated Web page with the browser. This feature enables Access application developers to readily incorporate Web pages on an intranet or the Internet directly into their application.
This next sample demonstrates how to use several LinkLabel control properties and one type of event to build a switchboard application. As you lay out a switchboard form, you must position and size the LinkLabel controls so that their Text property displays properly on the form. The Text property of a LinkLabel control (or a subset of characters within the Text property) offers a link for transferring control to another form or Web page. The Text property often describes why users should click the control. You can use the Width property of a LinkLabel control to designate the horizontal extent in pixels for displaying the Text property of a control on a form. The Left property for a LinkLabel control is an offset for designating the number of pixels between the left edge of the LinkLabel control and the left edge of the form in which the control resides. Failing to position LinkLabel controls with relatively long Text and Width property values far enough to the left can result in a form clipping the Text property when displaying the LinkLabel control.
The LinkVisited property is another interesting property. Setting this property to True causes the LinkLabel control to change color after a user initially clicks the control after the form opens. The transition in color occurs only once, the first time the LinkLabel control is clicked.
| Note | The LinkVisited property for a LinkLabel control is False by default. You can use the VisitedLinkColor property to explicitly specify the color to which a link changes after a click. The default setting for the VisitedLinkColor property is different from the default color for a LinkLabel control. |
Windows forms detect when a user clicks a LinkLabel control through the LinkClicked event. Because this is the default event for a LinkLabel control, double-clicking the control in Design view causes Visual Studio .NET to automatically build a LinkClicked event procedure shell.
The following switchboard sample relies on the availability of completed versions of the preceding four samples. If you do not have these samples conveniently available, you can demonstrate the operation of the sample by opening Form6 in the FormControlSamples project. This code is available in the sample materials for this chapter. Make sure that Form6 is the startup application for your project. Form6 contains LinkLabel controls for switching the focus to the other four samples. In addition, a fifth LinkLabel control opens an Internet page describing my favorite seminar tour. Because the page resides on the Internet, your application needs an open connection to the Internet for the LinkLabel control to work. By contrasting the processing for this fifth LinkLabel control with the preceding four, you can see what special steps are necessary for working with a URL.
Figure 5-17 shows the switchboard form in Design view. As you can see, it consists of five evenly spaced LinkLabel controls placed down the center of the form. You can drag a LinkLabel control to a form from the Windows tab of the Toolbox just as you can with a Label control or a TextBox control. Visual Studio .NET numbers the LinkLabel controls by default in a sequential pattern just as it does with buttons. As with buttons and other types of controls, you can override the default Name property value. When you arrange controls on a form, you will often find the Layout toolbar in the IDE convenient. This toolbar contains many controls to make quick work of manually sizing, aligning, and spacing controls. For example, the toolbar has controls for increasing and decreasing the spacing between a set of controls as well as making the spacing between controls even. This toolbar s operation is highly intuitive. This book does not spend much time discussing the use of graphical layout aids such as the Layout toolbar because our focus is on programming techniques.
The following code listing shows the code behind the form appearing in Figure 5-17. The module behind the form contains a Load event procedure to reformat the LinkLabel controls from their default properties that show in Figure 5-17. The reformatting adds custom Text property settings to each LinkLabel control, and it sets the Width and Left properties of the controls to manage how the controls display on the form. Because the Text property settings are long, the Width setting is expanded from its default property. In addition, the Left property offset value is reduced so the LinkLabel controls are closer to the form s left edge than normal.
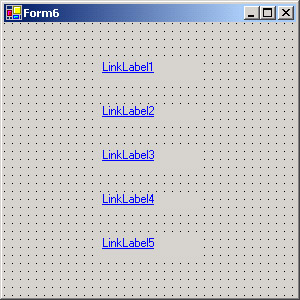
Figure 5-17: A Design view of a form with multiple LinkLabel controls that can serve as a switchboard form
One particularly interesting feature of the Load event procedure is the way it uses a For...Each loop to pass through the LinkLabel controls on the form. Because the loop passes through all controls on the form ( Me.Controls ), you need to filter only for LinkLabel controls. The procedure uses an If Then statement with a condition based on the default name for the control type. A Select Case statement within the loop assigns a custom Text property setting based on the sequential default names from LinkLabel1 through LinkLabel5 .
The code listing includes a separate LinkClicked event procedure for each of the five LinkLabel controls, but the first four of these (for LinkLabel1 through LinkLabel4) pass control to the HandleLocalForms procedure to complete the processing of the event. Before invoking the HandleLocalForms procedure, each of the four LinkClicked event procedures instantiates a local form instance, such as Form1 . These form instances refer to Form1 through Form4 in the preceding four samples. The event procedures then pass the form instance along with the LinkLabel control to the HandleLocalForms procedure. This procedure opens the passed form and sets the LinkVisited property for the passed LinkLabel control to True , which changes the color for the link during a session.
The LinkClicked event procedure for LinkLabel5 is slightly different from the other four LinkLabel controls because this LinkLabel control must open the default browser to point at a URL. Use the Start method of the System.Diagnostic.Process class to launch the default browser as a process. Passing a URL as the argument specifies the opening of the default browser. The second line in this LinkClicked event procedure marks the link as visited after the first click to the LinkLabel control in a session.
Private Sub Form6_Load(ByVal sender As System.Object, _ ByVal e As System.EventArgs) Handles MyBase.Load Loop through LinkLabel controls to reposition and resize each control, and assign a custom Text property value. Dim mylinklabel As LinkLabel Dim ctl1 As Control For Each ctl1 In Me.Controls If Mid(ctl1.Text, 1, 9) = "LinkLabel" Then mylinklabel = ctl1 mylinklabel.Left = 50 mylinklabel.Width = 225 Select Case mylinklabel.Text Case "LinkLabel1" LinkLabel1.Text = _ "TextBox Password Sample" Case "LinkLabel2" LinkLabel2.Text = _ "TextBox Browsing Sample" Case "LinkLabel3" LinkLabel3.Text = _ "ComboBox To Other Controls Sample" Case "LinkLabel4" LinkLabel4.Text = _ "ComboBox To Other Form Sample" Case "LinkLabel5" LinkLabel5.Text = _ "My Favorite Seminar Tour" End Select End If Next End Sub Private Sub LinkLabel1_LinkClicked( _ ByVal sender As System.Object, _ ByVal e As _ System.Windows.Forms.LinkLabelLinkClickedEventArgs) _ Handles LinkLabel1.LinkClicked Instantiate new instance of Form1 from data samples and pass form instance and LinkLabel control to HandleLocalForms. Dim frm1 As New Form1() HandleLocalForms(frm1, LinkLabel1) End Sub Private Sub LinkLabel2_LinkClicked( _ ByVal sender As System.Object, _ ByVal e As _ System.Windows.Forms.LinkLabelLinkClickedEventArgs) _ Handles LinkLabel2.LinkClicked Instantiate new instance of Form2 from data samples and pass form instance and LinkLabel control to HandleLocalForms. Dim frm1 As New Form2() HandleLocalForms(frm1, LinkLabel2) End Sub Private Sub LinkLabel3_LinkClicked( _ ByVal sender As System.Object, _ ByVal e As _ System.Windows.Forms.LinkLabelLinkClickedEventArgs) _ Handles LinkLabel3.LinkClicked Instantiate new instance of Form3 from data samples and pass form instance and LinkLabel control to HandleLocalForms. Dim frm1 As New Form3() HandleLocalForms(frm1, LinkLabel3) End Sub Private Sub LinkLabel4_LinkClicked( _ ByVal sender As System.Object, _ ByVal e As _ System.Windows.Forms.LinkLabelLinkClickedEventArgs) _ Handles LinkLabel4.LinkClicked Instantiate new instance of Form4 from data samples and pass form instance and LinkLabel control to HandleLocalForms. Dim frm1 As New Form4() HandleLocalForms(frm1, LinkLabel4) End Sub Sub HandleLocalForms(ByVal frm As Form, _ ByVal mylink As LinkLabel) Show passed form instance and mark link visited. frm.Show() mylink.LinkVisited = True End Sub Private Sub LinkLabel5_LinkClicked( _ ByVal sender As System.Object, _ ByVal e As _ System.Windows.Forms.LinkLabelLinkClickedEventArgs) _ Handles LinkLabel5.LinkClicked Open the default browser for a designated URL and mark link visited. System.Diagnostics.Process.Start( _ "http://www.programmingmsaccess.com/seminar2002/") LinkLabel5.LinkVisited = True End Sub
Figure 5-18 shows the switchboard application in operation. The form on the left depicts how the switchboard form looks just after a user clicks LinkLabel3. You ll notice when you run this program that the color of this link changes relative to the color of the other LinkLabel controls on the form that have not been clicked yet. The form to the right shows the Form3 sample after it has just opened. This is the form to which LinkLabel3 passes control.
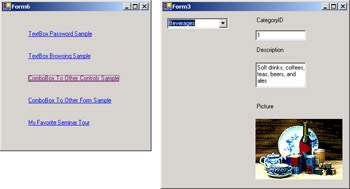
Figure 5-18: The LinkLabel switchboard sample in operation after a click to LinkLabel3
EAN: 2147483647
Pages: 111