File Processing Techniques
Although the .NET Framework offers traditional file-processing tools, such as the FileSystemObject , there is a new way of performing file processing that draws on the capabilities introduced with the .NET Framework. The classes for these new capabilities reside in the System.IO namespace. This section introduces these new capabilities, while demonstrating how to perform typical kinds of file-processing tasks .
System.IO Objects for File Processing
The System.IO namespace exposes a collection of classes to facilitate the access and manipulation of directories and individual files within a directory. The classes in the System.IO namespace expose methods , properties, and events to enable you to find, copy, delete, and write files. You can use these classes to process string or binary data. For example, you can copy a subset of the contents from a database on another computer to a file on a local computer. Later, you can read the file and process the data. When working with objects based on the classes in the System.IO namespace, you must add a reference to the namespace and use an Imports statement or just prefix the class name with System.IO when instantiating objects.
The System.IO namespace offers shared and instance-based classes for processing directories and files. As you ve learned, you can invoke shared classes without an instance of the object. The Directory class exposes shared methods for creating, moving, and enumerating the contents of directories. Use the GetFiles method for returning the names of files in a specified directory. You can also set the current directory, get the names of the subdirectories within a directory, or create a new directory with the SetCurrentDirectory , GetDirectories , and CreateDirectory methods. See the Directory Class topic in the Visual Studio .NET documentation for the complete list of methods for the Directory class, along with links for further details on each method. You can open the documentation from the Windows Start button. (Go to Programs, Microsoft Visual Studio .NET, and choose Microsoft Visual Studio .NET Documentation.)
| Note | In the Visual Studio .NET documentation, you will notice the Directory class referred to as a class with static methods. Static is a synonym for shared in Visual Basic .NET. The Show method of the MessageBox class is a shared method ”that is, you can invoke the method without creating an instance of the object. |
The File class is another class exposing shared methods. This class offers methods for creating, copying, moving, and opening files. You can also use the File class to assist in the creation of FileStream objects. A FileStream object is a sequence of bytes representing the contents of a file. You can use File class methods to read and write to the FileStream object representing the contents of a file. You can use File class methods such as Create , CreateText , and AppendText to create and populate files. Invoke the Delete method to remove a file that an application no longer needs. Other methods support the reading and manipulation of file attributes. Invoke the SetCreationTime method to set the date and time for the creation of a file or the SetLastWriteTime method to designate the last time that a file was modified.
The DirectoryInfo and FileInfo classes are instance-based classes that correspond to the Directory and File classes with their static methods. These two sets of classes perform comparable functions. However, the DirectoryInfo and FileInfo classes require you to create an instance of the class before you can refer to or manipulate a directory or a file. If an application repeatedly refers to the same file, the instance-based classes provide faster performance. This occurs because instance-based methods do not require a security check before invoking a method, such as Delete , each time you designate the same file. The security check is necessary only for the first use of a method for an instance. Classes with static methods, such as File , do require security checks each time you invoke a method. A static method does not know from one invocation to the next whether it is dealing with the same file or a different one.
The StreamWriter and StreamReader classes explicitly target writing to and reading from a file containing characters (the elements of a string). The bytes represent characters in a specific encoding; the default encoding is UTF-8 encoding. The UTF-8 encoding is for representing Unicode characters with a variable number of bytes, but it is optimized for the lower 127 ASCII characters ” American ASCII. Visual Basic .NET also offers the BinaryWriter and BinaryReader classes for reading and writing .NET Framework data types to a file. You can use the BinaryWriter and BinaryReader classes to process binary data files with streams of bytes representing objects, such as an image or a spreadsheet.
Listing Files in a Folder
This section demonstrates how to use the DirectoryInfo and Directory classes to enumerate the files in a directory. All the code samples illustrating file-processing techniques reside in the FileProcessingSamples project, which is a Microsoft Windows application. This makes it easy to launch procedures by clicking a button. One sample also demonstrates the use of the PictureBox control on a Windows form to display the contents of a file with a binary representation for an image.
Enumerating Files with the DirectoryInfo Class
Access 2002 ships the Northwind database with the employee images as stand- alone files instead of integrated into the database, as with previous versions of the Northwind.mdb file. Images, even relatively small ones such as those for the employees in the Northwind database, are relatively large in comparison to data type values normally stored in databases. Each employee image is around 40 KB. However, the ReportsTo column values, which have a Long Integer data type, each require just 4 bytes. This size difference can degrade database performance. Storing the files externally to the database and retaining just the path to the file in the database can speed performance. However, maintaining files outside the database requires procedures for managing the files.
The first file-processing sample illustrates how to iterate through all the .eps files in the Samples folder within the \Program Files\Microsoft Office\Office10 path. These .eps files are the image files for the employees in the Northwind database. There are nine .eps files ”one for each employee. The filenames are EMPID x , where x represents a number corresponding to the EmployeeID column value for an employee in the Employees table of the Northwind database.
Add a button ( Button1 ) to Form1 in the FileProcessingSamples project. In the button s event procedure, you can specify the path to process. A second procedure, BmpReporter , can accept the path and demonstrate the use of the DirectoryInfo class for iterating through the .eps files in the target path. In the sample, the BmpReporter procedure concludes by presenting a message box with some feedback on its search. The following listing illustrates one approach to this task.
The BmpReporter procedure begins by declaring objects that it will use. Critically, this procedure instantiates an instance of the DirectoryInfo class as dir1 . The constructor for this class takes an argument, strPath , that designates the folder to process. The declaration for fil1 does not instantiate an object, but it declares a variable based on the FileInfo class. As you know, both the DirectoryInfo and FileInfo classes work with specific instances of a directory and a file.
The procedure then illustrates the syntax for looping through a subset of the files in the target path with .eps file extensions. These files contain the employee pictures. Within the loop, the sample saves the full name of each successive image file with its path in the str1 string variable, and it adds 1 to the int1 variable. After the last pass through the loop, str1 contains the name of the last .eps file in the target path, and int1 equals the number of .eps files in the path for dir1 . The BmpReport procedure concludes by presenting one of two message boxes based on the value of int1 . With a default installation of Access 2002, the procedure returns a message box with three lines ”one each for the name of the target folder, the number of .eps files in the folder, and the full name of the last .eps file in the target folder. (See Figure 4-1.)

Figure 4-1: The message box generated when you run the Button1_Click event procedure in the FileProcessingSamples project
Private Sub Button1_Click(ByVal sender As System.Object, _ ByVal e As System.EventArgs) Handles Button1.Click If user has permission, this code works on a workstation. Dim strFolder = _ "c:\program files\microsoft office\" & _ "office10\samples\" BmpReporter(strFolder) End Sub Sub BmpReporter(ByVal strPath As String) Dim dir1 As New System.IO.DirectoryInfo(strPath) Dim fil1 As System.IO.FileInfo Dim str1 As String Dim int1 As Integer For Each loop to iterate through .eps files in the strPath path. For Each fil1 In dir1.GetFiles("*.eps") str1 = fil1.FullName int1 += 1 Next fil1 Return path name, number of .eps files, name of last .eps file (include path) in strPath. Dim str2 As String If int1 > 0 Then str2 = dir1.FullName & vbCr & _ "Number of .eps files in folder: " & _ int1.ToString & vbCr & _ "Last .eps file in folder: " & str1 Else str2 = "No .eps files found." End If MsgBox(str2) End Sub The next procedure listing, which is for the Click event for Button2 on Form1 , illustrates the use of UNC notation for specifying the path to a target folder. The Click event procedure directs the BmpReporter procedure to search one of two paths in the c share on another computer named cablat. Depending on the response to a message box, the procedure assigns a string for the Access 2002 Samples folder or the Access 2000 Samples folder. The cablat has both versions of Access installed, but only the Access 2002 Samples folder has the .eps files in its Samples folder. The Access 2000 version shipped with the employee image representations inside the database instead of as stand-alone files. Therefore, when I run this Button2 Click event procedure, the message box from BmpReporter reads, No .eps files found. You can achieve the same outcome by designating any target path that does not contain .eps files.
Private Sub Button2_Click(ByVal sender As System.Object, _ ByVal e As System.EventArgs) Handles Button2.Click Declare a string for the target folder. Dim strFolder As String Instantiate a string for the prompt in a message box. Dim str1 = "Click Yes to search the Access 2002 " & _ "Samples folder or No to search the Access " & _ "2000 Samples folder." Set the target folder to search the Samples folder for either Access 2002 (Office 10) or Access 2000 (Office). If MsgBox(str1, MsgBoxStyle.YesNo) = MsgBoxResult.Yes Then strFolder = _ "\\cablat\c\program files\microsoft office\" & _ "office10\samples\" Else strFolder = _ "\\cablat\c\program files\microsoft office\" & _ "office\samples\" End If Pass the path to BmpReporter. BmpReporter(strFolder) End Sub
Enumerating Files with the Directory Class
When using the Directory class to enumerate the files within a folder, the process changes. For example, you do not instantiate an object pointing at a directory. Although the Directory and DirectoryInfo classes both have a GetFiles method, the input and return from the method is different for each class. In the case of the Directory class, you have to designate a path whenever you invoke a method. This is not necessary for the DirectoryInfo class. Once you instantiate a DirectoryInfo object for a path, you can reuse different methods for that instance of the DirectoryInfo class. The GetFiles method for both classes can take a string indicating which subset of files to search for within a directory, but with the Directory class, this method must always precede this optional string with a string indicating the target folder to search. The DirectoryInfo class returns FileInfo instances from its GetFiles method, but the Directory class returns strings representing the name of the files returned by the method.
The following two procedures illustrate how to use the Directory class to search for all .eps files in the Access 2002 Samples folder. The Click event procedure for Button3 specifies the path to search and passes the string with that information to the BmpReporter2 procedure. The syntax in the For Each statement shows the arguments to search for only .eps files in the target path. You can omit the second argument for the GetFiles method if you want to search for all files within a directory.
Both the BmpReporter and BmpReporter2 procedures use a variable named fil1 to enumerate the members of the return set from the GetFiles method. However, BmpReport2 declares fil1 as a string, while BmpReporter declares fil1 as a FileInfo object. This is because the GetFiles method for the Directory class returns the names of files, while the DirectoryInfo class returns FileInfo objects with its GetFiles methods. Although the BmpReporter procedure does initially capture a FileInfo object, it does save a string by storing the FullName property value for the FileInfo object in the str1 string. In the BmpReporter2 procedure, the fil1 variable is already a string value. The BmpReporter2 procedure extends the BmpReporter procedure by stripping the path from before the filename. This path is not necessary in the message box showing the result because the path already shows on the first line of the message box prompt. The Mid function extracts only the portion of the string returned by the GetFiles method after the last "\" in the name. The InStrRev function returns the position of this target string. The Length property for a string is the total number of characters in the string.
Private Sub Button3_Click(ByVal sender As System.Object, _ ByVal e As System.EventArgs) Handles Button3.Click Declare a string variable with the target folder to search and pass the string to BmpReporter2. Dim strFolder = _ "c:\program files\microsoft office\" & _ "office10\samples\" BmpReporter2(strFolder) End Sub Sub BmpReporter2(ByVal strPath As String) Dim fil1 As String Dim str1 As String Dim int1 As Integer For...Each loop to iterate through all files in the strPath path, but select just .eps files; strip filename from path for selected files. For Each fil1 In System.IO.Directory.GetFiles(strPath, "*.eps") str1 = Mid(fil1, (InStrRev(fil1, "\") + 1), _ (fil1.Length - InStrRev(fil1, "\"))) int1 += 1 Next fil1 Return path name, number of .eps files, name of last .eps file in strPath. Dim str2 As String If int1 > 0 Then str2 = strPath & vbCr & _ "Number of .eps files in folder: " & _ int1.ToString & vbCr & _ "Last .eps file in folder: " & str1 Else str2 = strPath & vbCr & _ "Number of .eps files in folder: " & _ int1.ToString End If MsgBox(str2) End Sub
Selecting and Showing Binary Files
Now that you know how to iterate through the image files in a folder and find out information about them, such as their name, it is natural to want to display the images in the files. The .eps files for employees in the Access 2002 Samples folder are binary files because they are meant for any application that can run .eps files. You can t view the image by opening the file in a text reader such as the Windows Notepad utility. Therefore, we need a control in Visual Basic .NET that can decipher the byte stream in a .eps file in order to display the image. Visual Basic and Visual Basic for Applications (VBA) developers are familiar with the Image control for displaying the image corresponding to a binary image file, but this control is not available in Visual Basic .NET. However, the PictureBox control serves a similar role. The PictureBox control works differently from the Image control in that the PictureBox control actually displays the binary image that you assign to its Image property.
| Note | This section uses a control, the PictureBox, for a form in a Windows application. The sample discussion mentions manually setting control properties, such as Width and Height . Chapter 2 introduces form design in Windows applications, and Chapters 5 and 6 explore forms and controls for Windows applications in much more depth. |
You can drag a PictureBox control from the Toolbox to Form1 in the FileProcessingSamples project. This creates an instance, PictureBox1, of the control on the form. Select the instance and then set its Width and Height properties in the Properties window to 188 and 217 pixels; these settings appear nested within the Size property for the PictureBox1 control. The dimensions are appropriate for the employee image files within the Access 2002 Samples folder.
The sample for showing an image file uses two event procedures. The Form1_Load procedure hides the PictureBox1 control. It achieves this result by setting the control s Visible property to False , which hides the control when it has no image to display. The second procedure will make the control visible after a user selects an employee for which to show a picture.
The second procedure, Button4_Click , performs multiple tasks. First, the event procedure makes a connection to the Northwind database to generate a recordset with fields identifying each employee in the Employees table. Second, it presents an input box with information for a subset of the employees from the Employees table. This second step also captures the response to the user s selection of an employee from the list showing in the input box. Third, the procedure creates a setting for the Image property of PictureBox1 that corresponds to the selected employee. The setting for the Image property contains the bytes from one of the .eps files in the Access 2002 Samples folder (the one corresponding to the selected employee).
The second procedure uses the ADODB library to open a connection to the Northwind database and creates a recordset based on selected columns from the Employees table. Chapter 3 gives instructions for using the COM Interop feature to create a reference to the ADODB library from a Visual Basic .NET project. The declaration area of the Button4_Click procedure declares and instantiates ADODB connection objects. After that, a block of standard ActiveX Data Objects (ADO) code inside the Visual Basic .NET procedure makes the connection and recordset objects. The Select statement for the recordset designates the EmployeeID, FirstName, LastName, and Photo columns as fields in the recordset.
The second task starts by extracting fields for the first five employees from the recordset. A Do loop with a nested If Then statement implements this part of the task. The code inside the loop constructs a string with a separate line for each of the first five employees. Saving the recordset values to variables declared as Visual Basic .NET String s converts the recordset values from ADODB data types to Visual Basic .NET data types. This is necessary to display the values in an input box. The sample uses the Chr function with an argument of 10 to force a linefeed character at the end of each line within the str1 variable. After looping through the required rows from the recordset to create str1 , the procedure closes the recordset and its connection to the Northwind database. The second task concludes by invoking the InputBox function with str1 as the argument for the input box s prompt. Visual Basic .NET offers more robust tools for diplaying data than the InputBox function, but the sample purposefully takes a minimalist approach here to highlight the use of the binary file in a PictureBox control.
The third task begins by taking the user s response to the input box and preparing a setting for the Image property of PictureBox1 . This property points at the file that the PictureBox control is to show. The setting for the property must include the full path to the image file, which is one of the nine employee image files in the Access 2002 Samples folder. If your image files are in another location, either move them to the designated folder or update the expression setting the path to the image for the selected employee. The assignment of the Image property for the PictureBox1 control depends on the shared FromFile method for the Image class. The Image class method creates an image object from the path to a binary image file. The third task ends by setting the Visible property for the PictureBox1 control to True . This makes the image container, along with its image, visible on the form.
Private Sub Form1_Load(ByVal sender As System.Object, _ ByVal e As System.EventArgs) Handles MyBase.Load Hide Picture box conrol when form opens. PictureBox1.Visible = False End Sub Private Sub Button4_Click(ByVal sender As System.Object, _ ByVal e As System.EventArgs) Handles Button4.Click Dim cnn1 As New ADODB.Connection() Dim rst1 As New ADODB.Recordset() Dim str2 As String Dim int1 As Integer Make a connection to the Northwind database and open a recordset based on selected columns from the Employees table. cnn1.Open("Provider=Microsoft.Jet.OLEDB.4.0;" & _ "Data Source=C:\Program Files\" & _ "Microsoft Office\Office10\" & _ "Samples\Northwind.mdb") Dim str1 As String = "SELECT EmployeeID, " & _ "FirstName, LastName, Photo " & _ "FROM Employees" With rst1 .ActiveConnection = cnn1 .Open(str1, , _ ADODB.CursorTypeEnum.adOpenForwardOnly, _ ADODB.LockTypeEnum.adLockPessimistic) End With Loop through the recordset to extract information for the first five employees. str1 = "" int1 = 1 Do Until rst1.EOF If rst1("EmployeeID").Value <= 5 Then Dim strID As String = _ CStr(rst1("EmployeeID").Value) Dim strFname As String = _ rst1("FirstName").Value Dim strLname As String = _ rst1("LastName").Value Dim strPhoto As String = _ rst1("Photo").Value str1 += strID & _ ", " & strFname & _ ", " & strLname & _ ", " & strPhoto & Chr(10) rst1.MoveNext() Else Exit Do End If Loop Close the connection and recordset objects now that you no longer need them. rst1.Close() rst1 = Nothing cnn1.Close() cnn1 = Nothing Present an input box requesting a selection about which employee picture to show. str2 = InputBox(str1, _ "Show picture for one of 1st 5 employees", _ "1") Specify the path to the image file for the selected employee and assign the picture file in the path to the Image property of a PictureBox control. str2 = "C:\Program Files\Microsoft Office\" & _ "Office10\Samples\EmpID" & str2 & ".eps" Show the binary image file for the selected employee. Me.PictureBox1.Image = Image.FromFile(str2) Me.PictureBox1.Visible = True End Sub Figure 4-2 shows the application that lets a user select an employee and then displays the corresponding image file. The top window shows Button4 on Form1 just before a user clicks it. After clicking the button, the input box opens; the caption for the box is Show Picture For One Of 1st Five Employees. The default reply is 1, but Figure 4-2 shows an override of the default value to a new value of 5. The bottom window in Figure 4-2 displays the image of Steven Buchanan, whose EmployeeID value is 5, inside the form s PictureBox1 control. The control also was present in the top window in Figure 4-2, but the control s Visible property was set to False .
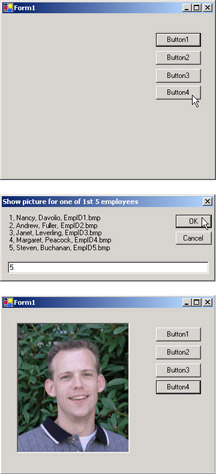
Figure 4-2: The sequence of windows presented by an application that lets a user pick an employee whose picture will show on Form1
Writing Access Database Contents to Files
The preceding application is interesting because it displays a binary image file. However, it does very little file processing. (Mostly, it forms an expression for the path to a file and then passes the image in the file to a control on a form in a Windows application.) The file processing developers traditionally think of has more to do with writing or reading values in memory to a file. This section presents a sample that illustrates how to write data values as string values to a file. The next section demonstrates how to read the file that this sample creates. The combined capability to write database contents to a local file and then subsequently read database values from the file is particularly useful whenever the connection to a database is not persistent ”for example, because of travel away from headquarters or an unreliable connection to a computer storing a database file.
The StreamWriter class is one easy tool for writing memory values to a file. Construct a StreamWriter object instance to which you can write memory values. These should be string values because the StreamWriter is for writing a text stream to a file. After invoking the Write method for the object instance as many times as necessary, invoke the Close method. This method ensures that all data is flushed from StreamWriter buffers to the file and calls the Dispose method for the object instance so that the garbage collector can remove the StreamWriter instance from memory on the next collection cycle.
You can invoke the sample by clicking Button5. This sample commences by creating a recordset object, rst1 , based on the Employees table in the Northwind database. The code to perform this task is identical to that in the preceding sample. Because the FileProcessingSamples project already has a reference to the ADODB library, you do not need to invoke the COM Interop feature a second time to create a new reference. After making the recordset, the sample loops through its records and creates a string with a separate line for each employee. The code sample uses the vbLf constant to delimit lines because the output is not constrained by the limitations of the InputBox function, which does not process the constant but instead requires the Chr function with a value of 10. In this case, you can just as easily use the vbCr constant or the vbCrLf constant; either of these intrinsic constants generates a new line. As in the preceding sample, this sample closes the recordset and connection after composing the string based on the Employees table.
The code to this point in the sample prepares a string for saving as a disk file. This code appears in boldface so that you know it is original, rather than recycled from earlier material in the chapter. The filename and extension will be Employees.txt. The str2 string stores the filename and extension as well as its path. The "..\" points to the root folder in the directory for the current project. The program running this code has the filename FileProcessingSamples.exe, and it resides in the bin subdirectory of the folder for the project. By using the "..\" notation, the code points to the folder one up from the bin subdirectory ”the root folder for the FileProcessingSamples project.
When the sample invokes the New method for the StreamWriter class to create a new instance of a file stream, it specifies two arguments. One argument is the name of the path to the file corresponding to the file stream. The second argument is a Boolean variable that designates whether to write over existing data in the file or append new data to the existing data. The value of True in the sample indicates the Write method should append to existing data. Next, the Write method for the StreamWriter instance copies the string with employee data ( str1 ) to the StreamWriter object. Finally, the Close method flushes the StreamWriter of any data not committed to the physical file and marks the StreamWriter object instance for removal from memory by the garbage collector. The last line of the procedure confirms that the attempt to write to disk is completed.
Private Sub Button5_Click(ByVal sender As System.Object, _ ByVal e As System.EventArgs) Handles Button5.Click Dim cnn1 As New ADODB.Connection() Dim rst1 As New ADODB.Recordset() Dim str1 As String Dim int1 As Integer Make a connection to the Northwind database and open a recordset based on selected columns from the Employees table. cnn1.Open("Provider=Microsoft.Jet.OLEDB.4.0;" & _ "Data Source=C:\Program Files\" & _ "Microsoft Office\Office10\" & _ "Samples\Northwind.mdb") str1 = "SELECT EmployeeID, " & _ "FirstName, LastName, Photo " & _ "FROM Employees" With rst1 .ActiveConnection = cnn1 .Open(str1, , _ ADODB.CursorTypeEnum.adOpenForwardOnly, _ ADODB.LockTypeEnum.adLockPessimistic) End With Loop through the recordset to extract information for all employees. str1 = "" int1 = 1 Do Until rst1.EOF Dim strID As String = _ CStr(rst1("EmployeeID").Value) Dim strFname As String = _ rst1("FirstName").Value Dim strLname As String = _ rst1("LastName").Value Dim strPhoto As String = _ rst1("Photo").Value str1 += strID & _ ", " & strFname & _ ", " & strLname & _ ", " & strPhoto & vbLf rst1.MoveNext() Loop Close the connection and recordset objects now that you no longer need them. rst1.Close() rst1 = Nothing cnn1.Close() cnn1 = Nothing Declare a StreamWriter to build the text filename Employees.txt in the root folder for the current project. Dim str2 As String = "..\Employees.txt" Dim fsw1 As New System.IO.StreamWriter(str2, True) Write the string of employee data. fsw1.Write(str1) Close the file. fsw1.Close() MsgBox("File closed.") End Sub After running the Button5_Click procedure, you will have added a new file to the project s assembly. You can verify the existence of this file from Solution Explorer. Depending on your existing settings for Solution Explorer, you might need to click the Show All Files and Refresh controls on the toolbar within Solution Explorer. You can always discern the purpose of a Windows tool by placing your mouse over it. Double-clicking the Employees.txt file in Solution Explorer opens the file s contents inside the IDE. Figure 4-3 shows the Employees.txt file contents in the IDE after a double-click of Employees.txt in Solution Explorer.
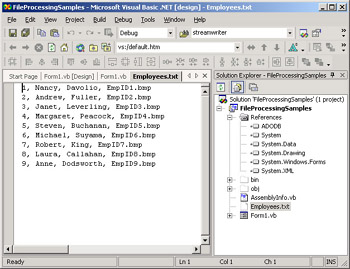
Figure 4-3: Using Solution Explorer to confirm the addition of files to a project and preview their contents
Reading and Managing Text Files
Although being able to view a saved file in the IDE is nice, one major reason for saving a file is to read it programmatically later. The final sample of this section illustrates how to do this. After reading a file, you might want to remove it from disk storage. Therefore, this sample also illustrates how to delete a file. By combining this sample with the earlier samples that show how to create files, add text to files, and search for files, you can create powerful file-processing solutions that enrich your Access database solutions.
The sample in this section reads the file prepared by the preceding sample and gives the user an opportunity to delete the file after reading it. You can read a text file with an instance of the StreamReader class. To open a StreamReader object instance that points at a file, invoke the New method with an argument. The argument should point at the path to the file that you want to open. Immediately after opening a text file with a StreamReader object, you can use the ReadToEnd method to transfer the contents of the whole file to a memory variable. The sample illustrates the syntax to accomplish this. Other StreamReader methods enable your applications to read parts of a text file.
After reading the whole text file into memory, the procedure prompts the user about whether to delete the Employees.txt file. If the user clicks the Yes button on the message box, the application instantiates a FileInfo object ( fin1 ) pointing at the Employees.txt file in the project s root folder. Then, the sample code invokes the Delete method for the FileInfo object. This removes the file from the project s folder. You can use the code from the preceding sample to reconstruct the Employees.txt file if you need it.
Private Sub Button6_Click(ByVal sender As System.Object, _ ByVal e As System.EventArgs) Handles Button6.Click Instantiate StreamReader pointing at Employees.txt in root folder of current project. Dim str1 As String = "..\Employees.txt" Dim fsr1 As New System.IO.StreamReader(str1) Read Employees.txt and display contents in a message box. Dim str2 As String = fsr1.ReadToEnd MsgBox(str2) fsr1.Close() Remove file if user says to. If MsgBox("Delete Employees.txt?", _ MsgBoxStyle.YesNo) = MsgBoxResult.Yes Then Dim fin1 As New System.IO.FileInfo(str1) fin1.Delete() End If End Sub EAN: 2147483647
Pages: 111