Event Handlers and Custom Events
Windows programming with Visual Basic has always been special because of how events and event procedures simplify application development. This section explores the creation of event handlers and the propagation of custom events from your own classes. By running and understanding the samples in this section, you will learn robust ways to take advantage of the built-in events for the .NET Framework classes as well as how to propagate events from your own custom classes.
Overview of Event Processing
In real life, events happen. For example, your telephone rings. You have the option to pick up the phone and respond to the event. If two or more phones are conveniently available, you can respond to the telephone ring (event) from any of the (multiple) phones. In your programming applications, you can elect to respond or ignore events. Normally, you respond to events with an event procedure, but an application can elect to ignore events by not specifying a procedure to handle an event. Although you can have multiple procedures to handle events, it is often best to keep things simple and have just one handler for each type of event.
Events can remind you of something just by their name, but often they can also return information that helps your application respond properly to them. When events return information, such as the identity of their sender, your event handler must know how to receive the information the event conveys. Events return information as values in a way that parallels the way you pass information to a procedure. Both the calling routine and the called routine must have the same list of arguments. Visual Basic .NET refers to the name of an event and its argument list as an event signature . To process an event, you must specify its signature properly.
Many beginning Visual Basic developers do not pay much attention to the structure of event handlers. These developers generate the shell for an event just by double-clicking an object, such as a button on a form. Double-clicking an object creates the shell for an object s default event in the code behind a form. The IDE responds by creating a shell that automatically specifies the event signature. Then, the developer enters his code into the shell. Unfortunately, all events do not come with automatically generated shells . This is especially true for custom events from the classes that you create for an application. (This would be a great time to review the Classes section in Chapter 3.) By learning how to raise events from custom classes and developing standards for responding to them appropriately, your organization can dramatically reduce the programming effort associated with projects or accomplish tasks not otherwise possible.
Custom classes require an Event keyword to declare each event emanating from them. When you declare an event, you give it a name and specify its signature. Although you must declare an event in order for it to occur, the mere declaration of an event is not sufficient to make it occur. You must also specify when an event will happen. Use the RaiseEvent keyword to trigger an event from your custom classes. By specifying argument values in a RaiseEvent statement, you can properly specify the signature for an event and pass information to an event handler. For example, an event handler for credit checks might receive information such as the amount of an order or the customer ID.
Visual Basic .NET assigns the term delegate to a procedure handling an event. This is because the application responding to an event delegates the handling of the event to the event-handling procedure. The procedure handling an event does the work of acknowledging the event for an application. By the way, this notion of delegates is part of what makes events so powerful. Your main procedure does not have to do everything. It delegates work to other procedures. This simplifies and segments your code development process. The other element that makes events so valuable is that event procedures do not have to be invoked (and therefore compiled). This can make your application start and run faster by requiring only the compilation of code that users actually invoke.
There are two ways to designate a procedure as a handler for a specific event. The Handles clause in a procedure declaration can specify the object and event that a procedure handles. To use the Handles clause, you must declare the object in the application by using the WithEvents keyword. This keyword is one way to let events propagate from one code block (such as a class) to another (such as a project referencing the class). When you drag controls from the Toolbox, Visual Studio .NET automatically declares the object instance for a control or a component by using the WithEvents keyword. This declaration appears in the code behind a form within the region named Windows Form Designer Generated Code. By double-clicking a control, you cause the IDE to create an event procedure shell with a Handles clause.
The second way to designate a procedure as an event handler is by using the AddHandler statement. The AddHandler statement allows you to declare an event handler. This statement has two clauses. The first clause starts with the AddHandler keyword. Follow this keyword with the name of the event. An event name has two parts: the object name and the name of the event within the object. Delimit the two parts with a period. The second clause starts with the AddressOf keyword. Follow this keyword with the name of the procedure that you are delegating as the processor for the event named in the AddHandler clause. You can ”but do not have to ”use the convention of naming an event procedure with the name of the object separated from the event name by an underscore (for example, MyClass1_MyEvent ). Delimit the two clauses in the AddHandler statement from one another with a comma and a space. Visual Studio .NET simplifies the task of designating the arguments for the AddHandler and AddressOf clauses by displaying a list of appropriate replies. For example, after you enter the AddHandler keyword, IntelliSense offers a menu of available objects to select. Then, when you highlight an object and press the period key, IntelliSense returns with a list of events for the selected object.
The AddHandler statement is more flexible than the Handles clause for delegating event processing to a procedure. First, you do not have to declare a class by using the WithEvents keyword to process events from the class. Second, the AddHandler event allows for the dynamic management of events at run time. When you designate the handling of an event by using an AddHandler statement, you can halt processing of the event by invoking the RemoveHandler statement for the same event. You can even change the event handler for an event at run time. This kind of dynamic control of event processing is not possible when you specify an event handler with the Handles clause.
Form Load Event Basics
If you double-click a form in a Windows application project, Visual Studio .NET creates the shell for a form Load event procedure. For example, if you double- click in a blank area on Form1 , Visual Studio .NET creates the Form1_Load event procedure shell in the current project. To demonstrate this basic event procedure and selected other event procedures that have more substance, I created a Windows application project named EventSamples. Within the shell that Visual Studio .NET creates, you can place any code you want. This basic sample merely echoes information about the event arguments.
Figure 4-4 shows a message box populated by an event procedure in the Visual Studio .NET IDE behind it. As with classic Visual Basic, the form Load event procedure in Visual Basic .NET fires before the form opens. Chapter 5 will show you how to take advantage of this feature to format a form before it opens. Notice that the form Load event procedure includes a Handles clause that refers to the Load event for the form s base class. The Inherits statement at the top of a module window specifies this class as the Form class in the System.Windows.Forms namespace.
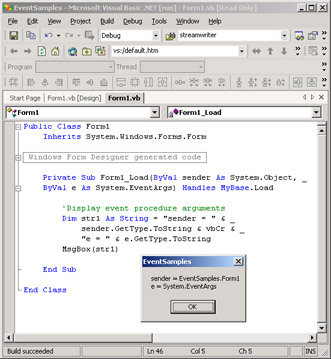
Figure 4-4: The Visual Studio .NET IDE in the background with a form Load event procedure behind a message box under the control of the event procedure
The Form1_Load event procedure has two arguments: sender and e . Both of these values are passed by value from the base class to the form, which is itself a class named Form1 . (See the declaration at the top of the module in Figure 4-4.) The sender argument has a type of Object , the generic base class for all other objects in the .NET Framework. In the sample, the message box portrays the sender argument as coming from Form1 within the EventSamples project. The e argument has a type of EventArgs . The EventArgs type is a base class for other classes that can pass information to an event handler. In particular, the .NET Framework uses derived classes based on the EventArgs type to pass state information to an event handler. This argument plays no role in Windows applications. The message box merely reflects the type for the e argument, and that type gives no indication of its function because it is a base class. Base classes have meaning only to derived classes that are based on them. A later section, Class Inheritance, more fully explores the relationship between base and derived classes.
Working with Windows and System Timers
Visual Basic .NET offers three timer classes. This section compares and contrasts two of these classes while demonstrating event-processing techniques. These two timer classes are interesting for event processing because they share a common purpose ”to raise an event at fixed intervals. The two timer classes examined are the Windows form timer from the System.Windows.Forms namespace and the System timer from the System.Timers namespace. Both of these timer classes are available as components on the Toolbox in a Windows application. Therefore, you can drag instances of them into a Windows application at design time.
| Note | The third timer class comes from the System.Threading namespace. It executes a method at fixed intervals. The timer has two intervals associated with it. One is for the wait to the first invocation of a method, and the second is the period between successive invocations of a method after the initial wait. |
The Windows timer and the System timer can behave similarly within a form in a Windows application, but the timers offer different features that optimize them for different contexts. One timer class is the traditional Windows timer available with classic Visual Basic. It is popular for purposes such as presenting a splash screen at the start of an application for a fixed duration or repeatedly querying a database to get the most recently entered data in a database file. Instances of this timer class are designed for exclusive use on a form in a Windows application. This timer is a single-threaded timer. Therefore, other activities associated with a form in a Windows timer (such as computing loops ) can interfere with the accuracy of the timed intervals.
The System timer is new with the .NET Framework. This timer is for use within a multithreaded environment. The System timer is not constrained to using the thread for a Windows form, so it can be more accurate in circumstances where a form has other activities that can consume thread resources when a timer class needs them. In addition, the System timer does not require a Windows form in order to operate as does the Windows timer. In fact, the System timer is often referred to as the Server timer because you can use it to monitor server operations for which no user interface is available. On the other hand, the System timer s ability to operate on any of multiple threads can cause the thread associated with a Windows form to miss its events. When you drag a System timer to a form in a Windows application, Visual Studio .NET automatically sets the timer s SychronizingObject property to the form. This ensures the timer events will not go unrecognized by an associated form.
Using the Windows Timer
You can locate the Windows Timer on the Windows Forms tab of the Toolbox. Drag the Timer component from the Toolbox to the body of a form, such as Form1 in the EventSamples project. Visual Studio .NET responds by opening a tray below the form if one does not exist already, and it places an icon representing the timer in the tray. If this is the first Windows timer that you drag to the form, the timer s name will be Timer1 . In setting up this demonstration for the Windows timer, I renamed the timer object to MyWindowsTimer by using the Name property in the Properties window. Figure 4-5 shows the IDE immediately after the specification of a new Name property for the timer component. You can see the Timer component class icon on the Toolbox in the lower portion of the Windows Forms tab. The Timer component is selected so that the Properties window displays the properties for the component. The new timer Name property setting appears in the Properties window with the Name property selected.
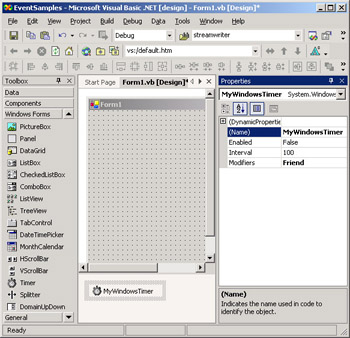
Figure 4-5: Dragging a Windows Timer component from the Toolbox s Windows Forms tab to a form and then manually changing its properties in the Properties window
This sample launches the timer object from the Click event procedure for a button. Therefore, you need to add a button to the form. In doing so, you can accept the default name of Button1 . The event procedure sets a property for and launches the timer. The Windows timer has an Interval property greater than 0, namely 9000. When a timer s Enabled property is True and its Interval property is greater than 0, a Windows timer object instance continues to measure time. At the end of a duration equal to the timer s Interval property setting, the timer raises a Tick event. The sample indicates how you can respond to this Tick event with a user interface.
| Note | Before launching this sample, place a comment marker ( ) in front of the MsgBox function within the Form1 Load event procedure. This will stop you from having to click OK to see Form1 open . |
From the preceding description of the sample s operation, you can tell that the sample has two event procedures. One of these is for the Click event for Button1 . This event procedure sets up the timer. The second event procedure is for the Tick event from the MyWindowsTimer object instance. This event procedure manages the timer, provides feedback about the Tick event, and allows a user to continue the timer for another interval or to stop the timer at the end of the current interval.
The Button1_Click event procedure contains three statements. The first statement assigns a delegate to handle the Tick events raised by the MyWindowsTimer object. This statement demonstrates the syntax for AddHandler . The second statement sets the Interval property for the Windows timer to 9000 milliseconds . This causes the timer to raise a Tick event every 9 seconds after you enable it. The timer s Enabled property is initially False . You can change the setting to True by directly assigning a value of True to the Enabled property or by invoking the timer s Start method. The third statement takes the second route to starting the timer. Nine seconds after the Click event procedure s last statement executes, control passes to MyWindowsTimer_Tick , which is the event procedure for Tick events from the MyWindowsTimer object.
You can create the shell for the Tick event procedure in the normal way by double-clicking the MyWindowsTimer object in the Design view of Form1 . As mentioned earlier, this approach generates a shell with the proper signature for the Tick event that includes a Handles clause. However, because a button s Click event procedure specifies an event handler with the AddHandler statement, you will process each Tick event twice unless you comment out the AddHandler statement or remove the Handles clause from the automatically generated shell for the Tick event procedure. The sample takes the latter approach, but comments remind you how to use the Handles clause.
The Tick event procedure starts by setting the timer s Enabled property to False . This stops the timer while the procedure processes the timer event. If the procedure did not set the Enabled property to False , the timer would continue running to the next Tick event, even while your application processes the current Tick event. This is not a good idea because the time between Tick events will then depend on how long it takes to process an event, which can vary. After halting the timer, the procedure presents a message box announcing the type of event; consider this a variation of the Hello world sample from an event procedure. The event procedure concludes by giving the user a chance to restart the timer and cause another Tick event. If the user elects to restart the timer, the procedure sets the timer s Enabled property to True and exits. This causes the Tick event procedure to start again in 9 seconds. If a user declines to repeat the cycle, the procedure exits normally with the Enabled property set to False . Therefore, the timer remains inoperative until a user clicks Button1 again.
| Note | Some readers might find it curious that I refer to the Windows timer with the name MyWindowsTimer in the button Click event procedure but use the term Me.MyWindowsTimer in the Tick event procedure. Both designations are equivalent in the context of this sample. The fact that I use two different names to refer to the same object confirms this. |
Private Sub Button1_Click(ByVal sender As System.Object, _ ByVal e As System.EventArgs) Handles Button1.Click Delegate MyWindowsTimer_Tick as the event procedure for the Tick event of the MyWindowsTimer object; use this statement or a Handles clause, but not both. AddHandler MyWindowsTimer.Tick, _ AddressOf MyWindowsTimer_Tick Set an interval between tick events. When process depends on user input, use long intervals. MyWindowsTimer.Interval = 9000 Start the timer. MyWindowsTimer.Start() End Sub If you use an AddHandler statement, choose the Sub declaration without the Handles clause. Private Sub _ MyWindowsTimer_Tick(ByVal sender As System.Object, _ ByVal e As System.EventArgs) _ Handles MyWindowsTimer.Tick Private Sub MyWindowsTimer_Tick(ByVal sender As System.Object, _ ByVal e As System.EventArgs) Stop timer. Me.MyWindowsTimer.Enabled = False Process Tick event. MsgBox("Windows Timer Tick Event") Prompt about restarting the timer. If MsgBox("Do it again?", MsgBoxStyle.YesNo, _ "Repeat?") = MsgBoxResult.Yes Then Me.MyWindowsTimer.Enabled = True End If End Sub Using the System Timer
You can add a System timer to a Windows application similarly to the way you add a Windows timer. Open the Toolbox. Instead of using the Windows Forms tab, select the Components tab. Then, drag the Timer component to a form. Unless a timer with a Name property of Timer1 already exists, Visual Studio .NET assigns this name to the timer. This sample assigns MySystemTimer as the Name property for the System timer. When comparing the Properties window for Windows and System timers, you will notice a couple of differences. First, the System timer has a SynchronizingObject property not present for the Windows timer. In the sample application, this property has the setting Form1 because the System timer resides on Form1 . Second, the Enabled property is True by default, instead of False as it is for a Windows timer. Therefore, the System timer will start as soon as you assign a value to the timer s Interval property. To make the operation of the two timers more compatible, the sample sets the Enabled property to False in the Properties window.
The goal of the sample for the System timer is to have it operate the same way as the Windows timer. To achieve this, we need to add another button ( Button2 ) to Form1 to launch an event procedure that sets up and starts the System timer. Then, we need a second event procedure to handle the event signaling the end of an interval. A couple of features of this event are noteworthy. First, the event has a different name than the comparable event for a Windows timer. The Windows timer raises the Tick event at the end of an interval, but the System timer raises an Elapsed event. Second, the signature for the Elapsed event is different than that for the Tick event. Therefore, you can t just copy the shell and modify the event name from the Tick event for the Elapsed event (because the two events have different signatures).
The listing for the use of the System timer appears next. Aside from the differences just noted, its syntax is nearly identical to that of the application for the Windows timer. I dropped the Me qualifier from the name for the timer in the Elapsed event procedure, although it appears in the comparable Tick event procedure for the Windows timer sample. I generated the shell for the Elapsed event by double-clicking MySystemTimer in Design view. Then, I edited out the Handles clause. Following this process automatically creates the proper signature for any built-in event. Because the System timer event has a different signature than the Windows timer and other common events, such as the form Load event and the button Click event, we need to focus on getting the signature right for the System timer.
Private Sub Button2_Click(ByVal sender As System.Object, _ ByVal e As System.EventArgs) Handles Button2.Click Delegate MySystemTimer_Elapsed as the event procedure for the Elapsed event of the MyWindowsTimer object. AddHandler MySystemTimer.Elapsed, _ AddressOf MySystemTimer_Elapsed Set timer interval between Elasped events. MySystemTimer.Interval = 9000 Launch timer by setting Enabled to True. MySystemTimer.Start() End Sub Notice the signature for the Elapsed event procedure of a SystemTimer is different than that of the Tick event for a WindowsTimer. Private Sub _ MySystemTimer_Elapsed(ByVal sender As System.Object, _ ByVal e As System.Timers.ElapsedEventArgs) Stop timer. MySystemTimer.Enabled = False Process Elapsed event. MsgBox("System Timer Elapsed Event") Prompt about restarting the timer. If MsgBox("Do it again?", MsgBoxStyle.YesNo, _ "Repeat?") = MsgBoxResult.Yes Then MySystemTimer.Enabled = True End If End Sub Raising Events from Custom Classes
The final event sample illustrates how to raise an event from a class library and process that event in a Windows application project. The class library project, EventDemoLib, contains a single class named LookAtHighDiscounts . A class method uses the COM Interop feature to make a connection to the Northwind database and compute a recordset for the rows from the Order Details table that match an OrderID value passed to the class method when you invoke it. The Function procedure implementing the method computes and returns the extended price of the line items for the order designated by the OrderID value passed to the function.
Although you have seen this part of the sample before, it s relisted here for a couple of reasons. First, we want to extend the sample to raise an event for any line item in an order with a Discount column value greater than or equal to 20 percent (.2). Second, I want to demonstrate the process for raising an event in the context of a sample that includes database processing. It is possible to fine-tune the design of this sample in several areas, but the point is to reuse familiar code so that you can readily focus on how to expand the functionality available from a class via event programming.
To construct the sample, create a new Class Library project named EventDemoLib. Add a reference, as described in Chapter 3, via the COM Interop feature to the ADODB library. Then, insert the code that follows . As with most of the samples throughout this book, project folders are available with the code already inserted. You might recognize a high degree of overlap in the design of this TotalOrder function from this sample with the TotalOrder function in the MyArraySubAndFunctionMethods class from the MethodsDemoLibrary project. The listing that follows uses boldface for the lines of code that are new.
The first line within the class uses the Event keyword to declare the HighDiscount event. The signature for this event indicates that the event returns two column values, an OrderID and a ProductID . Both of these column values return to the event handler for the HighDiscount event as Integer data types. The TotalOrder function composes a recordset from the Order Details table for a specific order ”the one matching the OrderID passed to the HighDiscount function. The new version of the TotalOrder function converts the ADODB column values for OrderID and ProductID to Visual Basic .NET data types. The HighDiscount event returns these column values to its event handler when the Discount column value is greater than or equal to .2. The procedure adds an If Then statement to assess when to raise the HighDiscount event. Recordset rows with a Discount column value qualifying to trigger the event cause the execution of the single line of code within the If Then statement. The RaiseEvent statement within the If Then statement shows how simple it is to return values with an event from a class. The ReturnOrderID and ProductID values are arguments that match the Event declaration at the class s declaration area. After composing the class, choose Build, Build Solution to create the .dll file for the class library.
Public Class LookAtHighDiscounts Public Event HighDiscount(ByVal ReturnOrderID As Integer, _ ByVal ProductID As Integer) Function TotalOrder(ByVal OrderID As Integer) As Decimal Declare and instantiate ADODB objects. Dim cnn1 As New ADODB.Connection() Dim rst1 As New ADODB.Recordset() Open an ADO Connection object. cnn1.Open("Provider=Microsoft.Jet.OLEDB.4.0;" & _ "Data Source=C:\Program Files\" & _ "Microsoft Office\Office10\Samples\Northwind.mdb;", _ "Admin", "") Open recordset for rows from Order Details, matching OrderID. Dim str1 As String = _ "SELECT * FROM [Order Details] " & _ "WHERE OrderID =" & OrderID.ToString Open a recordset on a table. With rst1 .ActiveConnection = cnn1 .Open(str1, , _ ADODB.CursorTypeEnum.adOpenForwardOnly, _ ADODB.LockTypeEnum.adLockReadOnly) End With Loop through the ADO recordset and compute the total for the designated OrderID. Dim ReturnOrderID As Integer Dim ProductID As Integer Dim Quantity As Integer Dim UnitPrice As Decimal Dim Discount As Decimal Dim OrderTotal As Decimal Do Until rst1.EOF ReturnOrderID = CInt(rst1("OrderID").Value) ProductID = CInt(rst1("ProductID").Value) Quantity = CInt(rst1("Quantity").Value) UnitPrice = CDec(rst1("UnitPrice").Value) Discount = CDec(rst1("Discount").Value) If condition for raising the HighDiscount event If Discount > = 0.2 Then RaiseEvent HighDiscount(ReturnOrderID, ProductID) End If OrderTotal = _ Quantity * UnitPrice * (1 - Discount) + OrderTotal rst1.MoveNext() Loop Return OrderTotal value from TotalOrder method. Return OrderTotal End Function End Class After creating the .dll for the class library, return to the EventSamples project. Then, update the EventSamples project to work with EventDemoLib.dll. First, create a reference to the .dll file. Choose Project, Add Reference. Select the Projects tab in the Add Reference dialog box. Click the Browse button, and navigate to EventDemoLib.dll. Double-click the filename so that it appears in the Selected Components list box in the Add Reference dialog box. Then, click OK to commit the reference to the external class library.
The next major change is to update the form to interact with the newly referenced class library. The sample application will pass through a series of orders to compute the total extended price for each order. The Click event procedure launching the sample will save the computed extended price to the Output window with a Debug.Writeline statement. In addition, an event procedure will save to a disk file the OrderID and ProductID for any line items with a Discount value greater than .2. The form modifications include the addition of a new button ( Button3 ) to launch the sample and the addition of three text boxes. The first and second text boxes ( TextBox1 and TextBox2 ) are for input. A user will input the first and last OrderID values over which the application will compute results. The third text box ( TextBox3 ) is for feedback. It shows the current order being processed . Figure 4-6 shows the completed version of the form in action.
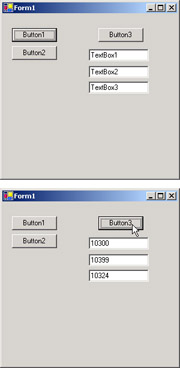
Figure 4-6: Two screens from a Windows application with a class library. The class library performs the processing, with the results appearing on the Windows form.
The listings for the Button3_Click event procedure and the event handler for the event raised from the LookAtHighDiscounts class in the EventDemoLib.dll appears next. For the purposes of this sample, the most important tasks performed by the Button3_Click procedure are to instantiate an object based on the LookAtHighDiscounts class and to designate a delegate for handling the HighDiscount event when the class raises it. A simple Dim statement suffices to declare the MyInstance variable based on the class. Next, an AddHandler statement designates the LookAtHighDiscounts_HighDiscount procedure in the EventSamples project as the event handler for the HighDiscount event. The balance of the procedure is a loop that repeatedly invokes the TotalOrder method for the MyInstance object based on the LookAtHighDiscounts class. The loop starts with the OrderID value in TextBox1 and continues through the OrderID value in TextBox2 . TextBox3 reflects the current OrderID being processed. When the value in TextBox3 matches the value in TextBox2 , the application is finished.
The LookAtHighDiscounts_HighDiscount procedure starts by creating or opening a StreamWriter class instance pointing at the HighDiscountLog.txt file in the bin subdirectory for the current project s folder. By setting a Boolean argument for the StreamWriter s constructor to True , the procedure will append values to an existing file or create a new file if one does not exist already. Next, the sample computes a string and writes it as a line in the text file. The event procedure concludes by closing the StreamWriter class instance.
Private Sub Button3_Click(ByVal sender As System.Object, _ ByVal e As System.EventArgs) Handles Button3.Click Instantiate object. Dim MyInstance As _ New EventDemoLib.LookAtHighDiscounts() Delegate LookAtHighDiscounts_HighDiscount as the event procedure for the Elapsed event of the MySystemTimer2 object. AddHandler MyInstance.HighDiscount, _ AddressOf LookAtHighDiscounts_HighDiscount Loop through Orders from TextBox2 value to TextBox3 value and print to Output window OrderID and OrderTotal. Dim int1 As Integer For int1 = CInt(TextBox1.Text) To CInt(TextBox2.Text) TextBox3.Text = int1.ToString TextBox3.Refresh() Dim OrderTotal As Decimal = _ MyInstance.TotalOrder(int1) Dim str1 As String = int1.ToString & _ ", " & CStr(OrderTotal) Debug.WriteLine(str1) Next End Sub Sub LookAtHighDiscounts_HighDiscount( _ ByVal OrderID As Integer, _ ByVal ProductID As Integer) Declare a StreamWriter to build a text filename HighDiscountLog.txt in the bin folder for the current project. Dim str1 As String = "HighDiscountLog.txt" Dim fsw1 As New System.IO.StreamWriter(str1, True) Prepare a string with discount exception info and write the info to HighDiscountLog.txt. Dim str2 As String = Now().ToString & ", " & _ OrderID.ToString & ", " & _ ProductID.ToString fsw1.WriteLine(str2) fsw1.Close() End Sub
Figure 4-6 shows the sample application, which handles events from a class library in a Windows application project. The top screen shows how Form1 looks before a user inputs the first and last OrderID values for processing. The form shows the default name for the text boxes as values within the text boxes; this is the default setting for text boxes. The bottom screen in Figure 4-6 shows the application in process. The application is processing a block of orders from OrderID 10300 through OrderID 10399. The current order being processed is 10324.
EAN: 2147483647
Pages: 111