Chapter 13: Controlling Access to Your Personal Files
Windows Vista is absolutely loaded with features, but its capability to function as a true multi-user operating system is among the most useful. As the Windows Vista system's owner, you can configure critical security settings in a centralized manner, while individual users can customize their working environment in a way not unlike having their own PCs. Perhaps the best part is that you can share resources like files, printers, and even Internet access with all users.
For all the benefits that sharing resources provides, however, individual users still value their privacy, especially when it comes to their personal files. Nobody likes the idea of having others root through his belongings, be they the contents of a closet or his Documents folder.
Thankfully, implementing some security privacy for your personal files and folders isn't terribly difficult. Windows Vista includes support for a file system that's all about privacy, allowing you to control whether certain users and groups can open, edit, and even delete your files and folders. Its name is NTFS, and if you're serious about security and privacy, then it's the file system that you want to use. Quite simply, if you opt to use any other file system, you're opting for no file system security at all.
In this chapter, you learn more about the NTFS file system, including how to configure permission settings to control access to your personal files and folders. The chapter explores two different techniques; the first is best suited to general users, although the second puts more power into the hands of those with a need for greater flexibility and control over the security of their Windows Vista system. Regardless of the method you choose to work with, configuring NTFS permissions is all about ensuring that you're in control of your personal files, and that you call the shots when it comes to how (or even if) other users are allowed to interact with your files.
Understanding File System Security
To store files on a computer's hard disk, the disk must first be divided into one or more formatted drives (often referred to as volumes or partitions), such as the familiar Drive C. As part of formatting a drive to store data you need to choose a file system, and Windows Vista supports three different file system options - FAT, FAT32, and NTFS.
Differences between FAT, FAT32, and NTFS
Both FAT and FAT32 are considered legacy file systems, born in the days of older operating systems like DOS and Windows 95. With the release of its Windows NT operating system, many years ago, Microsoft introduced a new file system into the mix - NTFS. The NTFS file system brought with it many advancements, including support for larger drive sizes and more efficient use of disk space. The most important feature included with NTFS, however, was its support for configuring files and folders with different security permissions, giving users a greater degree of control over who could access their files, and to what extent. For example, you could use NTFS permissions to allow all users to read your personal files, but not change them. Alternatively, you could grant some users full control over the files within a certain folder while denying all other users access the folder completely.
Ultimately, if you want to ensure that you secure your Windows Vista system to the greatest extent possible, you're well advised to make sure that you format any and all drives on your hard disk with the NTFS file system. The good news is that NTFS is the primary option for formatting drives on a Windows Vista system, and is selected by default (unless otherwise specified) during the operating system installation process. In other words, your Windows Vista system's drives are likely already formatted with the NTFS file system.
Follow these steps to determine which file systems are in use by drives on your Windows Vista system:
-
Select Start → Computer.
-
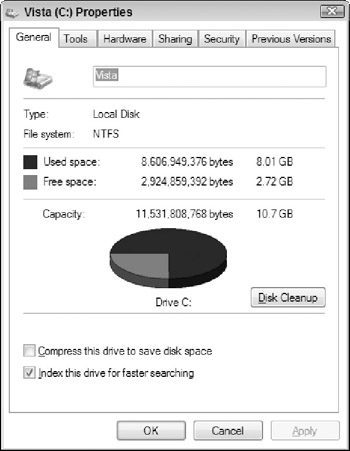
Right-click a drive letter (such as C:) and then select Properties. The General tab in the Properties window displays the file system that the drive uses, as shown in Figure 13-1.

Figure 13-1: Reviewing a drive's file system.
If your Windows Vista system's drives are already using the NTFS file system, then you're good to go on the file system front. If you find drives formatted with the FAT or FAT32 file systems, however, it's important to understand that these drives offer nothing in the way of file security capabilities.
Thankfully, Windows Vista offers a way to convert existing drives from the FAT or FAT32 file systems to NTFS without the need to format (and thus delete all files stored on) the drives. You can use a command-line utility known as CONVERT.EXE to change a FAT or FAT32 drive to NTFS, enabling you to take advantage of security permissions on existing files and folders per your needs.
| Caution | Converting a drive from the FAT or FAT32 file system to NTFS is a one-way process. You cannot convert an NTFS-formatted drive to the FAT or FAT32 file systems for security reasons (because any previously-configured permissions would be unsupported, and thus lost). The only way to switch an NTFS drive to FAT or FAT32 is to reformat the drive, in which case all files stored on the drive are deleted. |
Converting FAT or FAT32 to NTFS
Follow these steps to convert a drive using the FAT or FAT32 file system to NTFS:
-
Select Start → All Programs → Accessories. Right-click Command Prompt and select Run As Administrator.
-
At the command line, type convert i: /fs:ntfs. In this example, drive I: is converted from the FAT or FAT32 file system to NTFS. Specify the letter for the drive you want to convert, and then press Enter. When prompted, enter the volume label for the drive (typically NEW VOLUME or Local Disk by default) and press Enter.
-
If you are asked whether you want to force a dismount of the volume, press Y (for Yes) and then press Enter. The conversion process may take anywhere from a few seconds to a few minutes to complete, depending upon the size of the drive and number of files it contains.
-
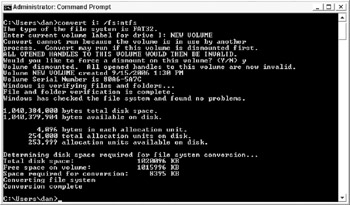
In some cases, you're prompted to restart Windows Vista to complete the conversion process. When finished, the Conversion Complete message appears, as shown in Figure 13-2.

Figure 13-2: Converting a drive to NTFS.
| Caution | As a precaution, always back up any and all critical personal files prior to attempting to convert a drive from FAT or FAT32 to NTFS. If something goes awry during the conversion process, there is a slim possibility that you could lose access to portions (or all) of the drive you are converting. |
When your Windows Vista system includes one or more drives formatted with the NTFS file system, you can get down to the business of securing individual files and folders with permissions. On a Windows Vista Home Basic or Home Premium system, each user's personal Documents folder hierarchy is protected by default, with special folders provided for the purpose of sharing files between users. On Windows Vista Business, Enterprise, and Ultimate systems, you can also configure permissions manually to provide a greater (and more granular) level of control over which users can access files and folders, and to what extent. Both methods of securing (and sharing) files and folders are explored in the following sections.
EAN: 2147483647
Pages: 135