Basic Modification Operations
SQL has three basic data modification statements: INSERT, UPDATE, and DELETE. I used these in some examples in previous chapters, assuming that you were already familiar with them. Here, I'll quickly review the most typical operations. Along with SELECT, the INSERT, UPDATE, and DELETE statements are referred to as DML, or data manipulation language. (DML is sometimes mistakenly referred to as data modification language, in which case SELECT couldn't be included, because it doesn't modify anything.) SELECT can manipulate data as the data is returned by using functions, aggregates, grouping, or the like. (Creation operations such as CREATE TABLE are DDL—data definition language—whereas security operations such as GRANT/DENY/REVOKE are DCL—data control language.)
INSERT
You generally use INSERT to add one row to a table. Here's the most common form of INSERT:
INSERT [INTO] {table_name|view_name} [(column_list)] VALUES value_list In SQL Server, the use of INTO is always optional, but ANSI SQL specifies using INTO. If you're providing a value for every column in the table and the values appear in the exact order in which the columns were defined, the column list is optional. The one exception to this is when the table has an identity column, which you must not include in the list of values. Later in this chapter, you'll learn more about inserting rows into a table that contains an identity column. If you omit a value for one or more columns or if the order of your values differs from the order in which the columns were defined for the table, you must use a named columns list. If you don't provide a value for a particular column, that column must allow NULL or must have a default declared for it. You can use the keyword DEFAULT as a placeholder. You can explicitly enter NULL for a column, or SQL Server will implicitly enter NULL for an omitted column for which no default value exists.
You can issue an INSERT statement for a view, but the row is always added to only one underlying table. If the view is an indexed view, all indexes will be updated to reflect the new data. You can insert data into a view as long as values (or defaults) are provided for all the columns of the underlying table into which the new row is being added. Partitioned views have a few additional restrictions, some of which I discussed in Chapter 6. I'll tell you more about partitioned views when I discuss query tuning in Chapter 16.
Following are some simple examples of using INSERT statements in a table that's similar to publishers in the pubs sample database. The CREATE TABLE statement is shown so that you can easily see column order and you can see which columns allow NULL and which have defaults declared.
CREATE TABLE publishers2 ( pub_id int NOT NULL PRIMARY KEY IDENTITY, pub_name varchar(40) NULL DEFAULT ('Anonymous'), city varchar(20) NULL, state char(2) NULL, country varchar(30) NOT NULL DEFAULT('USA') ) GO INSERT publishers2 VALUES ('AAA Publishing', 'Vancouver', 'BC', 'Canada') INSERT INTO publishers2 VALUES ('Best Publishing', 'Mexico City', NULL, 'Mexico') INSERT INTO publishers2 (pub_name, city, state, country) VALUES ('Complete Publishing', 'Washington', 'DC', 'United States') INSERT publishers2 (state, city) VALUES ('WA', 'Poulsbo') INSERT publishers2 VALUES (NULL, NULL, NULL, DEFAULT) INSERT publishers2 VALUES (DEFAULT, NULL, 'WA', DEFAULT) INSERT publishers2 VALUES (NULL, DEFAULT, DEFAULT, DEFAULT) INSERT publishers2 DEFAULT VALUES GO The table has these values:
pub_id pub_name city state country ------ ------------------- ----------- ----- ------------- 0001 AAA Publishing Vancouver BC Canada 0002 Best Publishing Mexico City NULL Mexico 0003 Complete Publishing Washington DC United States 0004 Anonymous Poulsbo WA USA 0005 NULL NULL NULL USA 0006 Anonymous NULL WA USA 0007 NULL NULL NULL USA 0008 Anonymous NULL NULL USA
These INSERT examples are pretty self-explanatory, but you should be careful of the following:
- If a column is declared to allow NULL and it also has a default bound to it, omitting the column entirely from the INSERT statement results in the default value being inserted, not the NULL value. This is also true if the column is declared NOT NULL.
- Other than for quick-and-dirty, one-time use, you're better off providing the column list to explicitly name the columns. Your INSERT statement will then still work even if you add a column via ALTER TABLE.
- If one of the INSERT statements in this example had failed, the others would have continued and succeeded. Even if I had wrapped multiple INSERT statements in a BEGIN TRAN/COMMIT TRAN block (and did nothing more than that), a failure of one INSERT (because of an error such as a constraint violation or duplicate value) wouldn't cause the others to fail. This behavior is expected and proper. If you want all the statements to fail when one statement fails, you must add error handling. (Chapter 12 covers error handling in more detail.)
- The special form of the INSERT statement that uses DEFAULT VALUES and no column list is a shorthand method that enables you to avoid supplying the keyword DEFAULT for each column.
- You can't specify the column name for a column that has the IDENTITY property, and you can't use the DEFAULT placeholder for a column with the IDENTITY property. (This would be nice, but SQL Server doesn't currently work this way.) You must completely omit a reference to the identity column. To explicitly provide a value for the column, you must use SET IDENTITY_INSERT ON. You can use the DEFAULT VALUES clause, however.
DEFAULT and NULL Precedence
You should understand the general behavior of INSERT in relation to NULL and DEFAULT precedence. If you omit a column from the column list and the values list, the column takes on the default value, if one exists. If a default value doesn't exist, SQL Server tries a NULL value. An error results if the column has been declared NOT NULL. If NULL is explicitly specified in the values list, a column is set to NULL (assuming it allows NULL) even if a default exists. When you use the DEFAULT placeholder on a column allowing NULL and no default has been declared, NULL is inserted for that column. An error results in a column declared NOT NULL without a default if you specify NULL or DEFAULT or if you omit the value entirely.
Table 9-1 summarizes the results of an INSERT statement that omits columns, specifies NULL, or specifies DEFAULT, depending on whether the column is declared NULL or NOT NULL and whether it has a default declared.
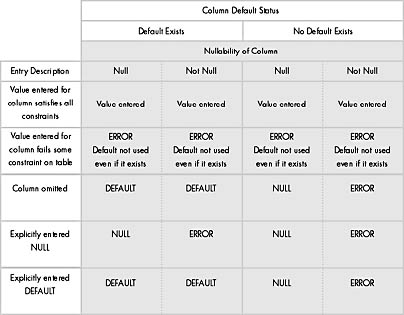
Table 9-1. The effects of an INSERT statement that omits columns, specifies NULL, or specifies DEFAULT.
Expressions in the VALUES Clause
So far, the INSERT examples have used only constant values in the VALUES clause of INSERT. In fact, you can use a scalar expression such as a function or a local variable in the VALUES clause. (I'll show you functions and variables in Chapter 10; you can take a quick look ahead if you need to.) You can't use an entire SELECT statement as a scalar value even if you're certain that it returns only one row and one column. However, you can take the result of that SELECT statement and assign it to a variable, and then you can use that variable in the VALUES clause. In the next section, you'll see how a SELECT statement can completely replace the VALUES clause.
Here's a contrived example that demonstrates how functions, expressions, arithmetic operations, string concatenation, and local variables are used in the VALUES clause of an INSERT statement:
CREATE TABLE mytable ( int_val int, smallint_val smallint, numeric_val numeric(8, 2), tiny_const tinyint, float_val float, date_val datetime, char_strng char(10) ) GO DECLARE @myvar1 numeric(8, 2) SELECT @myvar1=65.45 INSERT mytable (int_val, smallint_val, numeric_val, tiny_const, float_val, date_val, char_strng) VALUES (OBJECT_ID('mytable'), @@spid, @myvar1 / 10.0, 5, SQRT(144), GETDATE(), REPLICATE('A', 3) + REPLICATE('B', 3)) GO SELECT * FROM mytable GO The results will look something like this:
int_val smallint_val Numeric_val tiny_const float_val ---------- ------------ ----------- ---------- --------- 2082106458 56 6.55 5 12.0 date_val char_string ----------------------- ------------------- 2000-06-27 12:22:55.040 AAABBB
If you run this query, your values will be slightly different because your table will have a different object_id value, your process ID (spid) might be different, and you'll be executing this query at a different date and time.
Multiple-Row INSERT Statements
The most typical use of INSERT is to add one row to a table. However, two special forms of INSERT (INSERT/SELECT and INSERT/EXEC) and a special SELECT statement (SELECT INTO) allow you to add multiple rows of data at once. Note that you can use the system function @@ROWCOUNT after all these statements to find out the number of rows affected.
INSERT/SELECT As mentioned earlier, you can use a SELECT statement instead of a VALUES clause with INSERT. You get the full power of SELECT, including joins, subqueries, UNION, and all the other goodies. The table you're inserting into must already exist; it can be a permanent table or a temporary table. The operation is atomic, so a failure of one row, such as from a constraint violation, causes all rows chosen by the SELECT statement to be thrown away. An exception to this occurs if a duplicate key is found on a unique index created with the IGNORE_DUP_KEY option. In this case, the duplicate row is thrown out but the entire statement continues and isn't aborted. You can, of course, also use expressions in the SELECT statement, and using the CONVERT function is common if the target table has a datatype that's different from that of the source table.
For example, suppose I want to copy the authors table (in the pubs sample database) to a temporary table. But rather than show the author ID as a char field in Social Security-number format with hyphens, I want to strip out those hyphens and store the ID as an int. I want to use a single name field with the concatenation of the last and first name. I also want to record the current date but strip off the time so that the internal time is considered midnight. If you're working only with dates and want to ignore the time portion of datetime values, this is a good idea because it avoids issues that occur when the time portions of columns aren't equal. I'll also record each author's area code—the first three digits of the phone number. I need the author's state, but if it's NULL, I'll use WA instead.
CREATE TABLE #authors ( au_id int PRIMARY KEY, au_fullname varchar(60) NOT NULL, date_entered smalldatetime NOT NULL, area_code char(3) NOT NULL, state char(2) NOT NULL ) GO INSERT INTO #authors SELECT CONVERT(int, SUBSTRING(au_id, 1, 3) + SUBSTRING(au_id, 5, 2) + SUBSTRING(au_id, 8, 4)), au_lname + ', ' + au_fname, CONVERT(varchar, GETDATE(), 102), CONVERT(char(3), phone), ISNULL(state, 'WA') FROM authors SELECT * FROM #authors
Here's the result:
au_id au_fullname date_entered area_code state --------- ----------------- ------------------- --------- ----- 172321176 White, Johnson 1998-08-19 00:00:00 408 CA 213468915 Green, Marjorie 1998-08-19 00:00:00 415 CA 238957766 Carson, Cheryl 1998-08-19 00:00:00 415 CA 267412394 O'Leary, Michael 1998-08-19 00:00:00 408 CA 274809391 Straight, Dean 1998-08-19 00:00:00 415 CA 341221782 Smith, Meander 1998-08-19 00:00:00 913 KS 409567008 Bennet, Abraham 1998-08-19 00:00:00 415 CA 427172319 Dull, Ann 1998-08-19 00:00:00 415 CA 472272349 Gringlesby, Burt 1998-08-19 00:00:00 707 CA 486291786 Locksley, Charlene 1998-08-19 00:00:00 415 CA 527723246 Greene, Morningstar 1998-08-19 00:00:00 615 TN 648921872 Blotchet-Halls, 1998-08-19 00:00:00 503 OR Reginald 672713249 Yokomoto, Akiko 1998-08-19 00:00:00 415 CA 712451867 del Castillo, Innes 1998-08-19 00:00:00 615 MI 722515454 DeFrance, Michel 1998-08-19 00:00:00 219 IN 724089931 Stringer, Dirk 1998-08-19 00:00:00 415 CA 724809391 MacFeather, Stearns 1998-08-19 00:00:00 415 CA 756307391 Karsen, Livia 1998-08-19 00:00:00 415 CA 807916654 Panteley, Sylvia 1998-08-19 00:00:00 301 MD 846927186 Hunter, Sheryl 1998-08-19 00:00:00 415 CA 893721158 McBadden, Heather 1998-08-19 00:00:00 707 CA 899462035 Ringer, Anne 1998-08-19 00:00:00 801 UT 998723567 Ringer, Albert 1998-08-19 00:00:00 801 UT
I find that using the INSERT/SELECT is typically the most convenient way to quickly get some sample data into a table because the SELECT statement can simply select constants. For example, to create a table with an int and a varchar(10) column and then insert two rows into the table, I can use the following code:
CREATE TABLE demo (col1 int, col2 varchar(10)) GO INSERT INTO demo SELECT 1, 'hello' INSERT INTO demo SELECT 10, 'good-bye' GO
INSERT/EXEC You can use INSERT with the results of a stored procedure or a dynamic EXECUTE statement taking the place of the VALUES clause. This procedure is similar to INSERT/SELECT except that EXEC is used instead. EXEC should return exactly one result set with types that match the table you've set up for it. You can pass parameters if you're executing a stored procedure, use EXEC('string'), or even call out to extended procedures (your own custom DLLs) or to remote procedures on other servers. By calling to a remote procedure on another server, putting the data into a temporary table, and then joining on it, you get the capabilities of a distributed join.
For example, suppose I want to store the results of executing the sp_configure stored procedure in a temporary table. (You can also do this with a permanent table.)
CREATE TABLE #config_out ( name_col varchar(50), minval int, maxval int, configval int, runval int ) INSERT #config_out EXEC sp_configure SELECT * FROM #config_out
Here's the result:
name_col minval maxval configval runval -------------------- ------ ---------- --------- -------- allow updates 0 1 0 0 default language 0 9999 0 0 max text repl size (B) 0 2147483647 65536 65536 nested triggers 0 1 1 1 remote access 0 1 1 1 remote login timeout 0 2147483647 20 20 remote proc trans 0 1 0 0 remote query timeout 0 2147483647 600 600 show advanced options 0 1 0 0 user options 0 4095 0 0
If I want to execute the procedure against the remote server named dogfood, that's almost as easy (assuming that the same table #config_out exists):
INSERT #config_out EXEC dogfood.master.dbo.sp_configure
NOTE
Before executing a procedure on another server, you must perform several administrative steps to enable the servers to communicate with each other. See the SQL Server documentation for details on linked servers. After you carry out these simple steps, you can execute procedures on the remote server by simply including the name of the server as part of the procedure name, as shown in the previous example.
SELECT INTO SELECT INTO is in many ways similar to INSERT/SELECT, but it directly builds the table rather than requiring that the table already exist. In addition, SELECT INTO can operate as a minimally logged operation, depending on your recovery model. When you're running in SIMPLE or BULK_LOGGED recovery mode, the SELECT INTO operation can be a lot faster than an INSERT that adds the same data. (Chapter 5 discussed recovery models.)
You can also use SELECT INTO with temporary tables (which are prefixed with # or ##). A user executing SELECT INTO—whether to create a temporary or a permanent table—must have permission to select from the source table and must also have CREATE TABLE permission because the SELECT INTO statement does both actions.
SELECT INTO is handy. It's commonly used to copy a table, modify the datatype of a column, or switch the order of columns. To illustrate the SELECT INTO statement, here's an equivalent operation to the earlier INSERT/SELECT example. The results, including the column names of the new temporary table, appear identical to those produced using INSERT/SELECT.
SELECT CONVERT(int, SUBSTRING(au_id, 1, 3) + substring(au_id, 5, 2) + substring(au_id, 8, 4)) AS au_id, au_lname + ', ' + au_fname AS au_fullname, convert(varchar, getdate(), 102) AS date_entered, convert(char(3), phone) AS area_code, isnull(state, 'WA') AS state INTO #authors FROM authors
However, there's one important difference between the two procedures: the datatypes of the table created automatically are slightly different from the datatypes declared explicitly using INSERT/SELECT. If the exact datatypes are important, you can use CONVERT to cast them to the types you want in all cases or you can create the table separately and then use INSERT/SELECT. However, if you want to specify a particular nullability value, there is no way to do that. If a column is copied directly from the source to the destination, it keeps the same NULL or NOT NULL property; if any conversion is done on the column, the new column will have the default nullability of the connection. To force a nullability different from these defaults, you have to create the table before you copy the data into it and specify NULL or NOT NULL for each column.
Another feature of SELECT INTO is that you can add an identity column to the new table by using the function IDENTITY in the SELECT clause. The function takes up to three parameters. The first is the datatype, the second is the seed, and the third is the increment. SQL Server automatically populates the rows with the appropriate identity values if the table already has data in it. The following script creates a copy of the sales table in the pubs database, adding an additional identity column to be the order ID for each row:
SELECT IDENTITY(int, 1, 1) AS OrderID, * INTO NewSales FROM Sales
BULK INSERT
SQL Server 2000 provides the BULK INSERT command for loading a flat file of data into a SQL Server table. However, it offers no corresponding command for copying data out to a file. The file to be copied in must be either local or available via a UNC name. Here's the general syntax for BULK INSERT:
BULK INSERT [['database_name'.]['owner'].]{'table_name' FROM data_file} [WITH ( [ BATCHSIZE [ = batch_size]] [[,] CODEPAGE [ = ACP | OEM | RAW | code_page]] [[,] CHECK_CONSTRAINTS] [[,] DATAFILETYPE [ = {'char' | 'native' | 'widechar' | 'widenative'}]] [[,] FIELDTERMINATOR [ = 'field_terminator']] [[,] FIRETRIGGERS] [[,] FIRSTROW [ = first_row]] [[,] FORMATFILE [ = 'format_file_path']] [[,] KEEPIDENTITY] [[,] KILOBYTES_PER_BATCH [ = kilobytes_per_batch]] [[,] KEEPNULLS] [[,] LASTROW [ = last_row]] [[,] MAXERRORS [ = max_errors]] [[,] ORDER ({column [ASC | DESC]} [, ...n])] [[,] ROWTERMINATOR [ = 'row_terminator']] [[,] TABLOCK] ) To use the BULK INSERT command, the table must already exist. The number and datatypes of the columns must be compatible with the data in the file that you plan to copy in.
Here's a simple example to give you a feel for what this command can do:
Create a simple table in the pubs database using the following batch:
USE pubs CREATE TABLE mybcp ( col1 char(3), col2 INT )
Use your favorite editor (such as Notepad) to save a text file named mydata.txt to the root directory of drive C. Include the following text:
abc,1;def,2;ghi,3;
Load the file into the table using the following Transact-SQL statement:
BULK INSERT pubs.dbo.mybcp FROM 'c:\mydata.txt' WITH (DATAFILETYPE = 'char', FIELDTERMINATOR = ',', ROWTERMINATOR = ';')
NOTE
The data file must specify a valid path from the machine on which the SQL Server is running. If the file is a remote file, you must specify a UNC name.
As the syntax specification shows, the BULK INSERT command has quite a few possible arguments. These arguments are described in the online documentation, but because some of their descriptions might be unclear, I'll give you the highlights in Table 9-2.
Table 9-2. Some of the BULK INSERT command arguments.
| Argument | Description |
|---|---|
| BATCHSIZE | Each batch is copied to the server as a single transaction. If an entire batch is successfully loaded, the data is immediately written to disk. If a server failure occurs in the middle of a batch, all rows in that batch will be lost but all rows up to the end of the previous batch will still be available. By default, all data in the specified data file is one batch. |
| ORDER (column_list) where column_list = {column [ASC | DESC] [,…n]} | The data file is already sorted by the same columns in column_list as the destination table. A clustered index on the same columns, in the same order as the columns in column_list, must already exist in the table. Using a sorted data file can improve the performance of the BULK INSERT command. By default, BULK INSERT assumes that the data file is unordered. |
| TABLOCK | A table-level lock is acquired for the duration of the bulk copy. It improves performance because of reduced lock contention on the table. This special kind of BulkUpdate lock is primarily compatible only with other BulkUpdate locks, so a table can be loaded quickly using multiple clients running BULK INSERT in parallel. By default, no table-level lock is acquired. You can still run parallel BULK INSERTs, but their performance will be much slower, similar to running individual INSERT statements. (Chapter 14 covers locking in detail.) |
| CHECK_CONSTRAINTS | Any constraints on the table are applied during the bulk copy. By default, constraints aren't enforced, except for PRIMARY KEY and UNIQUE constraints. Applying constraints can have several benefits and is the recommended approach. By checking the constraints on the data, you know that the data you load will be valid. In addition, SQL Server might be able to better optimize the entire operation because it has advance knowledge of the kind of data that will be loaded. |
| FIRE_TRIGGERS | Any INSERT triggers on the destination table will execute during the bulk copy operations. By default, no triggers will execute. If FIRE_TRIGGERS is specified, any bulk load will be fully logged no matter what recovery mode your SQL Server is in. (I'll discuss why triggers required fully logged INSERTs in Chapter 12.) |
Unlike for previous versions of SQL Server, I don't always recommend that you drop all your indexes before running the BULK INSERT operation (or the BCP command, described in the next section). In many cases, the copy operation doesn't perform noticeably better if a table has no indexes, so you should usually leave your indexes on a table while copying data into it. The only exception is when you want to have multiple clients load data into the same table simultaneously; in that case, you should drop indexes before loading the data.
When SQL Server executes a BULK INSERT operation, the rows of data go straight into the server as an OLE DB row set. The functionality of a BULK INSERT operation is quite similar to that of the command-line utility BCP. In contrast to the BULK INSERT operation, BCP data is sent to SQL Server as a Tabular Data Stream (TDS) result set and flows through network protocols and Microsoft Open Data Services (ODS). This can generate a lot of additional overhead, and you might find that BULK INSERT is up to twice as fast as BCP for copying data into a table from a local file.
Tools and Utilities Related to Multiple-Row Inserts
INSERT and BULK INSERT aren't the only ways to get data into SQL Server tables. SQL Server also provides some tools and utilities for loading tables from external sources. I'll mention them briefly here.
Bulk copy libraries, SQL-DMO objects, and BCP.EXE The ODBC standard doesn't directly support SQL Server bulk copy operations. When it runs against SQL Server version 2000, however, the SQL Server 2000 ODBC driver supports a set of older DB-Library functions that perform SQL Server bulk copy operations. The specialized bulk copy support requires that the following files be available: odbcss.h, odbcbcp.lib, and odbcbcp.dll.
The BCP.EXE command-line utility for SQL Server 2000 is written using the ODBC bulk copy interface. This utility has little code other than the code that accepts various command-line parameters and then invokes the functions of the bcp library. I won't go into the details of BCP.EXE except to say that it was built for function, not form. It's totally command-line driven. If you're a fan of UNIX utilities, you'll love it. The possible arguments are similar to those for the BULK INSERT command, and you can find a complete description in the online documentation.
The SQL-DMO BulkCopy object ultimately invokes these same bcp functions, but it provides some higher-level methods and ease of use within the world of COM (Component Object Model) objects. The BulkCopy object represents the parameters of a single bulk-copy command issued against SQL Server.
The BulkCopy object doesn't have a place in the SQL-DMO object tree. Instead, it is used as a parameter to the ImportData method of the Table object and the ExportData method of the Table and View objects.
Data Transformation Services One of the most exciting tools available with SQL Server 2000 is Data Transformation Services (DTS). Using this tool, you can import and export data to and from any OLE DB or ODBC data source. You can do a straight copy of the data, or you can transform the data using simple SQL statements or procedures. Alternatively, you can execute a Microsoft ActiveX script that modifies (transforms) the data when it is copied from the source to the destination, or you can perform any operation supported by the Microsoft JScript, PerlScript, or Microsoft Visual Basic Script (VBScript) languages.
Unlike the BCP and BULK INSERT operations, DTS creates the destination table for you as part of the copying operation and allows you to specify the exact column names and datatypes (depending on what the destination data store allows). DTS is installed by default with a standard SQL Server setup, and complete documentation is available in SQL Server Books Online.
Copy SQL Server Objects SQL Server Enterprise Manager puts an easy-to-use graphical interface on top of the SQL-DMO BulkCopy object to make it easy to transfer data between two SQL Server installations. This provides the same functionality as the SQL Transfer Manager utility or the transfer management interface in earlier versions of SQL Server. The tool allows you to transfer all objects—not just data, but stored procedures, rules, constraints, and so on—but only when moving from one SQL Server database to another. The Copy SQL Server Objects tool is accessible as a task from the DTS Package Designer.
UPDATE
UPDATE, the next data modification statement, changes existing rows. Usually, UPDATE contains a WHERE clause that limits the update to only a subset of rows in the table. (The subset can be a single row, as would be the case when testing for equality with the primary key values in the WHERE clause.) If no WHERE clause is provided, UPDATE changes every row in the table. You can use the @@ROWCOUNT system function to determine the number of rows that were updated.
Here's the basic UPDATE syntax:
UPDATE {table_name | view_name} SET column_name1 = {expression1 | NULL | DEFAULT | (SELECT)} [, column_name2 = {expression2 | NULL | DEFAULT | (SELECT)} [ ,...n ] WHERE {search_conditions} Columns are set to an expression. The expression can be almost anything that returns a scalar value—a constant, another column, an arithmetic expression, a bunch of nested functions that end up returning one value, a local variable, or a system function. You can set a column to a value conditionally determined using the CASE expression or to a value returned from a subquery. You can also set columns to NULL (if the column allows it) or to DEFAULT (if a default is declared or if the column allows NULL), much like you can with the INSERT statement.
You can set multiple columns in a single UPDATE statement. Like a multiple-row INSERT, an UPDATE that affects multiple rows is an atomic operation: if a single UPDATE statement affects multiple rows and one row fails a constraint, all the changes made by that statement are rolled back.
The following simple UPDATE statements should be self-explanatory. Later in this chapter, I'll show you some that aren't this simple and intuitive.
-- Change a specific employee's last name after his marriage UPDATE employee SET lname='Thomas-Kemper' WHERE emp_id='GHT50241M' -- Raise the price of every title by 12% -- No WHERE clause, so it affects every row in the table UPDATE titles SET price=price * 1.12 -- Publisher 1389 was sold, changing its name and location. -- All the data in other tables relating to pub_id 1389 is -- still valid; only the name of the publisher and its -- location have changed. UPDATE publishers SET pub_name='O Canada Publications', city='Victoria', state='BC', country='Canada' WHERE pub_id='1389' -- Change the phone number of authors living in Gary, IN, -- back to the DEFAULT value UPDATE authors SET phone=DEFAULT WHERE city='Gary' AND state='IN'
Advanced UPDATE Examples
You can go well beyond these UPDATE examples, however, and use subqueries, the CASE expression, and even joins in specifying search criteria. (Chapter 10 covers CASE in depth.) For example, the following UPDATE statement is like a correlated subquery. It sets the ytd_sales field of the titles table to the sum of all qty fields for matching titles:
UPDATE titles SET titles.ytd_sales=(SELECT SUM(sales.qty) FROM sales WHERE titles.title_id=sales.title_id)
In the next example, you can use the CASE expression with UPDATE to selectively give pay raises based on an employee's review rating. Assume that reviews have been turned in and big salary adjustments are due. A review rating of 4 doubles the employee's salary. A rating of 3 increases the salary by 60 percent. A rating of 2 increases the salary by 20 percent, and a rating lower than 2 doesn't change the salary.
UPDATE employee_salaries SET salary = CASE review WHEN 4 THEN salary * 2.0 WHEN 3 THEN salary * 1.6 WHEN 2 THEN salary * 1.2 ELSE salary END
Forcing the Use of Defaults
Notice the use of the keyword DEFAULT in the last example. Sometimes you'll want to stamp a table with the name of the user who last modified the row or with the time it was last modified. You could use system functions, such as SUSER_SNAME or GETDATE, as the DEFAULT value, and then specify that data modification be done only via stored procedures that explicitly update such columns to the DEFAULT keyword. Or you can make it policy that such columns must always be set to the DEFAULT keyword in the UPDATE statement, and then you can monitor this by also having a CHECK constraint on the same column that insists that the value be equal to that which the function returns. (If you use GETDATE, you'll probably want to use it in conjunction with other string and date functions to strip off the milliseconds and avoid the possibility that the value from the DEFAULT might be slightly different than that in the CHECK.) Here's a sample using SUSER_SNAME:
CREATE TABLE update_def ( up_id int PRIMARY KEY, up_byname varchar(30) NOT NULL DEFAULT SUSER_SNAME() CHECK (up_byname=SUSER_SNAME()) -- Assume other columns would be here ) GO UPDATE update_def SET -- SET other columns to their value here, and then append the -- following up_byname=DEFAULT WHERE up_id=1 GO
DELETE
DELETE, the last data manipulation statement, removes rows from a table. Once the action is committed, no undelete action is available. (If the statement is not wrapped in a BEGIN TRAN/COMMIT TRAN block, the COMMIT, of course, occurs by default as soon as the statement completes.) Because you delete only rows, not columns, you never specify column names in a DELETE statement as you do with INSERT or UPDATE. But in many other ways, DELETE acts much like UPDATE does—you specify a WHERE clause to limit the DELETE to certain rows. If you omit the WHERE clause, every row in the table will be deleted. The system function @@ROWCOUNT keeps track of the number of rows deleted. You can delete through a view but only if the view is based on a single table. If you delete through a view, all the underlying FOREIGN KEY constraints on the table must still be satisfied in order for the delete to succeed.
Here's the general form of DELETE:
DELETE [FROM] {table_name | view_name} WHERE {search_conditions} The FROM preposition is ANSI standard, but its inclusion is always optional in SQL Server (similar to INTO with INSERT). The preposition must be specified per ANSI SQL. If the preposition is always needed, it is logically redundant, which is why SQL Server doesn't require it.
Here are some simple examples:
DELETE discounts -- Deletes every row from the discounts table but does not -- delete the table itself. An empty table remains. DELETE FROM sales WHERE qty > 5 -- Deletes those rows from the sales table that have a value for -- qty of 6 or more DELETE FROM WA_stores -- Attempts to delete all rows qualified by the WA_stores view, -- which would delete those rows from the stores table that have -- state of WA. This delete is correctly stated but would fail -- because of a foreign key reference.
TRUNCATE TABLE
In the first example, DELETE discounts deletes every row of that table. Every row is fully logged. SQL Server provides a much faster way to purge all the rows from the table. TRUNCATE TABLE empties the whole table by deallocating all the table's data pages and index pages. TRUNCATE TABLE is orders of magnitude faster than an unqualified DELETE against the whole table. Delete triggers on the table won't fire because the rows deleted aren't individually logged. If a foreign key references the table to be truncated, however, TRUNCATE TABLE won't work. And if the table is publishing data for replication, which requires the log records, TRUNCATE TABLE won't work.
Despite contrary information, TRUNCATE TABLE isn't really an unlogged operation. The deletions of rows aren't logged because they don't really occur. Rather, entire pages are deallocated. But the page deallocations are logged. If TRUNCATE TABLE were not logged, you couldn't use it inside transactions, which must have the capacity to be rolled back. Here's a simple example that shows that the action can indeed be rolled back:
BEGIN TRAN -- Get the initial count of rows SELECT COUNT(*) FROM titleauthor 25 TRUNCATE TABLE titleauthor -- Verify that all rows are now gone SELECT COUNT(*) FROM titleauthor 0 -- Undo the truncate operation ROLLBACK TRAN -- Verify that rows are still there after the undo SELECT COUNT(*) FROM titleauthor 25
Modifying Data Through Views
You can specify INSERT, UPDATE, and DELETE statements on views as well as on tables, although you should be aware of some restrictions and other issues. Modifications through a view end up affecting the data in an underlying base table (and only one such table) because views don't store data. All three types of data modifications work easily for single-table views, especially in the simplest case, in which the view exposes all the columns of the base table. But a single-table view doesn't necessarily have to expose every column of the base table—it can restrict the view to a subset of columns only.
If your views or your desired data modification statements don't meet the requirements for actually updating through the view, you can create INSTEAD OF TRIGGERS on a view. The code in an INSTEAD OF TRIGGER is executed instead of a specified modification operation, and this is the only kind of trigger you can place on a view. (The other kind of trigger is an AFTER TRIGGER.) For example, suppose you have a view based on a join between two tables, and you want to update columns in both tables. An INSTEAD OF TRIGGER on UPDATE of your view can issue two separate UPDATE statements so that both tables can actually be updated. I'll discuss INSTEAD OF TRIGGERS along with AFTER TRIGGERS in Chapter 12. The remaining discussion in this section will assume there are no INSTEAD OF TRIGGERS on your views and that you want to modify the base table data directly through the view.
For any direct modification, all the underlying constraints of the base table must still be satisfied. For example, if a column in the base table is defined as NOT NULL and doesn't have a DEFAULT declared for it, the column must be visible to the view and the insert must supply a value for it. If the column weren't part of the view, an insert through that view could never work because the NOT NULL constraint could never be satisfied. And, of course, you can't modify or insert a value for a column that's derived by the view, such as an arithmetic calculation or concatenation of two strings of the base table. (You can still modify the nonderived columns in the view, however.)
Basing a view on multiple tables is far less straightforward. You can issue an UPDATE statement against a view that is a join of multiple tables, but only if all columns being modified (that is, the columns in the SET clause) are part of the same base table. An INSERT statement can also be performed against a view that does a join only if columns from a single table are specified in the INSERT statement's column list. Only the table whose columns are specified will have a row inserted: any other tables in the view will be unaffected. A DELETE statement can't be executed against a view that's a join because entire rows are deleted and modifications through a view can affect only one base table. Because no columns are specified in a delete, which table would the rows be deleted from?
In the real world, you would probably have little use for an INSERT statement against a view with a join because all but one table in the underlying query would be totally ignored. But the insert is possible. The following simple example illustrates this:
CREATE TABLE one ( col11 int NOT NULL, col12 int NOT NULL ) CREATE TABLE two ( col21 int NOT NULL, col22 int NOT NULL ) GO CREATE VIEW one_two AS (SELECT col11, col12, col21, col22 FROM one LEFT JOIN two ON (col11=col21)) GO INSERT one_two (col11, col12) VALUES (1, 2) SELECT * FROM one_two
Here's the result:
col11 col12 col21 col22 ----- ----- ----- ----- 1 2 NULL NULL
Notice that this insert specifies values only for columns from table one, and only table one gets a new row. Selecting from the view produces the row only because LEFT OUTER JOIN is specified in the view. Because table two contains no actual rows, a simple equijoin would have found no matches. Although the row would still have been inserted into table one, it would have seemingly vanished from the view. You could specify the view as an equijoin and use WITH CHECK OPTION to prevent an insert that wouldn't find a match. But the insert must still affect only one of the tables, so matching rows would have to already exist in the other table. I'll come back to WITH CHECK OPTION in the next section; for now, here's how it would be specified:
CREATE VIEW one_two_equijoin AS (SELECT col11, col12, col21, col22 FROM one JOIN two ON (col11=col21)) WITH CHECK OPTION GO
If you try to specify all columns with either view formulation, even if you simply try to insert NULL values into the columns of table two, an error results because the single INSERT operation can't be performed on both tables. Admittedly, the error message is slightly misleading.
INSERT one_two (col11, col12, col21, col22) VALUES (1, 2, NULL, NULL) Server: Msg 4405, Level 16, State 2, Line 1 View or function 'one_two' is not updatable because the modification affects multiple base tables..
Similarly, a DELETE against this view with a join would be disallowed and results in the same message:
DELETE one_two Server: Msg 4405, Level 16, State 1, Line 1 View or function 'one_two' is not updatable because the modification affects multiple base tables referenced.
The UPDATE case isn't common, but it's somewhat more realistic. You'll probably want to avoid allowing updates through views that do joins (unless you have INSTEAD OF TRIGGERS), and the next example shows why.
Given the following view,
CREATE VIEW titles_and_authors AS ( SELECT A.au_id, A.au_lname, T.title_id, T.title FROM authors AS A FULL OUTER JOIN titleauthor AS TA ON (A.au_id=TA.au_id) FULL OUTER JOIN titles AS T ON (TA.title_id=T.title_id) )
selecting from the view
SELECT * FROM titles_and_authors
yields this:
au_id au_lname title_id title ----------- ------------- -------- ------------------------------ 172-32-1176 White PS3333 Prolonged Data Deprivation: Four Case Studies 213-46-8915 Green BU1032 The Busy Executive's Database Guide 213-46-8915 Green BU2075 You Can Combat Computer Stress! 238-95-7766 Carson PC1035 But Is It User Friendly? 267-41-2394 O'Leary BU1111 Cooking with Computers: Surreptitious Balance Sheets 267-41-2394 O'Leary TC7777 Sushi, Anyone? 274-80-9391 Straight BU7832 Straight Talk About Computers 409-56-7008 Bennet BU1032 The Busy Executive's Database Guide 427-17-2319 Dull PC8888 Secrets of Silicon Valley 472-27-2349 Gringlesby TC7777 Sushi, Anyone? 486-29-1786 Locksley PC9999 Net Etiquette 486-29-1786 Locksley PS7777 Emotional Security: A New Algorithm 648-92-1872 Blotchet-Halls TC4203 Fifty Years in Buckingham Palace Kitchens 672-71-3249 Yokomoto TC7777 Sushi, Anyone? 712-45-1867 del Castillo MC2222 Silicon Valley Gastronomic Treats 722-51-5454 DeFrance MC3021 The Gourmet Microwave 724-80-9391 MacFeather BU1111 Cooking with Computers: Surreptitious Balance Sheets 724-80-9391 MacFeather PS1372 Computer Phobic AND Non-Phobic Individuals: Behavior Variations 756-30-7391 Karsen PS1372 Computer Phobic AND Non-Phobic Individuals: Behavior Variations 807-91-6654 Panteley TC3218 Onions, Leeks, and Garlic: Cooking Secrets of the Mediterranean 846-92-7186 Hunter PC8888 Secrets of Silicon Valley 899-46-2035 Ringer MC3021 The Gourmet Microwave 899-46-2035 Ringer PS2091 Is Anger the Enemy? 998-72-3567 Ringer PS2091 Is Anger the Enemy? 998-72-3567 Ringer PS2106 Life Without Fear 341-22-1782 Smith NULL NULL 527-72-3246 Greene NULL NULL 724-08-9931 Stringer NULL NULL 893-72-1158 McBadden NULL NULL NULL NULL MC3026 The Psychology of Computer Cooking (30 rows affected)
The following UPDATE statement works fine because only one underlying table, authors, is affected. This example changes the author's name from DeFrance to DeFrance-Macy.
UPDATE TITLES_AND_AUTHORS SET au_lname='DeFrance-Macy' WHERE au_id='722-51-5454' (1 row(s) affected)
This UPDATE statement yields an error, however, because two tables from a view can't be updated in the same statement:
UPDATE TITLES_AND_AUTHORS SET au_lname='DeFrance-Macy', title='The Gourmet Microwave Cookbook' WHERE au_id='722-51-5454' and title_id='MC3021' Server: Msg 4405, Level 16, State 2, Line 1 View or function 'TITLES_AND_AUTHORS' is not updatable because the modification affects multiple base tables referenced.
If you created the view, it might seem obvious that the UPDATE statement above won't be allowed. But if the person doing the update isn't aware of the underlying tables—which a view does a great job of hiding—it will not be obvious why one UPDATE statement works and the other one doesn't.
Views that join multiple tables can be extremely useful for querying and are wonderful constructs that make querying simpler and less prone to bugs from misstated joins. But modifications against them are problematic. Even if you have created INSTEAD OF TRIGGERS, you still need to carefully plan exactly what the INSTEAD OF TRIGGER will do. If you do allow an update through a view that's a join, be sure that the relationships are properly protected via FOREIGN KEY constraints or triggers; otherwise, you'll run into bigger problems.
Suppose we want to change only the au_id column in the example view above. If the existing value in the underlying authors table is referenced by a row in titleauthor, such an update won't be allowed because it would orphan the row in titleauthor. The FOREIGN KEY constraint protects against the modification. But here, we'll temporarily disable the FOREIGN KEY constraint between titleauthor and titles:
ALTER TABLE titleauthor -- This disables the constraint NOCHECK CONSTRAINT ALL
Notice that although we'll be updating the authors table, the constraint we're disabling (the constraint that would otherwise be violated) is on the titleauthor table. New users often forget that a FOREIGN KEY constraint on one table is essentially a constraint on both the referencing table (here, titleauthor) and the referenced table (here, titles). With the constraint now disabled, we'll change the value of au_id through the view for the author Anne Ringer:
-- With constraint now disabled, the following update succeeds: UPDATE titles_and_authors SET au_id='111-22-3333' WHERE au_id='899-46-2035'
But look at the effect on the same SELECT of all rows in the view:
au_id au_lname title_id title ----------- ------------- -------- ------------------------------ 172-32-1176 White PS3333 Prolonged Data Deprivation: Four Case Studies 213-46-8915 Green BU1032 The Busy Executive's Database Guide 213-46-8915 Green BU2075 You Can Combat Computer Stress! 238-95-7766 Carson PC1035 But Is It User Friendly? 267-41-2394 O'Leary BU1111 Cooking with Computers: Surreptitious Balance Sheets 267-41-2394 O'Leary TC7777 Sushi, Anyone? 274-80-9391 Straight BU7832 Straight Talk About Computers 409-56-7008 Bennet BU1032 The Busy Executive's Database Guide 427-17-2319 Dull PC8888 Secrets of Silicon Valley 472-27-2349 Gringlesby TC7777 Sushi, Anyone? 486-29-1786 Locksley PC9999 Net Etiquette 486-29-1786 Locksley PS7777 Emotional Security: A New Algorithm 648-92-1872 Blotchet-Halls TC4203 Fifty Years in Buckingham Palace Kitchens 672-71-3249 Yokomoto TC7777 Sushi, Anyone? 712-45-1867 del Castillo MC2222 Silicon Valley Gastronomic Treats 722-51-5454 DeFrance-Macy MC3021 The Gourmet Microwave 724-80-9391 MacFeather BU1111 Cooking with Computers: Surreptitious Balance Sheets 724-80-9391 MacFeather PS1372 Computer Phobic AND Non-Phobic Individuals: Behavior Variations 756-30-7391 Karsen PS1372 Computer Phobic AND Non-Phobic Individuals: Behavior Variations 807-91-6654 Panteley TC3218 Onions, Leeks, and Garlic: Cooking Secrets of the Mediterranean 846-92-7186 Hunter PC8888 Secrets of Silicon Valley NULL NULL MC3021 The Gourmet Microwave NULL NULL PS2091 Is Anger the Enemy? 998-72-3567 Ringer PS2091 Is Anger the Enemy? 998-72-3567 Ringer PS2106 Life Without Fear 111-22-3333 Ringer NULL NULL 341-22-1782 Smith NULL NULL 527-72-3246 Greene NULL NULL 724-08-9931 Stringer NULL NULL 893-72-1158 McBadden NULL NULL NULL NULL MC3026 The Psychology of Computer Cooking (31 rows affected)
Although we haven't added or deleted any rows, the view now produces 31 rows instead of 30 rows, as was the case earlier, because the outer join fabricates a row for the new au_id that has no match in the titles table. (It appears with NULL title fields.) Also notice that the two titles that matched the old au_id now have NULLs in their author fields. This might be comprehensible to someone who has a detailed understanding of the tables, but if the view is the only window for updating the table, it will be extremely confusing.
Even if your FOREIGN KEY constraint specifies that any updates are to be cascaded to the referencing tables, you'll still have the problem of affecting columns from more than one table without knowing which is which. In the example above, both the authors and titleauthor table have an au_id column, so we would have to make sure we knew which table was actually being updated through the view.
WITH CHECK OPTION
Earlier, you saw that modifying data with views based on one table is pretty straightforward—but there's one "gotcha" to think about: disappearing rows. By default, a view can allow an UPDATE or an INSERT even if the result is that the row no longer qualifies for the view. Consider the following view, which qualifies only stores in the state of Washington:
CREATE VIEW WA_stores AS SELECT * FROM stores WHERE state='WA' GO SELECT stor_id, stor_name, state FROM WA_stores
Here's the result:
stor_id stor_name state ------- ------------------------------------ ----- 6380 Eric the Read Books WA 7131 Doc-U-Mat: Quality Laundry and Books WA (2 rows affected)
The following UPDATE statement changes both qualifying rows so that they no longer satisfy the view's criteria and have seemingly disappeared:
UPDATE WA_stores SET state='CA' SELECT stor_id, stor_name, state FROM WA_stores
Here's the result:
stor_id stor_name state ------- --------- ----- (0 rows affected)
Modifications you make against a view without WITH CHECK OPTION can result in rows being added or modified in the base table, but the rows can't be selected from the view because they don't meet the view's criteria. The rows seem to disappear, as the example above illustrates. For users who realize that WA_stores is a view and who understand exactly how views work, this might not be a big problem. But if your environment attempts to have users treat views as if they were actually tables, having an UPDATE statement cause rows to disappear can be very disconcerting.
If you allow data to be modified through a view that uses a WHERE clause and you want your views to act exactly as if they were tables, consider using WITH CHECK OPTION when you define the view. In fact, I think it would be better if WITH CHECK OPTION were the default behavior. But the behavior described above is in accordance with the ANSI and ISO SQL standards, and the expected result is that the disappearing row phenomenon can occur unless WITH CHECK OPTION is specified. Of course, any modifications you make through the view must also satisfy the constraints of the underlying table or else the statement will be aborted. This is true whether or not WITH CHECK OPTION is declared.
The following example shows how WITH CHECK OPTION protects against the disappearing rows phenomenon:
CREATE VIEW WA_stores AS SELECT * FROM stores WHERE state='WA' WITH CHECK OPTION GO UPDATE WA_stores SET state='CA'
Here's the result:
Server: Msg 550, Level 16, State 1, Line 1 The attempted insert or update failed because the target view either specifies WITH CHECK OPTION or spans a view that specifies WITH CHECK OPTION and one or more rows resulting from the operation did not qualify under the CHECK OPTION constraint. The statement has been terminated. SELECT stor_id, stor_name, state FROM WA_stores
And here's the final result:
stor_id stor_name state ------- ------------------------------------ ----- 6380 Eric the Read Books WA 7131 Doc-U-Mat: Quality Laundry and Books WA (2 rows affected)
Reenabling Integrity Constraints
To demonstrate a point in the preceding section, we disabled foreign key checks on the titleauthor table. When you're reenabling constraints, make sure that no rows violate the constraints. By default, when you add a new constraint, SQL Server automatically checks for violations, and the constraint won't be added until the data is cleaned up and such violations are eliminated. You can suppress this check by using the NOCHECK option. With this option, when you reenable an existing constraint that has just been disabled, SQL Server doesn't recheck the constraint's relationships.
After reenabling a disabled constraint, adding a new constraint with the NOCHECK option, or performing a bulk load operation without specifying the CHECK CONSTRAINTS option, you should check to see that constraints have been satisfied.
You can query for constraint violations using subqueries of the type discussed in Chapter 7. You must formulate a separate query to check for every constraint, which can be tedious if you have many constraints. Alternatively, you can execute DBCC CHECKCONSTRAINTS, as you'll see shortly.
In an earlier example, we disabled the constraints on the titleauthor table and updated one row in such a way that the FOREIGN KEY constraint was violated. Here's an example that reenables the constraints on titleauthor and then runs DBCC CHECKCONSTRAINTS, which reveals the constraint failure:
-- Reenable constraints. Note that this does not check the validity -- of the constraints. ALTER TABLE titleauthor CHECK CONSTRAINT ALL GO DBCC CHECKCONSTRAINTS (titleauthor) RESULT: Table Constraint Where ------------ ------------------------------- ---------------------- titleauthor FK__titleauth__au_id__07020F21 au_id = '899-46-2035'
The constraint failure occurred because of the foreign key reference to the authors table. The output shows which value(s) in titleauthor has no matching value in authors. In earlier versions of SQL Server, you could actually issue a dummy UPDATE statement that set the column with the constraint to itself, as in this example:
UPDATE titleauthor SET au_id = au_id
This would cause SQL Server to verify constraints on the au_id column and detect that there was an unmatched foreign key. However, in SQL Server 2000, the optimizer will detect that this operation is really not doing anything, so no plan is generated, no UPDATE is carried out, and no constraints are checked. DBCC CHECKCONSTRAINTS performs all the validation you need.
EAN: 2147483647
Pages: 179