Section 5.13. Visual Basic Programming in a Windows Application
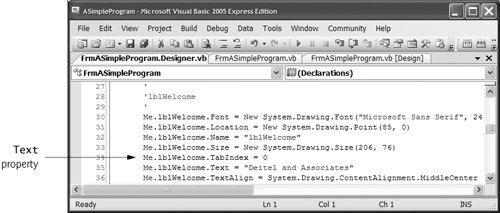
5.13. Visual Basic Programming in a Windows ApplicationIn chapter 2, we showed how to create a simple GUI application using visual programmingthat is, defining the appearance of an application by dragging and dropping GUI controls onto a Form and setting properties in design mode without writing any program code. The application you created in Chapter 2 (Fig. 2.27) displayed text and an image, but did not perform any other actions. In Chapters 3, 4 and 5 we have focused on console applications, which do not provide a GUI but perform various actions, such as finding the average of several grades and displaying the results as text in the command prompt. Most Visual Basic programmers use a combination of visual programming and conventional programming techniques. In this section, you will see that when you build a GUI, Visual Basic code (which makes use of predefined FCL classes) is generated by the IDE to define that GUI. You will modify a GUI control's property programmatically, causing the text displayed on the Form to change at runtime. You will also add code to a GUI application to perform an action when the Form is loaded. Before proceeding, load the project ASimpleProgram from your Chapter 4 examples folder into the IDE. This is the same program as the one you created in Chapter 2. Change the name of the file from Form1.vb to FrmASimpleProgram.vb to enhance clarity. Then double click this file in the Solution Explorer to open the file in design mode. Select the Form by clicking it. Notice in the Properties window that Visual Basic changed the Form's name to FrmASimpleProgram when you changed the name of the file from Form1.vb to FrmASimpleProgram.vb. Next, let's change the name of the Form's controls for clarity. To do this, simply select the control, and modify the Name property (listed in the Properties window as (Name)), entering the new identifier you want to represent the control. Use this technique to change the name of the Label to lblWelcome and the name of the PictureBox to picBug. This enables us to easily identify the Form's controls in the program code. Viewing Windows-Generated CodeLet us view the code that defines our Windows application. When you use visual programming to create a program's GUI, the IDE generates the Visual Basic code that defines how the GUI appears. The code that defines the GUI application is stored in two filesone to define the initial appearance of the GUI (e.g., the background color of the Form or the size of a Label), and one to define the behavior of the GUI (i.e., what happens when a Button is clicked or text is entered in a TextBox). Unlike a console application's code, a Windows application's program code is not displayed initially in the editor window. Once you open the file FrmASimpleProgram.vb in design mode, you can view the code by selecting View > Code. Figure 5.19 shows the code editor displaying the program code. This is the file that defines your GUI's behavior. Figure 5.19. IDE showing program code for ASimpleProgram.vb. Note that FrmASimpleProgram.vb does not contain a Module. Instead Windows applications use classes. You have used FCL classes, such as Console and MessageBox, and you have created your own classes in Chapters 4 and 5. The class declared in Fig. 5.19 is called FrmASimpleProgram and is currently empty, as we have not yet defined the application's behavior. Recall that the application's initial GUI appearance is defined in another file. To view that file, go into the Solution Explorer and click the Show All Files button. Then click the plus sign to the left of FrmASimpleProgram.vb, and double click FrmASimpleProgram.Designer.vb. The file is shown in Fig. 5.20. Figure 5.20. Windows Form Designer generated code.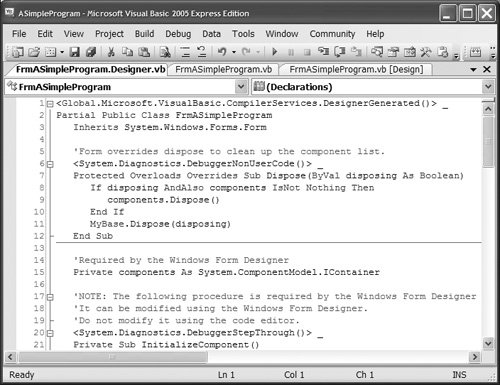 This code appears complex (and especially so for this early in the book), but it is created for you by the IDE, and normally you will not edit it. It is important for novice programmers to be aware of the code that the IDE generates, even though much of the code is not explained until Chapters 914. This type of code is present in every Windows application. If the IDE did not provide the code, you would have to write it, which would require a considerable amount of time and would be an error-prone process. Inheriting Predefined FunctionalityKeyword Inherits (line 3 of Fig. 5.20) indicates that the class FrmASimpleProgram inherits existing pieces from another class. The class from which FrmASimpleProgram inheritsSystem.Windows.Forms.Formappears to the right of the Inherits keyword. This is the class Form preceded by its namespace and a dot separator. The namespace and class name together form the class's fully-qualified name. In this inheritance relationship, Form is called the base class, and FrmASimpleProgram is called the derived class. This inheritance results in a FrmASimpleProgram class definition that has the attributes (data) and behaviors (methods) of class Form. Every Windows application consists of at least one class that inherits from class Form. A key benefit of inheriting from class Form is that someone else has previously defined everything about "what it means to be a Form." The Windows operating system expects every window, including Form, to have certain capabilities (attributes and behaviors). However, because class Form already provides these capabilities, you do not need to "reinvent the wheel" by defining all those capabilities yourself. In fact, class Form has over 200 methods! The use of Inherits to absorb the capabilities of class Form enables you to create Forms quickly and easily. When you created this application in Chapter2, you used the Properties window to set properties for the Form, Label and PictureBox. Once a property was set, the Form or control was updated immediately. Forms and controls contain a set of default values for their properties, which are displayed initially in the Properties window when a Form or control is selected. These default values provide the initial characteristics of a Form or control. When a control (such as a Label) is first placed on the Form, the IDE adds code to the class's designer file (e.g., FrmASimpleProgram.Designer.vb) that creates the control and sets some of the control's property values, such as the name of the control and its location on the Form. Figure 5.21 shows the portion of ASimpleProgram.Designer.vb that sets the lblWelcome's Font, Location, Name, Size, TabIndex, Text and TextAlign properties. These lines specify property values that are set when the Label is first placed on the Form, or edited by you in the Properties window (your line numbers may differ if you have made your own changes to the original application). The control contains many more propertiesthose not set in the code contain their default values. Recall from Chapter2 that you explicitly set values for the Label's Text and TextAlign properties. The values set in the Properties window are reflected in this code. Note that the code sets properties of control lblWelcome. Had we not updated the name of this control, every instance of the identifier lblWelcome would be replaced with its default name, in this case Label1. Figure 5.21. Property initializations generated by the Windows Form Designer for lblWelcome.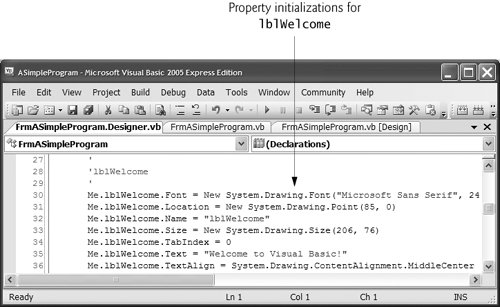 Modifying Properties in Design ViewThe values assigned to the properties are based on the values in the Properties window. We now demonstrate how the IDE updates the generated code when a control's property is modified. While performing the steps in this section, you must switch between code view and design view. To switch views, select the corresponding tabsFrmASimpleProgram.vb or FrmASimpleProgram.Designer.vb for code view (we will specify which file as necessary) and FrmASimpleProgram.vb [Design] for design view. Alternatively, you can select View > Code (for FrmASimpleProgram.vb) or View > Designer (for FrmASimpleProgram.vb [Design]). Now you will modify the application's code:
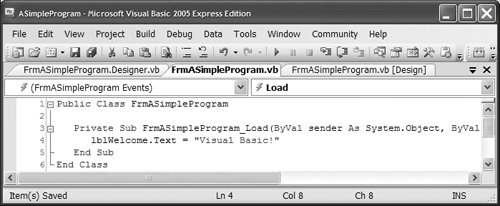
Modifying Properties ProgrammaticallyNow that you have seen how properties are updated in code in response to changes in the Properties window, we show how you can write code to modify a property. You'll also see how to specify code that executes when a GUI application loads.
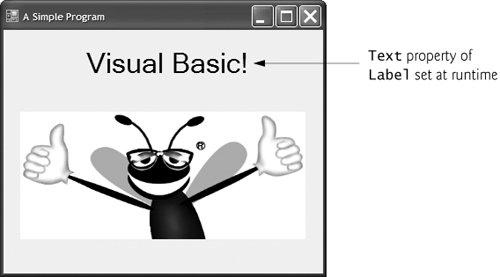
This example combined conventional programming and visual programming. We provided a brief overview of the code that the IDE generates for a Windows application, and showed how to add code that performs actions when the application's Form loads. The topics covered in this section provide a basis for the more complex GUI applications that you'll create throughout this book. Our next GUI program appears in Chapter 7, which finds the maximum of three input values. The user enters input into TextBoxes then clicks a Button to indicate that the application should determine and display the maximum value. |
EAN: 2147483647
Pages: 435
- Step 1.2 Install SSH Windows Clients to Access Remote Machines Securely
- Step 3.1 Use PuTTY as a Graphical Replacement for telnet and rlogin
- Step 3.4 Use PuTTYs Tools to Transfer Files from the Windows Command Line
- Step 6.1 Port Forwarding
- Step 6.2 Using Port Forwarding Within PuTTY to Read Your E-mail Securely