Section 14.2. Menus
14.2. MenusMenus provide groups of related commands for Windows applications. Although commands vary between applications, somesuch as Open and Save are common to many applications. Menus organize commands without "cluttering" the application's user interface. In Fig. 14.1, an expanded menu from Visual Basic 2005 Express lists various commands (called menu items), plus submenus (menus within a menu). Menu items are typically displayed down and indented to the right of the top-level menu, but they can be displayed to the left if there is not enough space to the right. The menu that contains a menu item is called the menu item's parent menu. A menu item that contains a submenu is considered to be the parent of the submenu. Figure 14.1. Menus, submenus, menu items and menu icons.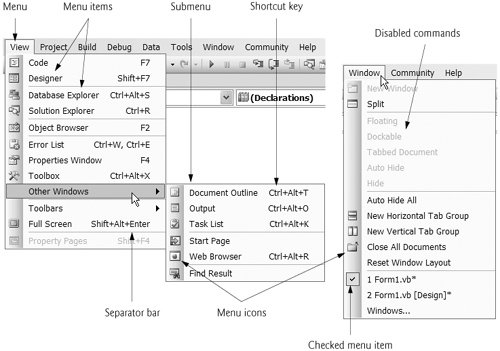 All menu items can have Alt key shortcuts (also called access shortcuts or hotkeys), which are accessed by pressing Alt and the underlined letter (for example, Alt F typically expands the File menu). Menus that are not top-level menus can have shortcut keys as well (combinations of Ctrl, Shift, Alt, F1, F2, letter keys, etc.). Some menu items display check marks, usually indicating that multiple options on the menu can be selected at once. To create a menu, open the Toolbox and drag a MenuStrip control onto the Form. This creates a menu bar across the top of the Form (below the title bar) and places a MenuStrip icon in the component tray. To select the MenuStrip, click this icon. You can now use Design mode to create and edit menus for your application. Menus, like other controls, have properties and events, which can be accessed through the Properties window. To add menu items to the menu, click the Type Here TextBox (Fig. 14.2) and type the menu item's name. This action adds an entry to the menu of type ToolStripMenuItem. After you press the Enter key, the menu item name is added to the menu. Additional Type Here TextBoxes appear, allowing you to add items underneath or to the right of the original menu item (Fig. 14.3). Figure 14.2. Editing menus in Visual Studio.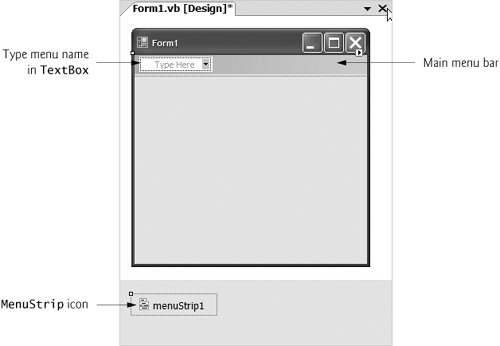 Figure 14.3. Adding ToolStripMenuItems to a MenuStrip.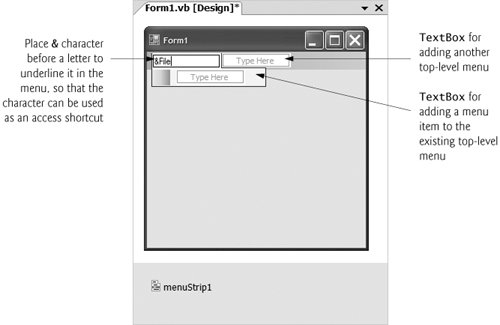 To create an access shortcut (or keyboard shortcut), type an ampersand (&) before the character to be underlined. For example, to create the File menu item with the letter F underlined, type &File. To display an ampersand, type & &. To add other shortcut keys (like those shown in Fig. 14.1) for menu items, set the ShortcutKeys property of the appropriate ToolStripMenuItems. To do this, select the down arrow to the right of this property in the Properties window. In the window that appears (Fig. 14.4), use the CheckBoxes and drop-down list to select the shortcut keys. When you are finished, click elsewhere on the screen. You can hide the shortcut keys by setting property ShowShortcutKeys to False, and you can modify how the control keys are displayed in the menu item by modifying property ShortcutKeyDisplayString. Figure 14.4. Setting a menu item's shortcut keys.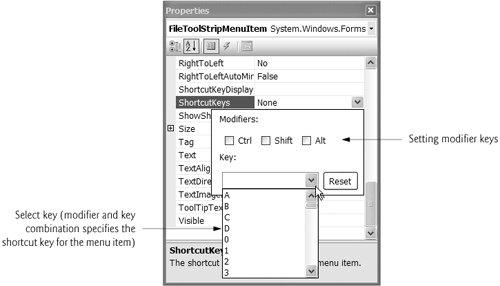 Look-and-Feel Observation 14.1
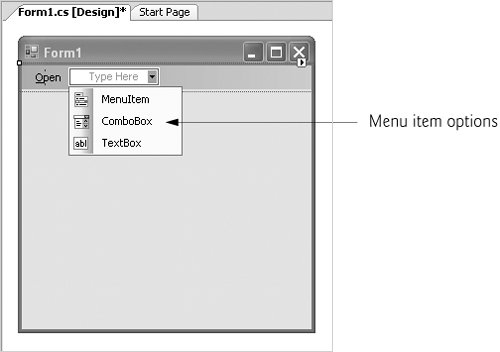
You can remove a menu item by selecting it and pressing the Delete key. Menu items can be grouped logically by separator bars, which are inserted by right clicking a menu item and selecting Insert > Separator or by typing "-" for the text of a menu item. You can also add TextBoxes and ComboBoxes (drop-down lists) as menu items. When adding an item in Design mode, you may have noticed that before you click to enter text for a new item, you are provided with a drop-down list. Clicking the down arrow (Fig. 14.5) allows you to select the type of item to addMenuItem (of type ToolStripMenuItem, the default), ComboBox (of type ToolStripComboBox) and TextBox (of type ToolStripTextBox). We focus on ToolStripMenuItems. [Note: If you view this drop-down list for menu items that are not on the top level, a fourth option appears, allowing you to insert a separator bar.] Figure 14.5. Menu item options. ToolStripMenuItems generate a Click event when selected. To create an empty Click event handler, double click the menu item in Design mode. Common actions in response to these events include displaying dialogs and setting application properties. Common menu properties and a common event of MenuStrip and ToolStripMenuItem are summarized in Fig. 14.6.
Look-and-Feel Observation 14.2
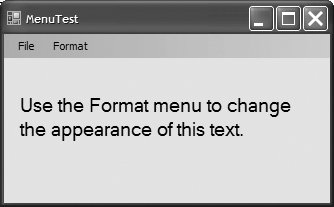
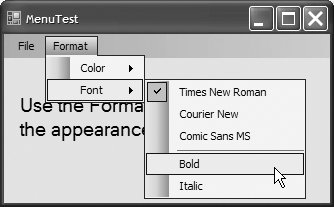
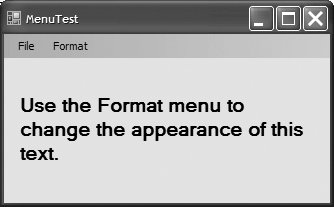
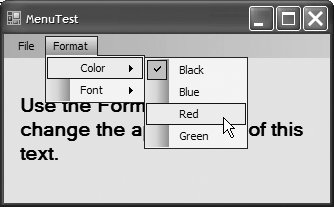
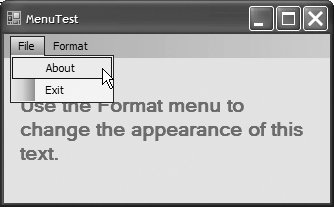
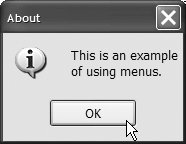
Class FrmMenuTest (Fig. 14.7) creates a simple menu on a Form. The Form has a top-level File menu with menu items About (which displays a MessageBox) and Exit (which terminates the program). The program also includes a Format menu, which contains menu items that change the format of the text on a Label. The Format menu has submenus Color and Font, which change the color and font of the text on a Label. Figure 14.7. Menus for changing text font and color.
To create this GUI, begin by dragging the MenuStrip from the ToolBox onto the Form. Then use Design mode to create the menu structure shown in the sample outputs. The File menu (fileToolStripMenuItem) has menu items About (aboutToolStripMenuItem) and Exit (exitToolStripMenuItem); the Format menu (formatToolStripMenuItem) has two submenus. The first submenu, Color (colorToolStripMenuItem), contains menu items Black (blackToolStripMenuItem), Blue (blueToolStripMenuItem), Red (redToolStripMenuItem) and Green (greenToolStripMenuItem). The second submenu, Font (fontToolStripMenuItem) contains menu items Times New Roman (timesToolStripMenuItem), Courier New (courierToolStripMenuItem), Comic Sans MS (comicToolStripMenuItem), a separator bar (dashToolStripMenuItem), Bold (boldToolStripMenuItem) and Italic (italicToolStripMenuItem). The About menu item in the File menu displays a MessageBox when clicked (lines 612). The Exit menu item closes the application through Shared method Exit of class Application (line 19). Class Application's Shared methods control program execution. Method Exit causes our application to terminate. We made the items in the Color submenu (Black, Blue, Red and Green) mutually exclusivethe user can select only one at a time (we explain how we did this shortly). To indicate that a menu item is selected, we will set each Color menu item's Checked property to true. This causes a check to appear to the left of a menu item. Each Color menu item has its own Click event handler. The event handler for color Black is blackToolStripMenuItem_Click (lines 3239). Similarly, the event handlers for colors Blue, Red and Green are blueToolStripMenuItem_Click (lines 4249), redToolStripMenuItem_Click (lines 5259) and greenToolStripMenuItem_Click (lines 6269), respectively. The Color menu items must be mutually exclusive, so each event handler calls method ClearColor (lines 2329) before setting its corresponding Checked property to TRue. Method ClearColor sets the Checked property of each color MenuItem to False, effectively preventing more than one menu item from being selected at a time. In the designer, we initially set the Black menu item's Checked property to true, because at the start of the program, the text on the Form is black. Software Engineering Observation 14.1
The Font menu contains three menu items for fonts (Times New Roman, Courier New and Comic Sans MS) and two menu items for font styles (Bold and Italic). We added a separator bar between the font and font-style menu items to indicate that these are separate options. A Font object can specify only one font at a time but can set multiple styles at once (e.g., a font can be both bold and italic). We set the font menu items to display checks. As with the Color menu, we must enforce mutual exclusion of these items in our event handlers. Event handlers for font menu items Times New Roman, Courier New and Comic Sans MS are timesToolStripMenuItem_Click (lines 7989), courierToolStripMenuItem_Click (lines 92102) and comicToolStripMenuItem_Click (lines 105115), respectively. These event handlers behave in a manner similar to that of the event handlers for the Color menu items. Each event handler clears the Checked properties for all the font menu items by calling method ClearFont (lines 7276), then sets to true the Checked property of the menu item that raised the event. This enforces the mutual exclusion of the font menu items. In the designer, we initially set the Times New Roman menu item's Checked property to true, because this is the original font for the text on the Form. The event handlers for the Bold and Italic menu items (lines 118127 and 130140) use the Xor operator to combine font styles, as we discussed in Chapter 13. | |||||||||||||||||||||||||||||||||||||
EAN: 2147483647
Pages: 435
