Access Data Projects
Very few developers would dispute the fact that Microsoft is evolving Access toward greater integration with SQL Server. Access 2002 introduced Access Data Projects to facilitate this. This is a new file type, with the file extension of .adp, which creates a common ground between SQL Server and traditional .mdb files. Prior to Access 2000, you had to create linked tables from Access to SQL Server.
Beginning with Access 2003, ADP files can create actual SQL Server objects while still working in the familiar Access GUI environment. In simpler terms, Access is serving as the GUI for SQL Server. In addition, features have been added to SQL Server to make it more Access-like. As an example, Figure 19-1 shows the Table Design window in SQL Server. While it is not identical, it is remarkably close to the Table Design window in Access.
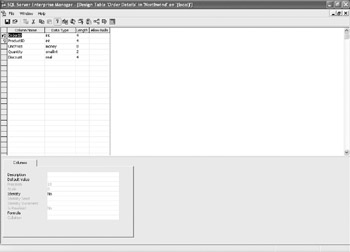
Figure 19-1: Table Design window in SQL Server
Because of this evolving integration, upsizing (the term used when migrating from Access to SQL Server) is not as daunting a task as you may think. As we move through this chapter, we will examine the upsizing mechanics. As you will see, it is not simply a matter of opening the file with a different program.
When a database is created in SQL Server, two files are created (as opposed to the single .mdb file of Access). The first has the file extension .mdf, and the second has the file extension .ldf.
The .mdf file contains the database that SQL Server will be using. The .ldf file contains a log of all the actions, or transactions, that have taken place in the database. In other words, it provides a history of what occurred within the database. A full discussion of how to use these files is well beyond the scope of this book. As a matter of fact, it would probably be a book in itself.
An Access Data Project, or ADP, allows you to use the easy-to-use features of Access to access the data in the SQL Server engine. The ADP file stores all of the objects created in Access (forms, reports, VBA code, etc.). The data itself is held on SQL Server. Note that ADP files will work only with SQL Server. If the data is stored on another database management system, such as Oracle, ADP cannot access it. However, SQL Server does have tools for accessing data in other systems.
Matters such as security, stored procedures (a stored procedure is precompiled SQL), functions, and views are handled by SQL Server.
Upsizing Your Access Database
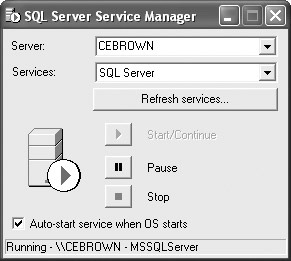
Before you begin, you must make sure that SQL Server is up and running. If you installed it, you should see an icon in the Windows System Tray, which, if you double-click on it, should open the SQL Server Service Manager shown here.
You should also insure that each table in your Access database has a primary key. If a table does not, SQL Server will upsize the table in a read-only mode. Also, make sure that none of the object names (tables, forms, fields, etc.) have spaces in them. If they do, you would need to refer to them with the use of square brackets in SQL Server. For instance, if you were referring to a table called Address Book, you would need to use [Address Book] because of the space.
One invaluable tool that many developers use is SSW Upsizing Pro. This is a third-party tool that will analyze the existing Access database for potential problems before the upsizing process begins. You can get details and obtain a trial version at http://www.ssw.com.au/ssw/UpsizingPRO/. While the tool is not inexpensive, it could save you hours of troubleshooting.
Once the database is ready for conversion, you use Access itself to perform the conversion to a SQL Server database. Click Tools | Database Utilities | Upsizing Wizard from within Access. You should now see step 1 of the Upsizing Wizard.
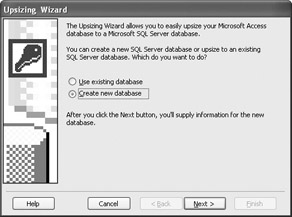
Here you can either create a new SQL Server database or use an existing one. In most cases, you are going to create a new SQL Server database to put your existing Access database into.
When you select Next, you should see step 2 of the wizard, shown here.
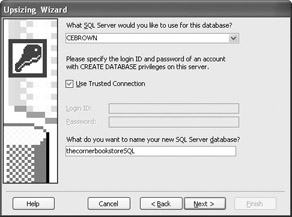
You need to select the name of the server where SQL Server resides. In most cases, there is only one name. However, in very large applications, there could be multiple instances of SQL Server. You also need to provide a name for your database. By default, the wizard uses the name of the Access database with the string “SQL” appended to it.
Depending on permissions, you may need to provide a user ID and password to access SQL Server. If you are working with the Development Edition of SQL Server and just running it on your own computer, you could probably just use the Use Trusted Connection check box to access it through the Windows administrator.
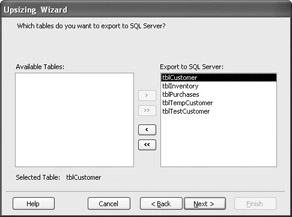
Once you complete the options, and select Next, you are asked to select the tables you want to upsize to SQL Server (step 3). In this example, I used the double right- pointing arrows to select all of the tables from the Access database.
Once the tables are selected, click Next. You are brought to the screen shown here.
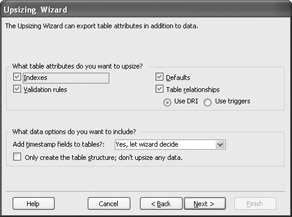
This allows you to select several additional options:
-
Indexes will convert your Access indexes (remember, a primary key is an index) into SQL Server-type indexes. SQL Server uses indexes a little differently, and searches, by leaving this option on, will be a lot more efficient.
-
Defaults will attempt to keep your field defaults when upsizing the tables. In most cases, it will work fine. However, if for some reason the wizard cannot upsize the default, the entire table will be skipped for upsizing. Again, a program such as SSW Upgrade Pro will flag potential problems.
-
Validation Rules will convert validation rules to SQL Server constraints if you select this option.
-
Table Relationships will retain the referential integrity of the database. This means it will keep cascading updates and deletions. DRI (Declarative Referential Integrity) is the same technique used by Access.
-
Timestamps allows SQL Server to add a Timestamp field to each table, which will be updated each time the data in the table is modified.
Finally, you have an option to upsize only the table structures and to leave the data behind. You would then need to import the data at some future date.
After you select Next, you are brought to step 5 of the Upsizing Wizard.
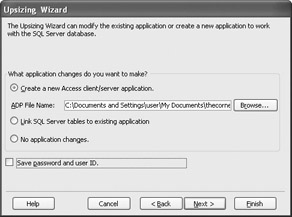
Again, you are presented with a variety of options:
-
Create a New Access Client/Server Application will move the tables into SQL Server and the user objects (forms, reports, and VBA code) into the ADP file. You can also browse to select the location for the new ADP file.
-
Link SQL Server Tables to Existing Applications will create two copies of the tables: the SQL Server tables and the original .mdb tables with the prefix _local added. Unless you are very familiar with SQL Server processes, I strongly suggest that you do not select this option and leave it set for Create a New Client/Server Application. It could create difficulties.
-
No Application Changes means that no changes will be made to the original .mdb file. All this will do is create the tables in SQL Server. There will be no connection between the original file and SQL Server. Again, I strongly suggest that you do not select this feature initially.
After selecting Next, you are brought to the final screen of the wizard.
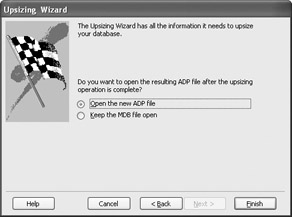
You can choose whether you want to open the new ADP file or stay in the existing MDB file. In this case, we are going to assume you want to open the ADP file.
After selecting Finish, the conversion begins. The process could take anywhere from several minutes to several hours, depending on the complexity of the database and the amount of data that needs to be upsized.
Upon completion, Access will produce a multipage report on the process. It is not a bad idea to print it out as a record. The report will also be kept as an Access Snapshot file in the same folder as the ADP file.
EAN: 2147483647
Pages: 214