Section 37. Use the Clone Brush


37. Use the Clone Brush

BEFORE YOU BEGIN

SEE ALSO

Open Photos in PhotoSuite

Fix Facial FlawsIncluding Red Eye

Clean and Fix a Damaged Photo

Edit Multiple Photos at Once


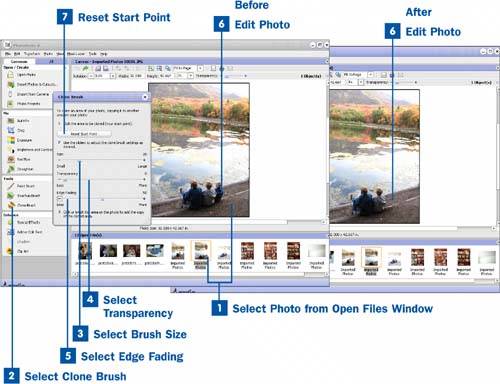
The Clone Brush is a lot of fun. You can use it to fix small blemishes or scratches or to remove unwanted objects from a photo. Sometimes an unwanted object is a personremember that horrible prom date? No problem.

The Clone Brush works by copying an area in the photo and pasting it in the area that you want to fix. The first time you click on your photo, you are setting the start point, or the area from which to copy. The next click copies the start point onto the area that you select. For example, in this photo I clicked on the lake and then began clicking over the head of the third boy to copy the lake into that space. As you continue to click, the clone tool follows so the area you are cloning over looks natural.

It takes a bit of practice, but the Clone Brush tool can accomplish some amazing things.

Use the Clone Brush


Select Photo from Open Files Window

From within PhotoSuite, choose the photo from the Open Files window at the bottom of the screen on which to remove dust or scratches.

Select Clone Brush

From the Tools menu in the tasks pane, select the Clone Brush to bring up the Clone Brush window.

Select Brush Size

Your brush size is determined by the area of the photo you would like to clone over. The larger the area, the larger the brush can be.

Select Transparency

The Transparency slider determines how opaque the Clone Brush is. If you want full coverage, choose a less transparent setting; if you want your edit to look more like a blending in, choose a more transparent setting.

Select Edge Fading

The Edge Fading slider determines how soft the edges of the Clone Brush are. The softer the brush, the more the new area blends, but if you make it too soft, you might not get the coverage that you want.

Edit Photo

Here's the fun part. If you need to zoom up on the area to be cloned, do that. Now click on the area of your photo to set the start point. Then start clicking over the area to cover. The blemish, scratch, or bad prom date disappears as if by magic.

Reset Start Point

The more complicated the photo, the more you will want to reset the start point. For instance, in this photo, I set a start point for the lake, for the log, and for the ground cover. I actually set it more often than that just to get a better clone. The more you practice, the better you'll get.

When you are done with the Clone Brush, close the window.


Roxio Easy Media Creator 8 In a Snap
Roxio Easy Media Creator 8 in a Snap
ISBN: 0672328658
EAN: 2147483647
Year: 2004
Pages: 171

flylib.com © 2008-2017.
If you may any questions please contact us: flylib@qtcs.net