Trimming a video clip is like cropping a photo. It's a method of cutting out the unnecessary portions of the clip. Remember that time when you forgot to turn off the camcorder and videotaped the lens cap for 10 minutes?
If you have a longer clip, you might want to split it into several clips and then trim them. As a general rule, you want to use shorter clips to keep your video interesting. Creatively mixing your clips and photos makes your video fun to watch.
Trimming your photo is just a way to make the duration shorter. You can also split a photo to use it in two places.
If you have added motion to a photo, you want to make sure your trimming doesn't compromise the effect you were creating with the motion.
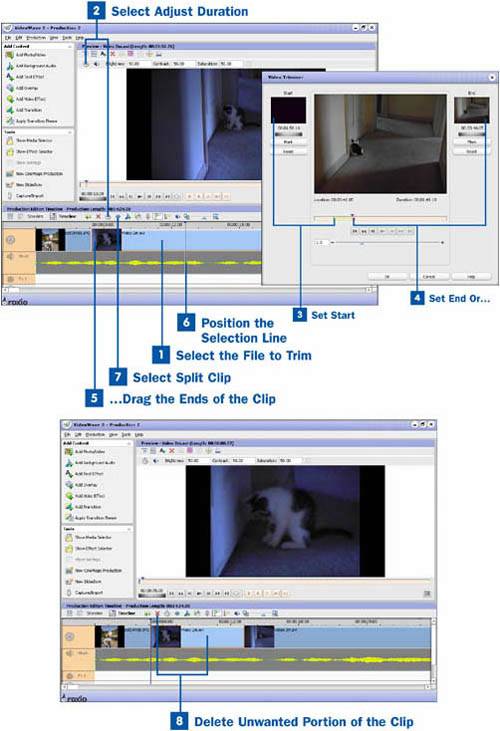
 Select the File to Trim
Highlight the video clip or photo you would like to trim by clicking on it.
 Select Adjust Duration
After you have highlighted your video clip, select the Adjust Duration icon from the Production Editor taskbar. This brings up the Video Trimmer.
 Set Start
After the Video Trimmer is open, use the slider or the playback controls to find the point on your video clip from which you would like to start. Click the Mark button under the Start window; this sets the start marker on the image currently in the Preview window. You can now adjust the start frame more precisely by using the jog dial above the Mark button. You can start over at any time by clicking on the Reset button.
 Set End Or...
When you have set the beginning of your clip, do the same thing to set the end of your clip using the buttons under the End window. When you have set your start and end points, click OK.
 ...Drag the Ends of the Clip
For a less precise but faster way to trim your clips, click and hold your mouse key down as you drag the beginning or end of the clip in the timeline view. Watch the Preview window closely to choose the point where you want to stop dragging.
Tip
Use the Zoom option in the taskbar to make your clip as long as manageable when dragging to trim or using the selection line to find a position in your clip. This makes it much easier to be precise.
 Position the Selection Line
To split your clip, use the playback controls or drag the selection line over your clip until you get to the spot where you would like your clip to be split.
 Select Split Clip
When you have positioned the selection line, click on the Split Selected Item icon in the Production Editor taskbar to split the clip into two pieces.
 Delete Unwanted Portion of the Clip
If you would like to delete one of the split portions of the clip, select it and click on the Delete Selected Item icon in the either the Production Editor or Preview taskbar.
Tips
Deleting an unwanted portion of a video clip is also a convenient way of trimming the clip.
After you have trimmed or split a video clip, you can easily retrieve the missing portions of it by dragging the end of the clip in the timeline view with the left mouse button held down.