Using Network Discovery
| Now that you understand the ZENworks for Servers 3 network discovery process, you are ready to begin using it to build a topology database from which you can manage and configure your network. Configuring and using discovery correctly can improve network bandwidth and make administration much easier. This section covers how to start and stop the network discovery, how to monitor its progress, and how to configure it to correctly discover your network. Starting and Stopping Network DiscoveryThe first thing you should know about setting up network discovery is how to start it manually, as well as how to stop it. During the installation, you are prompted whether to start the autodiscovery and back-end services. If you select yes to those prompts, Network Discovery automatically launches. To start the network discovery process and load the back-end services on a server, follow these steps:
The discovery process runs 24 hours a day while it is loaded. The time required to run the initial discovery and build a complete database of your network varies depending on the size of your network and the load placed on your ZENworks for Servers 3 management server. NOTE The ZENworks for Servers 3 network discovery process occurs in the background on your server. If your server is being heavily used, it takes considerably longer for the network discovery to finish. We suggest that you schedule your network discovery to occur during nonpeak hours over a weekend, for example. After the management server is up and running, you can start and stop the discovery process by using the following two commands and the ZENworks for Servers 3 management server console:
Checking the Status of the Initial DiscoveryAfter the network discovery process is running, an initial discovery is started. This can take a long time, depending on the size of your network. When the initial discovery is completed, your topology maps in the management console reflect the discovered devices while discovery progresses. You must, however, wait for the initial discovery to complete before the topology maps are updated. The easiest way to determine whether the initial discovery is complete is to use the NXPCON utility on the management server to look at the status of each NetExplorer module. Each module must complete at least one full cycle to complete the initial discovery and draw a complete network map. The following is a list of modules that can be configured to run during discovery:
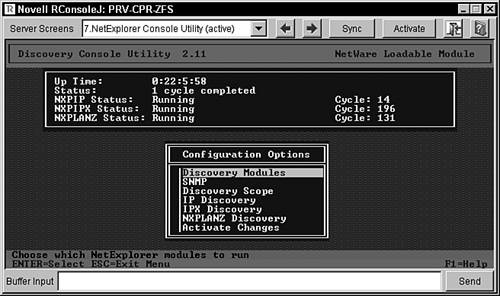
To view the discovery status, look at the following information displayed on the NetExplorer Console screen, shown in Figure 9.1:
Figure 9.1. Network discovery status on the NetExplorer Console screen.
The following is a list of the different statuses that each module can show and what they mean:
Changing the Default ConfigurationThe ZENworks for Servers 3 network discovery software is installed with configuration defaults that are designed to work in most network environments. You may, however, want to modify the default configuration to discover more or fewer devices in your network. To change the default network discovery configuration, you need to use the NXPCON utility on the ZENworks for Servers 3 management server. The NXPCON utility is automatically loaded when the NetExplorer software is loaded, or you can load it manually by using the following command at the ZENworks for Servers 3 management server console prompt: load nxpcon The following sections describe how you can use the NXPCON utility to choose which discovery modules are loaded, how to change SNMP names, and how to modify the discovery scope to help you optimize the discovery process for your network, and how to ensure workstation discovery. Choosing Which Modules to LoadAfter the NXPCON utility is loaded, you can modify which modules are being loaded. If you choose to not load a module, the network discovery is limited to the remaining modules being loaded. Use the following steps in the NXPCON utility to modify which modules are loaded for network discovery:
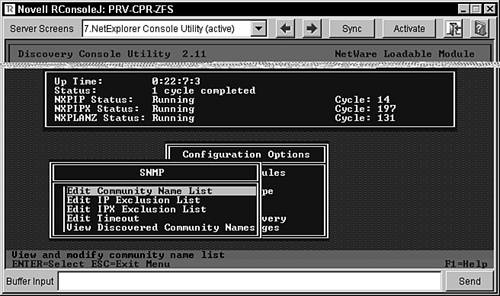
Changing SNMP Community NamesAfter selecting which modules to load, you may want to change some of the SNMP community names. ZENworks for Servers 3 automatically uses the community name of Public by default. If your network uses SNMP names other than Public, you should reconfigure the SNMP names in NXPCON to ensure your network maintains the proper security. To view, add, modify, or delete SNMP configuration information from within the NXPCON utility, follow these steps:
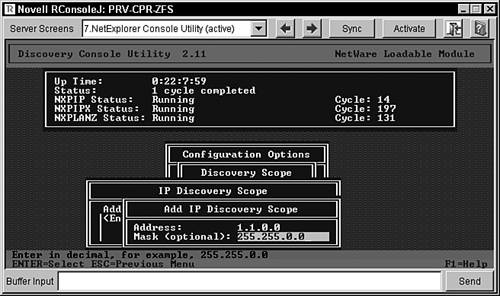
Changing the Discovery ScopeAfter you modify your SNMP community names appropriately, you can change the scope of the network discovery. NXPCON is set to discover all IPX and IP networks by default. But if your network is extremely large, you may want to limit the scope of discovery for the following reasons:
The following two sections discuss how to use the NXPCON utility to modify the network discovery scope. Changing the IP Discovery ScopeThe NXPCON utility enables you to limit the IP discovery scope by address and subnet mask filters. Using these filters enables you to discover only certain segments or addresses. If you wanted to restrict the discovery scope to your local IP network, for example, you could set a limit to the IP address of your local network and a subnet mask that you want to use. The mask indicates which part of the addresses needs to match for discovery to proceed on a network segment. The number 0 indicates that no match is required. If your local network IP address were 1.1.x.x, you would use the IP address of 1.1.0.0 and a mask of 255.255.0.0 to capture everything on your local network, but nothing else. Use the following steps in NXPCON utility to limit the scope of IP discovery:
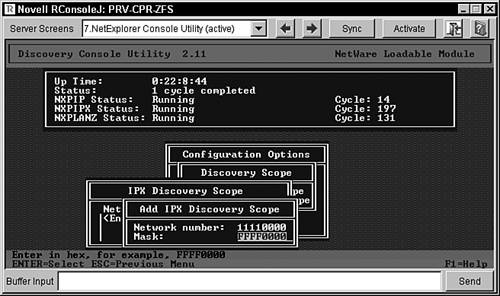
Changing the IPX Discovery ScopeThe NXPCON utility enables you to limit the IPX discovery scope by network number and mask filters. Using these filters enables you to discover only certain segments or addresses. A zero in the filter indicates that no match is required. For example, if you use a specific IPX address on your servers of 1111xxxx, you could limit the scope of your IPX discovery to include only your IPX servers by using the network number of 11110000 and a mask of FFFF0000. Discovery would then pick up only IPX devices whose network number started with 1111. Use the following steps in the NXPCON utility to limit the scope of IPX discovery:
Ensuring Workstation DiscoveryAfter you verify your IPX scopes in the NXPCON utility, you may want to ensure that your IPX workstations will be discovered properly. IPX workstations are discovered with a username if the user is logged in to or attached to a NetWare server that is running the management agent software. To ensure that your workstations are properly discovered, ensure that the management agent is installed on all NetWare servers that have users attached. Checking the Results of a Network DiscoveryYou can check the results of the network discovery after the initial discovery is completed and after the ZENworks for Servers 3 database has been updated. You should always check your network atlas to determine whether your network topology was accurately discovered. Your network atlas should have discovered all the servers, desktops, switches, and routers on your network for which you configured it. For each object that is discovered, the following characteristics are captured:
If a node is not on your network atlas, you should check the following things about the device:
|
 Discovery Modules.
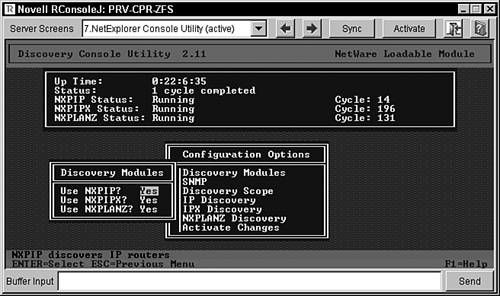
EAN: N/A
Pages: 137
- Integration Strategies and Tactics for Information Technology Governance
- An Emerging Strategy for E-Business IT Governance
- Linking the IT Balanced Scorecard to the Business Objectives at a Major Canadian Financial Group
- Governing Information Technology Through COBIT
- Governance in IT Outsourcing Partnerships