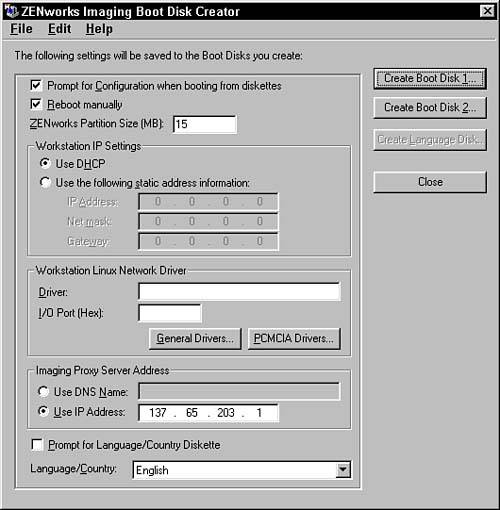
Within the Boot Disk Creator program, choose the options that you want. Figure 14.1 shows a sample of the Boot Disk Creator window.
Prompt for Configuration When Booting From Diskettes After the boot process is done, this prompts the screen for the configuration information that is included on this screen (such as reboot manually, proxy address, use DHCP, and so on). This enables you to change these values from the specified defaults given in this screen. You just press Enter when running the imaging program on the workstation, because you want to keep the defaults that you specify on this screen.
Reboot Manually Requires that the user request the reboot (Ctl+Alt+Del) manually at the completion of the imaging process (either take an image or receive an image) rather than having the program automatically reboot the workstation when done.
ZENworks Partition Size Enables you to specify how many megabytes you want any Linux partition to be on the workstation, if you decide to create the partition.
Workstation IP Settings: Use DHCP Tells the Linux system to use DHCP to get the workstation's IP address to connect to the imaging server.
Workstation IP Settings: Use the Following Static Address Information Enables you to specify the address instead of using DHCP. This is the address used by the workstation to connect to the imaging server.
Workstation Linux Network Driver: Driver: Specifies the special driver to use for your network card. The Linux boot disks are configured for most of the common network cards. The known network cards are automatically detected and the appropriate driver is loaded. Should you not have a card that is part of the default set, you need to include additional drivers on the disk.
Workstation Linux Network Driver: I/O Port Identifies the I/O port for access to your network card. In most cases, this field can be blank because it is auto-detected. If not, you need to enter the port number (for example, 300) of the interrupt for the network card.
Workstation Linux Network Driver: Drive Buttons These buttons bring up a driver window, which enables you to browse to the file system and find a Linux driver and then select it to be included on the disks. The driver selected in the field is attempted first, followed by the list of alternative drivers in the button lists, followed by the default drivers.
Imaging Proxy Server Address: Use DNS Name Enables you to select and enter the DNS name of the imaging server. Choose this option only if you have DNS enabled and have entered a record in the DNS system for this server. Enter the full DNS name, such as imgsrvr.novell.com.
Imaging Proxy Server Address: Use IP Address This flag identifies that the system should use the IP address to connect to the imaging server rather than DNS. The address specified should be the address of the server that is running the imaging service.
Prompt for Language/Country Diskette Requests that the system should prompt for the language disk at boot time. If this is on, the system waits for the language disk to be inserted before it finishes. This is not necessary if you are using the default English system.
Language/Country Chooses the country language. This results in these language files being placed on the system and used in the workstation imaging system.