Understanding the Graphics Coordinate System
So far, I've created several graphics screens, each time with a width of 640 and a height of 480, but I haven't said much about them beyond that. So I want to take a closer look at the screen and its coordinate system.
You can think of a graphics screen as a grid, 640 columns across by 480 rows down. Each intersection of a column and a row is a location on the screen, a single point or pixel. When you talk about a specific point on the screen, you give two coordinates, an x, which represents the column, and a y, which represents the row. You start counting coordinates from the upper-left corner of the screen, so the upper-leftmost point is where the x-coordinate is 0 and the y-coordinate is 0, which you write as the pair (0,0). As you move to the right, the x values increase. As you move down the screen, the y values increase. That makes the point in the lower-right corner (639,479). Figure 11.5 gives a visual representation of the graphics screen coordinate system.
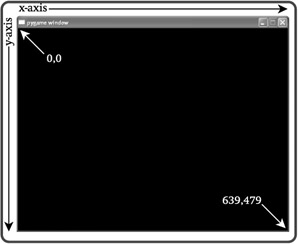
Figure 11.5: You specify points on a graphics screen with x- and y-coordinate pairs.
You can place graphics objects, like the image of a pizza or the red-colored text "Game Over," on the screen using the coordinate system. The center of a graphics object is placed at the specified coordinates. You'll see exactly how this works in the next chapter program.
EAN: 2147483647
Pages: 194