Section 9.3. Using PEAR
9.3. Using PEARPEAR is a framework and distribution system for reusable PHP components. Actually, PEAR is a collection of add-on functionality for PHP development. There are many modules available to handle everything from session management to shopping cart functionality. Modules that are currently available are listed in Table 9-1.
Our list is not complete. Visit http://pear.php.net to find out all of the modules that are available for download. 9.3.1. InstallingPEAR uses a Package Manager to manage which PEAR features you install. Whether you need to install the Package Manager depends on which version of PHP you installed. If you're running PHP 4.3.0 or newer, it's already installed. If you're running PHP 5.0, PEAR has been split out into a separate package. The DB package that you're interested in is also installed by default with the Package Manager. So if you have the Package Manger, you're all set. 9.3.1.1. UnixYou can install the Package Manager on a Unix system by executing the following from the shell (command-line) prompt: lynx -source http://go-pear.org/ | php This takes the output of the go-pear.org site (which is actually the source PHP code) to install PEAR and passes it along to the php command for execution. 9.3.1.2. WindowsThe PHP 5 installation includes the PEAR installation script as C:\php\go-pear.bat. In case you didn't install all the files in Chapter 2, go ahead and extract all the PHP files to C:/php from the command prompt, and execute the .bat file. Figure 9-5 shows the initial screen after executing the PEAR installer. Figure 9-5. The go-pear.bat install script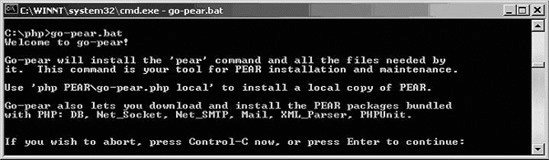 You'll be asked a set of questions about paths. You can accept the defaults for all of them.
The PEAR installer creates a file called C:\php\PEAR_ENV.reg. You need to double-click to set up the PEAR paths in the registry. This file is contingent on which PEAR version you installed. When the dialog box appears to verify your information, you will add this to the registry and click OK. You may have to edit the php.ini file after running this .bat file to add the PEAR directory to the include path. Line 447 of php.ini now looks like this: include_path = ".;c:\php\includes;c:\php\PEAR" Apache must be restarted before the DB package can be used. 9.3.1.3. Hosted ISPMost ISPs have PEAR DB installed. Ask your ISP to install it if they haven't already. You can tell if PEAR DB has been installed by trying the PHP code in Example 9-7 to see whether the require_once ('DB.php'); line causes an error when the script is executed. 9.3.2. Adding Additional PackagesOnce that's complete, you can access the PEAR Package Manger by entering pear at the command prompt. Adding new modules is as easy as executing pear packagename. You won't need to do anything, since the DB package was installed along with the install by default. However, if you're running Windows XP Home, you'll need to take these steps to install the PEAR DB: C:\>cd c:\php C:\>pear install DB C:\>pear list To find out what versions of PEAR packages are installed, execute pear list. That returns a listing such as the one shown in Figure 9-6. Figure 9-6. A listing of installed PEAR packages and versions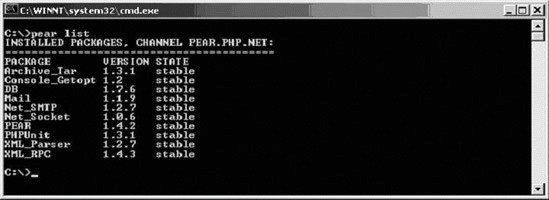 Once you've got PEAR installed, you're ready to try it out. 9.3.3. Rewriting the Books Example with PEARWhen using the PEAR DB package, you follow the same steps. However, the function syntax is slightly different. We'll go line by line and explain the differences as they appear in Example 9-7. Example 9-7. Displaying the books table with PEAR DB
Line 4 has a new require statement: require_once( "DB.php" ); This requires the file DB.php, which provides the PEAR DB functions. The require_once function errors out if the DB.php file is not found. It also will not include the file if it has been incorporated already. And, this would cause an error.
9.3.3.1. Creating a connect instanceThe DB.php file defines a class of type DB. Refer to Chapter 5 for more information on working with classes and objects. We'll principally be calling the methods in the class. The DB class has a connect method, which we'll use instead of our old connect function mysql_connect. The double colons (::) indicate that we're calling that function from the class in line 4: connection = DB::connect("mysql://$db_username:$db_password@$db_host/$db_database"); When you call the connect function, it creates a new database connection that is stored in the variable $connection. The connect function attempts to connect to the database based on the connect string you passed to it. 9.3.3.2. Connect stringThe connect string uses this new format to represent the login information that you already supplied in separate fields: dbtype://username:password@host/database This format may look familiar to you, as it's very similar to the connect string for a Windows share. The first part of the string is what really sets the PEAR functions apart from the plain PHP. The phptype field specifies the type of database to connect. Supported databases include ibase, msql, mssql, mysql, oci8, odbc, pgsql, and sybase. All that's required for your PHP page to work with a different type of database is changing the phptype! The username, password, host, and database should be familiar from the basic PHP connect. Only the type of connection is required. However, you'll usually want to specify all fields. After the values from dblogin.php are included, the connect string looks like the following: "mysql://test:test@localhost/test" If the connect method on line 6 was successful, a $DB object is created. It contains the methods to access the database as well as all of the information about the state of that database connection. 9.3.3.3. QueryingOne of the methods it contains is called query. The query method works just like PHP's query function in that it takes a SQL statement. The difference is the hyphen and greater-than syntax (->) is used to call it from the object. It also returns the results as another object instead of a result set. $query = "SELECT * FROM `books`" $result = $connection->query($query); Based on the SQL query, this code calls the query function from the connection object and returns a result object named $result. 9.3.3.4. FetchingLine 22 uses the result object to call the fetchRow method. It returns the rows one at a time, similar to mysql_fetch_row. while ($result_row = $result->fetchRow()) { echo 'Title: '.$result_row[1] . '<br />'; echo 'Author: '.$result_row[4] . '<br /> '; echo 'Pages: '.$result_row[2] . '<br /><br />'; } You use another while loop to go through each row from fetchRow until it returns FALSE. The code in the loop hasn't changed from the non-PEAR example. 9.3.3.5. ClosingIn line 30, you're finished with the database connection, so you close it using the object method disconnect: $connection->disconnect(); 9.3.3.6. PEAR error reportingThe function DB::isError will check to see whether the result that's been returned to you is an error or not. If it is an error, you can use DB::errorMessage to return a text description of the error that was generated. You need to pass DB::errorMessage the return value from your function as an argument. Here you rewrite the PEAR code to use error checking: <?php if ( DB::isError( $demoResult = $db->query( $sql))) { echo DB::errorMessage($demoResult); } else { while ($demoRow = $demoResult->fetchRow()) { echo $demoRow[2] . '<br />'; } } ?> Now that you have a good handle on connecting to the database and the various functions of PEAR, we're going to talk about forms. Forms provide a way to send substantial data from the user to the server where it can be processed. |

 Control Panel
EAN: 2147483647
Pages: 135