Section 8.2. Managing the Database
8.2. Managing the DatabaseNow that you're connected to the database, you can create users, databases, and tables. You may not need to create a database or user account if you're using a MySQL server in a hosted environment, and if they supplied you with a username and a database name. 8.2.1. Creating UsersTo create users above and beyond the default privileged root user, issue the grant command. The grant command uses this syntax: GRANT PRIVILEGES ON DATABASE.OBJECTS TO'USER'@'HOST' IDENTIFIED BY 'PASSWORD'; For example: GRANT ALL PRIVILEGES ON *.* TO 'michele'@'localhost' IDENTIFIED BY 'secret'; This creates the user michele who can access anything locally. To change to the michele user, at the mysql command prompt, type: exit Then start MySQL from the command line with the new username and password. The syntax for specifying the username and password when starting MySQL is: mysql -h hostname -u username -ppassword If you don't want users to access tables other than their own, replace * with the name of the user's database, like this: GRANT ALL PRIVILEGES ON `store`.* TO 'michele'@'localhost' IDENTIFIED BY 'secret'; You'll need to run the above line as root or as someone with permission. In the above code, the word store correlates to the database name to which privileges are assigned, which you'll create in the next section. 8.2.2. Creating a MySQL DatabaseYou're going to create a database called store. The create database command works like this: CREATE DATABASE `store`; If this works, you'll get a result like this one: Query OK, 1 row affected (0.03 sec)
To start using this database, type: USE `store`; You will get the result: Database changed. Assuming you've done everything correctly, you'll be set up with new data and selected it for use. Creating tables is an important concept, so that's where we're headed! 8.2.3. Table ManipulationOnce you've created a table and started storing information in it, you may find that you need to make a change to the column types. For example, you may find a field you thought would need only 30 characters actually needs 100. You could start all over and redefine the table, but you'd lose all your data. Thankfully, MySQL allows you to modify column types without losing your data. 8.2.3.1. Renaming a tableTo rename a table, use ALTER TABLE table RENAME newtable. In this example, we are renaming the table from books to publications. ALTER TABLE `books` RENAME `publications`; This would look like Figure 8-3. Figure 8-3. Renaming a table 8.2.3.2. Changing a column's data typeTo change a column data type, use ALTER TABLE table MODIFY column datatype. The following syntax modifies the author field so that the column can take 150 characters. ALTER TABLE `authors` MODIFY `author` VARCHAR(150); Changing a column's data type will look like Figure 8-4. Figure 8-4. Changing column's data type 8.2.3.3. Adding a columnTo add a column, use ALTER TABLE table ADD column datatype. Here, we're changing the publications table so a timestamp is automatically added to it. ALTER TABLE publications ADD time TIMESTAMP; Figure 8-5 shows the result. Figure 8-5. Adding a column 8.2.3.4. Remove a columnIf you look at your database tables and decide you don't need a specific column, you can remove it. To remove a column, use ALTER TABLE table DROP column. Here, we're removing the pages column; therefore, we'll no longer know how many pages are in a book listed in the database. ALTER TABLE publications DROP COLUMN pages; Figure 8-6 shows how it would look after you execute the command. Figure 8-6. Removing a column 8.2.3.5. Deleting an entire tableSometimes you may want to completely remove a table. Use the DROP command to permanently remove a table and its data. DROP TABLE `authors`; 8.2.4. Using phpMyAdminThe tool phpMyAdmin, available from http://www.phpmyadmin.net/, allows you to administer a MySQL database through your web browser. All that's required is a web server with PHP installed and a MySQL database to administer. To install phpMyAdmin, follow these steps:
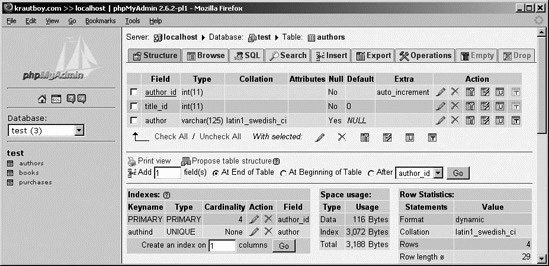
Once installed and connected to the database, phpMyAdmin's main page looks similar to Figure 8-7, except in the case that you're running the stable release of 2.7.0-pl2, instead of the 2.6.2-pl1 release. Figure 8-7. Selecting a database to administer in phpMyAdmin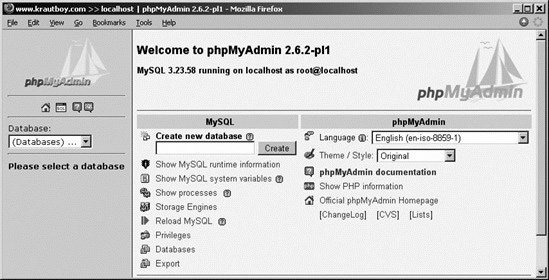 You can select any configured databases from the drop-down list labeled Databases. The admin provides an easy way to see how your database is configured and what objects exist (such as tables), and you're even offered the option to add tables through the graphical interface. Using PHP admin, you can create new databases and tables, run queries, and display server statistics. Figure 8-8 shows the tables that are in the test database. Click on the authors table on the left to get more details on that table. Figure 8-8. The objects in the test database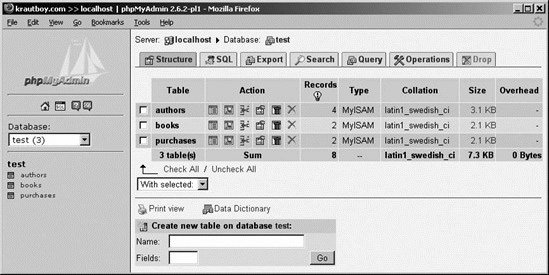 In Figure 8-9, the table structure of the authors table is displayed. This screen provides an easy way to visualize the layout of a database, particularly if it's a database that you did not create yourself. Figure 8-9. Viewing the authors table structure in |

EAN: 2147483647
Pages: 135