Photo Enhancement
| [ LiB ] |
Photo Enhancement
Do you have scratches in your photos or an imperfection that you'd like to remove? The Scratch Remover tool or the Clone Brush can help you out. Do you have areas of your photo that are too dark or too light? The Dodge Brush and the Burn Brush could help you out. Are there areas where you'd like to make localized adjustments to the lightness or saturation? The Change To Target Brush might be what you want. Let's take a look at these and other photo enhancement tools.
Using the Scratch Remover 
The Scratch Remover can be used to get rid of a scratch or a hair on the scan of a photo. Scratch Remover can also be used to eliminate other imperfections as well. For example, if the subject of a portrait has wrinkles that you'd like to remove, try the Scratch Remover with its Width set to the width of a wrinkle. For something wider, like a mole, just set the Width to a larger value and drag over the mole. The Scratch Remover blends the area you drag across with the background at the edges of the tool's bounding box. It works best where the background is relatively smooth. (For more complex backgrounds, the Clone Brush is a better choice of tool.)
NOTE
 TIP
TIP
Remember that the Scratch Remover tool can only be used on a Background layer. If you want to make subtle changes by fading an edited duplicate layer into the original, try this: Duplicate the Background layer, then toggle the visibility of the duplicate off. Make the Background layer the active layer and edit with the Scratch Remover. Promote the Background layer to a true layer, and then move it above the duplicate layer. Toggle the visibility of the duplicate layer back on, and then adjust the opacity of the edited layer to get the effect you want.
Using the Clone Brush 
We looked at the Clone Brush in Chapter 2. In its Aligned mode, the Clone Brush is handy for eliminating objects that you don't want in your image or for correcting imperfections like facial blemishes in portraits. Here are a few pointers for using the Clone Brush to correct photos:
-
Set the Hardness of the brush rather low so that the edges of your corrections blend in well with the rest of the image.
-
When correcting blemishes, set the Opacity rather low and click the blemish several times, sampling from slightly different areas of your photos. This, too, will help blend the correction in with the rest of the image.
-
In almost all cases, you'll get better results with multiple clicking rather than dragging. In situations where you do want to drag, be sure that Step is set to a low value.
Using the Dodge and Burn Brushes 

The Dodge and Burn retouch brushes can be used to lighten overly dark areas (Dodge) or darken overly light areas (Burn). The opacity of the brushes should be kept quite low so the effect isn't overdone. And, if you like, you can restrict the effect to only the shadows, only the midtones, or only the highlights.
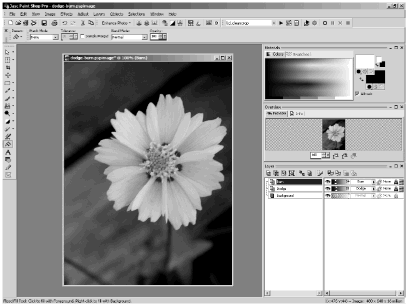
I find the effect of these tools less than ideal. An alternative, which I myself prefer, is to use layers for dodging and burning, as in Figure 8.26.
Figure 8.26. Using Blend Modes and Blend Ranges to Dodge and Burn.

In this method, you add a new raster layer above your image, setting Blend Mode to Dodge or Burn as appropriate, lowering the opacity significantly, and then painting on the layer. For Dodge, paint with white. For Burn, paint with black. If you want to limit the application to shadows, midtones, or highlights, you can use blend ranges to get just what you want. (See Chapter 4, "Mastering Layers and Blend Modes," for discussion of blend ranges.)
Using the Change To Target Brush 
Change To Target has settings for Color , Hue , Saturation , and Lightness . When you paint with one of these tools, the painted pixels take on the chosen attribute of the Foreground color set in the Materials palette. You can use this tool to colorize areas of a black-and-white photo or to adjust saturation or lightness in localized areas.
NOTE
 NOTE
NOTE
Other related retouch tools to try out are Lighten/Darken, Saturation Up/Down, and Hue Up/Down.
| [ LiB ] |