Vector Objects
| [ LiB ] |
Vector Objects
To practice handling vector objects, create a vector shape, as follows :
-
Open a new image with a solid white raster background. (Having a raster layer isn't necessary, but the solid-colored background makes it easier to see your drawing as you're creating it. The raster layer can always be deleted later, if you like.)
-
If the Tool Options palette isn't visible, press F4 to make this palette visible. Then select the Preset Shapes tool. In the Materials palette, set the Stroke to Solid Color mode, setting the color to whatever you want for the stroke, and set Fill to Transparent. In the Tool Options palette, select Star 2 in the drop-down list. Retain style is not to be checked, but be sure to check Create as vector (see Figure 6.2.). Set Width to whatever width you want for the stroke.
Figure 6.2. Tool Options palette for Preset Shapes.

-
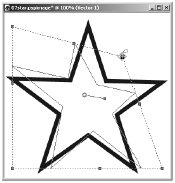
Draw a star in the middle of your new image by dragging from the upper-left to the lower-right corner (or by right-dragging from the center out). When you release the mouse button, you'll see something like Figure 6.3.
Figure 6.3. A vector shape.
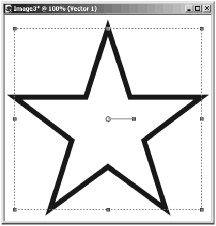
Notice the rectangular border around the star, which indicates that the object is selected. Also notice the control handles on the top, bottom, corners, and sides of this border and the bar radiating from the center of the circle, along with its control handles. You can use the border and control handles to move or deform the object.
-
If the Layer palette isn't visible, press the F8 key to make that palette visible. Notice that there is a plus sign to the left of the vector layer icon, indicating that this layer contains at least one object. Click on the plus sign and the vector layer information will be expanded, showing a button for the new Star 2 object (see Figure 6.4).
Figure 6.4. Layer palette display for a vector object.

-
When an object is selected, its name appears in boldface on its object button in the Layers palette. To deselect an object, right-click the object button for the selected object and choose Select None. The label on the button becomes unbolded, and the object becomes deselected. Click the object button of the object again and that object becomes selected again.
Deforming a Shape
Now try moving, resizing, rotating, and deforming the vector object. Before beginning, be sure that the Star 2 object is selected and that you're using either the Preset Shapes tool or the Object Selection tool.
-
Reposition the object by placing the mouse cursor on the center handle or on any edge of the object itself. When the cursor is in the correct position, the shape of the cursor changes to the double-headed crossed arrows of the Mover tool. Then drag to move the object. Until you release the mouse button, you'll see both the original object in its initial position and a thin moving outline of the object.
-
To resize the object, place the mouse cursor on one of the control handles on the selection border and drag. Dragging the top or bottom handle alters the height of the object, whereas dragging a side handle alters the width. To change both the height and width at the same time, drag a corner handle.
-
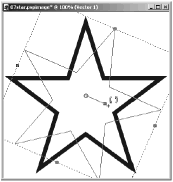
To rotate the object, position the mouse cursor on the handle at the outer end of the bar radiating from the center of the object. When the cursor is in the correct position, the shape of the cursor changes to two arrows forming a circle (see Figure 6.5).
Figure 6.5. Rotating a vector object.
-
There are several ways you can deform an object: Drag on a handle with either the Shift key, the Ctrl key, or both keys depressed, as shown in Figures 6.6 through 6.8. The shape of the cursor when the mouse is positioned over a handle will give you a clue about what will happen when you drag with that particular handle. When you release the mouse, the object will take on its new shape.
Figure 6.6. Deform with Shift+drag.
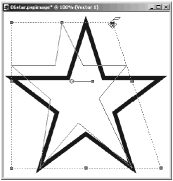
Figure 6.7. Deform with Ctrl+drag.
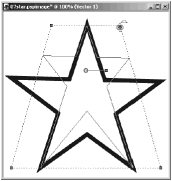
Figure 6.8. Deform with Shift+Ctrl+drag.
NOTE
 TIP
TIP
To maintain the aspect ratio while resizing your object, right-drag on one of the corner handles.
NOTE
 NOTE
NOTE
As we saw in Chapter 2, "More Painting Tools," you deform figures on a raster layer with the Deform tool. The Deform tool is unavailable when the active layer is a vector layer.
Modifying an Object's Properties
There are three ways to access an object's properties:
-
Double-click on the object's object button in the Layers palette.
-
Right-click on the object's object button in the Layers palette, and then select Properties from the resulting menu.
-
Choose the Object Selection tool, select the object that you're interested in (either by clicking its object button or by dragging the tool around the object), and then right-click anywhere within the object's selection border and select Properties.
The Vector Property box of the Star 2 object looks something like what you see in Figure 6.9.
Figure 6.9. The Vector Property dialog box.
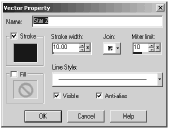
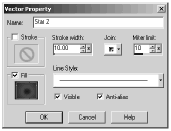
You can modify any of the vector object's properties. To change the stroke or fill colors, click on the appropriate color box in the Vector Property dialog box and then select the material you want, just as you would with the Materials palette. For example, Figure 6.10 shows the settings you'd use to change the stroked star to one with a gradient fill and no stroke.
Figure 6.10. Modifying a vector object's properties.
Object Alignment and Distribution
Sometimes you'll want to position an object in the exact center of the image canvas, align one object with another, or evenly space a group of objects on the image canvas. Commands for all these operations are available as suboptions on the Objects menu:
-
Align. These options enable you to precisely align selected objects with each other or in relation to the image canvas.
-
Distribute. These options enable you to precisely distribute selected objects in the image canvas.
-
Make Same Size. This enables you to make selected objects all the same size as the first object selected, either in height or width or both.
-
Arrange. This enables you to move objects on a vector layer within the layer stack. For example, you could move the object at the top of the stack down in the stack.
| [ LiB ] |