Setting Up Version Control
Assuming you've never used a source control system, where do you start? Even if you have used other version control systems, how to do you effectively set up and use Team Foundation version control? We will walk you through the process step-by-step.
When you start up a new Team Project (by clicking on File ![]() New
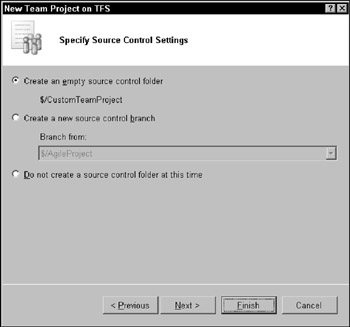
New ![]() New Team Project—you have to be connected to a Team Foundation Server for this option to show up), you will be provided a series of options. You'll get three source control options to set up a new parent folder (as shown in Figure 20-2).
New Team Project—you have to be connected to a Team Foundation Server for this option to show up), you will be provided a series of options. You'll get three source control options to set up a new parent folder (as shown in Figure 20-2).

Figure 20-2
In this window, you have the following three options:
-
You can create a brand-new parent source control folder (based on the name of your project).
-
You can create a branch based on a pre-existing project. This option is especially compelling if you want to create another version of an existing application or implement a new process to develop an existing application.
-
You can also skip the source control folder creation process. Note that it isn't possible to create root level folders other than by creating Team Projects. Interestingly enough, you can't get rid of a root level folder without deleting a Team Project also.
Setting up security roles
Before you can start using the version control feature, you should determine who on your team will take on the responsibility of Administrator. The rest of the individuals on your team will be typically classified as Contributors. Keep in mind that the way you organize your roles should be determined by a matter of convenience and organizational requirements. For example, if you are in a small team, you might want to make everyone an administrator to maintain as much flexibility as possible. The roles and responsibilities shown in the following list are a configuration appropriate for a large organization:
-
Administrator: The administrator is responsible for setting up version control permissions for each contributor (either directly or through the IT staff). He (or she) also sets the security and policies around your code check-in and co-ordinates with the build team.
-
Development or Test Lead: The lead could be granted certain additional permissions above a contributor, but still less than an administrator.
-
Contributor: The contributor's role is as an end user, to check-in and check-out code, shelve and create changesets. Typically, you would assign this role to a tester or developer.
Setting up your workspace
Think of a workspace as simply your personal local folder to work on source code. A workspace is associated to a folder in Team Foundation version control. Whenever you check-out code, the code from the repository is placed in your workspace and vice-versa. The core advantage is isolation— workspaces allow you to work on an application without affecting any changes the rest of your team might be making.
| Note | There are two primary restrictions in setting up your workspaces. You can't map two local folders to one folder in the repository. Likewise, you can't map two repository folders to a single local folder. As a rule of thumb, stick to one local folder mapped to a single folder in the version control system. |
To set up a new workspace, click on File ![]() Source Control
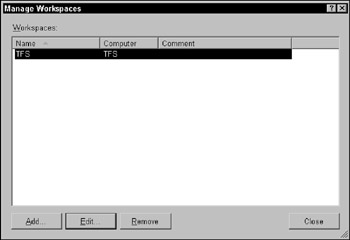
Source Control ![]() Workspaces. You'll get the Manage Workspaces window (as shown in Figure 20-3).
Workspaces. You'll get the Manage Workspaces window (as shown in Figure 20-3).

Figure 20-3
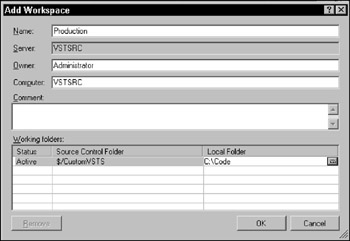
The next step involves adding a new workspace. Note that within each workspace, you can create several one-to-one mappings between local folders and repository folders. Clicking the Add button on this window opens the Add Workspace window, as shown in Figure 20-4.

Figure 20-4
In the preceding example, the Code folder on your local C: drive will synchronize with the CustomVSTS folder in Team Foundation version control.
| Note | Notice that you have a Status field next to the Source Control Folder path. There are two statuses that can be set — Active and Cloaked. When you cloak a folder, you exclude it from certain synchronization tasks (such as add, get, and others). Note that cloaking is not an alternative to deleting a workspace. It's a way to cut down on the amount of disk space used as well as bandwidth for files that you don't have an interest in or need for. It will also provide better performance because only Active mappings are synchronized. |
EAN: 2147483647
Pages: 220
- Challenging the Unpredictable: Changeable Order Management Systems
- ERP System Acquisition: A Process Model and Results From an Austrian Survey
- The Second Wave ERP Market: An Australian Viewpoint
- Context Management of ERP Processes in Virtual Communities
- A Hybrid Clustering Technique to Improve Patient Data Quality