Creating Corporate Intranet Portals
Intranet portals are intended to help organizations manage their information by performing three primary functions:
-
Aggregating Aggregation can include indexing, linking to, and hosting content. A corporate portal can aggregate content using hyperlinked lists or indexing services such as SharePoint Server Search and by directly hosting content, as is the case with portal document libraries. Portals can also provide access to information from sources such as SAP, Siebel, and Microsoft Office Excel spreadsheets.
-
Organizing This function is accomplished through the creation of taxonomies. Taxonomies can change over time, but spending the time in the beginning to clearly define the basics will save valuable administrative resources down the road. A very common taxonomy in use today is the Dewey Decimal System used in libraries. In fact, many organizations are now using classically trained librarians to assist them with their corporate or organizational taxonomies.
-
Presenting After you have completed the exercise of aggregating and organizing your data, you must research the best method to present that data, in a timely and targeted manner, to your end users. Be sure to present data that are relevant to your users; the audience capability of SharePoint Server serves this purpose nicely.
Creating a Corporate Intranet Portal
-
Browse to Central Administration.
-
Create a new Web application. Portals cannot be created as subsites and should be applied at the root of a new Web application. Chapter 4, "Creating Site Collections," describes how to create Web applications.
-
Select the Collaboration Portal from the Publishing templates, as shown in Figure 9-1.
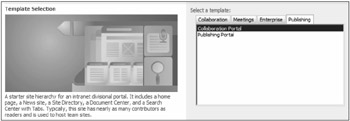
Figure 9-1: Create an Intranet Portal by applying the Collaboration Portal site template.
Customizing Portal Navigation
To enable consistent navigation throughout the portal, the SharePoint Server portal templates handle this function differently from the standard Windows SharePoint Services site methods. The standard Top Link Bar and Quick Launch are replaced with a more advanced navigational system. In addition, the tabs in the default navigation bar are subsites and not pages. These subsites, and all other subsites created beneath the portal, inherit the portal's advanced navigation. Furthermore, most of the default sites' navigation can be managed directly from the Site Actions control. For all of the portal sites, except the Document Center, you can reach the navigation configuration page by browsing to Site Actions > Site Settings > Modify Navigation, as seen in Figure 9-2. You can also modify the navigation settings from Navigation, under the Look And Feel section of Site Settings.
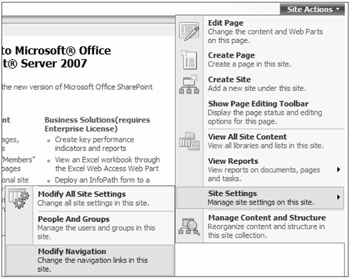
Figure 9-2: Use Modify Navigation to directly access a site's navigation settings.
Modifying Portal Navigation Settings
The advanced portal navigation system is configured differently from other sites. Navigation settings can be customized on a per site basis and are divided into two categories: Global and Current. Global Navigation defines which items will be displayed on the Top Link Bar. Current Navigation defines how sites will be displayed in the Quick Launch. Subsite Navigation configuration pages display a graphic, shown in Figure 9-3, that demonstrates this relationship.

Figure 9-3: The Navigation configuration page for a subsite shows which navigation controls are affected by Global Navigation and which by Current Navigation.
Navigation elements that are shared across all portal sites are controlled from the navigation settings of the portal top-level site. Settings unique to each subsite, such as which sites are displayed in drop-down menus on the top site, are controlled from the subsite's navigation settings.
Configuring Top-Level Portal Navigation
When creating a portal, your first choice should be adding subsites and/or pages automatically to the Top Link Bar and Quick Launch. Items that are added automatically can then be hidden on an per item basis, if required. Alternatively, you may elect to add sites and pages manually to the portal's navigation controls. The order in which sites and subsites are displayed can be controlled automatically by choosing the Sort Automatically option on the Site Navigation Settings page. The Navigation Editing And Sorting control also allows headings and links to be added to the Global and Current Navigation, as shown in Figure 9-4.
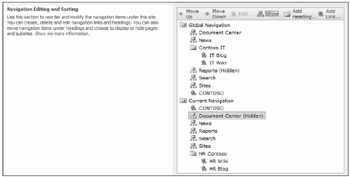
Figure 9-4: You can add headings and links to customize site navigation across your portal.
Headings added to the global navigation are displayed in the Top Link Bar and can have links displayed beneath them in a drop-down menu. Links added to the Global Navigation outside of headings are displayed directly on the Top Link Bar, as seen in Figure 9-5.

Figure 9-5: Links added beneath headings appear in a drop-down menu. (Note the relationship to Figure 9-4.)
Headings added to the Current Navigation are displayed in the Quick Launch and can have links grouped beneath them, as shown in Figure 9-6.
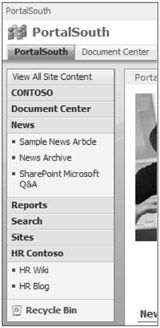
Figure 9-6: Links are grouped together beneath their heading in the Quick Launch. (Note the relationship to Figure 9-4.)
Configuring Portal Subsite Navigation
When configuring navigation at the subsite level, there are two options for Global Navigation:
-
Display The Same Navigation Items As The Parent Site By default, a subsite displays the same Global Navigation as its parent site.
-
Display The Navigation Items Below The Current Site Selecting Display The Navigation Items Below The Current Site causes navigation beneath that site to behave similarly to a portal top-level site. This option causes the Top Link Bar to display the sites beneath the current subsite. If Show Subsites and Show Pages are selected, items beneath the sites in the Top Link Bar are displayed in drop-down menus, as seen in Figure 9-7.
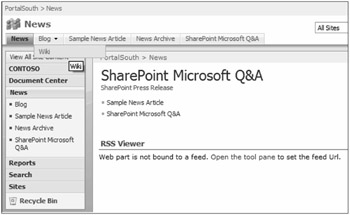
Figure 9-7: The news site's Global Navigation has been configured to display its subsites, and the Current Navigation is displaying its subsites and siblings.
There are three options for Current Navigation:
-
Display The Same Navigation Items As The Parent Site The Quick Launch displays the same navigation items as the parent site.
-
Display The Current Site, The Navigation Items Below The Current Site, And The Current Site's Siblings The site's siblings are the other sites beneath the current site's parent site. Navigation Items that have been added to the parent as links are displayed; headings and the links beneath them are not.
-
Display Only The Navigation Items Below The Current Site Only sites beneath the current site are displayed in the Quick Launch.
Using the Site Directory
The Site Directory is a central location for managing sites associated with the portal. Portal subsites, farm sites, and Extranet sites can all be linked to and categorized using the Site Directory. Using the Site Directory, administrators can view the portal's structure using the Site Map, view sites within the directory, approve or reject new sites, and edit or delete site links.
Creating Sites Beneath the Site Directory
Sites created beneath the Site Directory are not added automatically to the Site Directory list. To add a site to the Site Directory at creation, you must check the List This New Site In The Site Directory check box on the creation page, as shown in Figure 9-8.
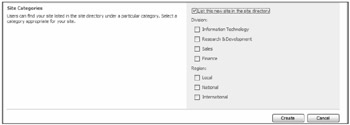
Figure 9-8: Check the List This New Site in the Site Directory check box to add a site to the Site Directory at creation.
| Tip | You can also specify a Master Site Directory in Central Administration by navigating to Central Administration > Operations > Global Configuration > Master Site Directory Settings. |
You must also select which Division and Region, if any, the site belongs in. A default value for both Division and Region can be defined using the List Settings options of the Sites List. To create a site beneath the Site Directory, click on the Create Site link in the top right-hand portion of the page.
Adding Links to the Site Directory
Links added to the Site Directory by users must be approved by an administrator before they become visible in the directory. Links are added automatically to the Sites List even if they are associated with a region, division, top sites, or top tasks. Checking the Top Tasks check box displays the link in the I Need To… Web Part on the Portal Welcome page as seen in Figure 9-9, and beneath Top Tasks under Tasks and Tools in Site Directory Categories.

Figure 9-9: Links added to the Top Tasks category are displayed in the I Need To… Web Part on the Portal Welcome page.
Managing the Site Directory Using the Sites List
The heart of the Site Directory is the Sites List because it contains the actual site entries and because it is the only place in which sites can be edited or deleted from the Site Directory. It is also where the properties for the Site Directory, such as the Division and Region categories, are defined. To access the Sites List, do the following:
-
Browse to the Site Directory.
-
Select View All Site Content.
Many of the features needed to manage the Site Directory are available through a drop-down menu in the Sites List. To access the options in the drop-down menu, place the pointer over the name of the site to be modified, and click the down arrow that appears. Doing so provides several options, as shown in Figure 9-10.
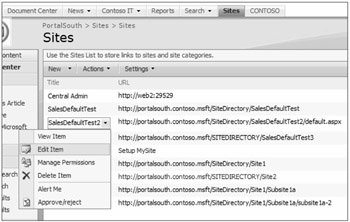
Figure 9-10: Several options for managing the Site Directory are only available from the Sites List's drop-down menu.
-
View Item This option displays a synopsis of the site's list items and provides a link to create a new item, edit or delete the item, manage its permission, approve or reject it, or generate an alert.
-
Edit Item You can alter all of the properties associated with the item from this option. Of particular importance is the Top Site check box. Selecting Top Site adds the site to the list displayed under Top Sites in the Site Directory. After a link has been added to the Site Directory, selecting this option is the only way to add it to the Top Site's list.
-
Manage Permissions This option allows you to define custom permissions on a per list item basis.
-
Delete Item To delete a site from the Site Directory, select Delete. This does not delete the site, only its entry in the Site Directory.
-
Alert Me This option enables an e-mail notification to be sent when changes are made to the item.
-
Approve/Reject By default, sites added by administrators are approved automatically. Sites added by other users must be approved by an administrator before they are added to the Site Directory.
Finding Broken Links
Sites listed in the site directory are not removed automatically from the directory when they are deleted. You can find broken links by using the Broken Link Checker at the site collection level and the Site Directory Links Scan in Central Administration. The Site Directory Links Scan regularly scans multiple site directories using a scheduled timer job.
Scanning for Broken Links at the Site Collection Level
-
In the Site Directory select Scan For Broken Links from Site Actions.
-
Select the types of sites you wish to scan from the View List and click OK. The View List limits the scan to items listed in the corresponding view of the Sites List.
Scanning for Broken Links from Central Administration
-
Browse to Central Administration > Operations > Site Directory Links Scan.
-
Add the URL for the site directory's Sites List to the Site Directory View URLs text box. Multiple entries, separated by commas, can be added. The sites will be validated before the job is created.
-
If you would like the titles and descriptions of scanned sites to be updated automatically, check the Update Title And Description Of Links In The Site Directory Automatically check box.
| Tip | The Site Directory Broken Links Scan timer job that performs the broken links scan can be viewed and disabled by browsing to Central Administration > Operations > Timer Job Definitions. |
Modifying the Sites List
Several common modifications of the Site Directory, such as changing Regions or Divisions, are accomplished by modifying the Sites List's list settings. To modify the list settings, select List Settings from the Settings drop-down menu of the Sites List, as shown in Figure 9-11.
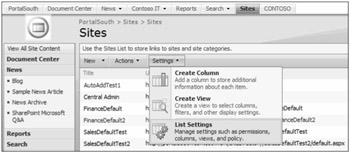
Figure 9-11: To change several of the Site Directory settings you must alter the List Settings of the Sites List.
Changing the Options for Division and Region in the Site Directory
It is unlikely that the default division and region options will align with most organizations. To modify the division and region options you must do the following:
-
Browse to the List Settings for the Sites List.
-
Click on either Division or Region in the section labeled Columns.
-
Alter the entries listed in the text box under Type Each Choice On A Separate Line.
-
To require that a value be specified, select Yes from the Require That This Column Contains Information option buttons.
-
To set a default value, select the Choice option button under Default Value and enter the desired default. The default value must be one of the choices available in Step 3.
Adding a Custom Category to the Site Directory
You can create custom categories, in addition to the Division and Region categories, to better reflect the structure of your organization.
-
Browse to the List Settings for the Sites List.
-
Click on Create Column from the bottom of the List Settings page.
-
Enter a name for the column. This value is then displayed along with Division and Region default categories.
-
Select the Choice (Menu To Choose From) option button.
-
If you wish to require a value for the column, select Yes from the Require That This Column Contains Information option buttons.
-
Enter the desired options in the text box labeled Type Each Choice On A Separate Line, which contains the values: Enter Choice #1, Enter Choice #2. These values are the choices that users are presented with during site creation.
-
To allow only a single choice to be selected, choose either the drop-down menu or option buttons from Display Choices Using. To allow a site to be associated with multiple choices, select Checkboxes.
-
If you wish to give the user the option to fill in his or her own choice, select Yes from the Allow 'Fill-In' Choices option buttons.
-
If one of the values entered in Step 6 should be a default value, then select the Choice option button under Default Value and enter the name. An empty entry indicates that there is no default.
-
Check the Add To Default View check box to add the column to the default view. Even if the check box is not checked, the column will still be displayed on the Sites main page, as shown in Figure 9-12.
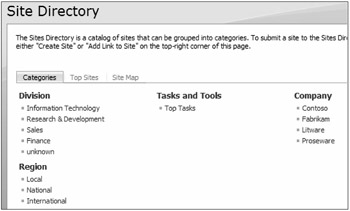
Figure 9-12: You can add custom categories, such as this one named Company, to the Category Web Part that is displayed on the Sites main page.
Viewing the Portal Structure with the Site Map
By default, the Site Map provides a view of the portal's subsites and the second-level subsites beneath them. It also displays items that have been created as headings in the Current, but not Global, Navigation at the top level of the portal. To view the Site Map, click on Site Map in the tool bar of the Site Directory.
Modifying the Site Map Web Part
The Site Map is generated by a Table of Contents Web Part, which can also be added to other pages. If you wish to modify the look and feel of the Web Part, it can be customized easily.
-
From the Site Map page, click on Site Actions and then select Edit Page.
-
On the Site Map Web Part's toolbar, select Modify Shared Web Part from the Edit drop-down menu.
In addition to the common Web Part properties, the Site Map Web Part has two property groups of particular interest: Content and Organization.
Configuring the Site Map Web Part's Content Options
-
Expand the Content group of Web Part properties.
-
Enter a location to start from in the Start From text box. If the Show Content From Starting Location check box is checked, the Web Part only displays sites and/or pages beneath the starting location.
-
Select the levels to show from the Select Levels To Show drop-down menu.
-
Choose to include pages, hidden sites, and hidden pages by selecting the appropriate check boxes.
Configuring the Site Map Web Part's Organization Options
-
Select Sort Contents As They Are Sorted In Navigation if you wish sites to be ordered as they appear in the portal top-level Current Navigation. Heading items in the Current Navigation are listed on the first level. Link items beneath heading items are not displayed.
-
Choose Sort Contents Using the Following Settings to order sites and pages according to their properties.
Using the Reports Center
The Reports Center allows you to consolidate information in a central location, making information visible through the use of Key Performance Indicators (KPIs) and dashboards. KPIs provide, at a glance, a visual summary of critical organizational information. KPI lists are displayed on pages using the Key Performance Indicators Web Part. For a detailed view of a KPI, use the KPI Details Web Part. Dashboards consolidate and visually summarize business intelligence information from multiple sources into a single, easily referenced page. Dashboards are made up of several business intelligence Web Parts, such as the KPI, Excel Web Access, and the Business Data List Web Part. The steps required to create a KPI list are described below.
Creating a KPI List
-
From the Reports Center, select Site Actions, View All Site Content.
-
Click on the Create icon located directly beneath the All Site Content title.
-
Click on KPI List from the Custom Lists section of the create page.
-
Give the list a meaningful name and description.
-
Selecting yes in the Display This List On The Quick Launch option buttons adds the list as a link beneath the Lists heading in the Current Navigation. The heading is then displayed in the Quick Launch, but the individual links are not.
Creating Key Performance Indicators
Once a KPI list has been created, you can populate it with KPIs. Four different data sources can be used to create KPIs: SharePoint lists, Excel workbooks, SQL Server 2005 Analysis Services, and manually entered data. To create a KPI, you need to navigate to the appropriate KPI list.
Creating a KPI Using Data in SharePoint List
-
Select Indicator Using Data In SharePoint List from the New drop-down menu.
-
Give the KPI a meaningful name and description, and enter comments to explain its use.
-
Select the list's URL by clicking on the Browse icon, or enter a value manually. To create a KPI to track items in the Sites List, enter http(s)://[portalURL]/SiteDirectory/SitesList/AllItems.aspx.
-
Select which list view to use to populate the KPI.
-
To base the KPI on the total number of items in the list, select Number Of List Items In The View.
-
To base the KPI on the percentage of items that meet some acceptance criteria, select Percentage Of List Items In The View Where. For example, if the portal has 100 total sites in its Sites Directory and 30 of them are in the Sales division, the KPI would return a value of 30%. Be careful because calculations on columns of the type "Choice" can allow multiple selections and may return values that are misleading.
-
To base the KPI on the sum, average, maximum, or minimum of a column in a view, choose Calculation Using All List Items In The View.
-
Specify whether better values are higher or lower.
-
Enter values for Display [green circle symbol] When Has Met Or Exceeded Goal and Display [yellow triangle symbol] When Has Met Or Exceeded Warning.
Creating an Indicator Using Data in Excel Workbook
-
Select Indicator Using Data In Excel Workbook from the New drop-down menu.
-
Give the KPI a meaningful name and description, and enter comments to explain its use.
-
Use the Browse icon to locate the appropriate value for the Workbook URL, or enter the document's path. The document's URL must be relative to the current site.
-
Use the Select icon, shown in Figure 9-13, to choose a value for Cell Address For Indicator Value, or enter a cell manually. If the cell is entered manually, it must have the syntax [sheet]!(cell). For instance, for the cell G15 in a sheet named Sales, the appropriate value would be Sales!G15. You may also use a named range in place of a cell value. This has the advantage of giving the cell a meaningful name that is not dependent on the structure of the spreadsheet.
-
Specify whether better values are higher or lower.
-
Choose values for Display [green circle symbol] When Has Met Or Exceeded Goal and Display [yellow triangle symbol] When Has Met Or Exceeded Warning using the Select icon or by entering them manually.

Figure 9-13: The Select icon allows you to choose values directly from an Excel spreadsheet.
Creating an Indicator Using Data Using Manually Entered Information
-
Select Indicator Using Data Using Manually Entered Information from the New drop-down menu.
-
Give the KPI a meaningful name and description, and enter comments to explain its use.
-
Manually enter the Indicator Value.
-
Manually enter the values for Display [green circle symbol] When Has Met Or Exceeded Goal and Display [yellow triangle symbol] When Has Met Or Exceeded Warning.
Configuring Common KPI Properties
-
Details Link The Details Page property allows you to reference a custom page to display explanatory information about the KPI. The format of the entry is validated to ensure an appropriate URL syntax, but the existence of the page is not checked.
-
Update Rules All of the KPIs, except those using manually entered information, have a control option when they are updated. To update for each user the KPIs based on an Excel spreadsheet, the user in question must have permission to view the spreadsheet. If you choose to manually update the KPI, a user who cannot view the spreadsheet itself can view the last manually updated KPI value associated with it.
Creating Dashboards
Dashboards reveal organizational information contained in any structured data system, but out-of-the-box applications do work with Excel workbooks and KPIs. They provide useful mechanisms for combining information from disparate sources into a single point of reference. To create a new dashboard within a Reports Center, do the following:
-
Click on View All Site Content.
-
Click on Reports Library.
-
Select Dashboard Page from the New drop-down menu.
-
Give the dashboard a meaningful filename, title, and description. Note that the filename will appear in headings and links throughout the site.
-
Use the Add A Link To Current Navigation Bar option buttons to configure how, if at all, the dashboard is displayed in the Quick Launch.
-
Select the desired page layout for the dashboard.
-
In the Key Performance Indicators section, if you choose Create A KPI List For Me Automatically, a KPI list is created using the naming convention [dashboard name] KPI Definitions. Selecting Allow Me To Select An Existing KPI List Later allows you to configure the KPI Web Part after creation. If you choose Do Not Add A KPI List To This Dashboard, the dashboard page is created without a KPI Web Part.
Configuring Dashboards
Spreadsheets can be added to the page using the Excel Web Access Web Part. An appropriate workbook created with Excel 2007 in the .xlsx file format is required to use the Excel Web Access Web Part. The workbook must be published to a site included in the Trusted File Location under Excel Services Settings in the site's Shared Services Provider, and it must then be published to the site using the Excel Services option.
| Tip | For more information on Excel Services, including Trusted File Locations, see Chapter 11, "Configuring Office SharePoint Server Excel Calculation Services." |
The settings for publishing the workbook can be configured by clicking on Excel Services Options, in the publish Save As dialog box. It is possible to use the Excel Service Options to reveal only portions of a workbook, such as a chart or graph, while keeping the rest private. Finally, if portions of the workbook are to be kept private or if you want multiple views of different parts of the spreadsheet, the selected cells need to be named in Excel. You may also specify named single cells as parameters. Users are able to interact with the workbook by entering values for the parameters. The parameter values entered by users will not affect the workbook. To configure an Excel Web Access Web Part, do the following:
-
Select Modify Shared Web Part from the Web Part's Edit drop-down menu, or click on Click Here To Open The Tool Pane if the option is available.
-
Enter the location of the workbook in the Workbook text box, or browse to the workbook by clicking on the button marked with an ellipsis.
-
You may specify a named item in the workbook. If the named item field is left blank, the Web Part displays an item by default. By selecting a named item and clearing the Named Item drop-down menu check box in the Web Part's properties, you can ensure that only a single view of the workbook is displayed.
-
Configure the remaining options for the Web Part.
Using Online Editing in Portals
New to SharePoint Server 2007 are several publishing features. The Page Editing tool bar contains several useful tools for modifying pages, as seen in Figure 9-14. It contains tabs to modify or configure the page and workflow, in addition to several tools including spelling and checking for unpublished items.

Figure 9-14: The Page Editing tool bar allows you to interact with pages and initiate workflows.
Using the Page Drop-Down Menu
-
Save/Save and Stop Editing When a file is saved, but not checked in, any changes made will be lost if another user overrides the check out.
-
Check Out You must check out a page to alter it. When a page is checked out, other users are not able to modify it.
-
Check In Checking in the page through the Page drop-down menu offers several options not available through the Check In Page To Draft button on the toolbar.
-
Override Check Out When you override a page being checked out, any changes that have not been checked in will be lost.
-
Discard Check Out When Discard Check Out is used, all changes made since the last check out will be lost.
-
Page Settings Selecting Page Settings allows you to configure many of the page's properties, such as the title, description, audience, and page contact.
-
Delete Page Deleting the page moves it to the site's Recycle Bin. A page can be restored from the Recycle Bin, along with its full version history.
-
Add Web Parts You choose to browse, search, or import Web Parts onto the page.
-
Modify Web Parts Modify Web Parts displays a fly-out menu of all the Web Parts on the page. Selecting a Web Part opens the Modify Web Part interface on the left-hand side of the page.
The Workflow functionality is discussed in depth in Chapter 6, "Using Workflows and Information Management Policies."
Here are some features of the Tools drop-down menu:
-
Spelling Clicking on Spelling runs a spell check on the page's HTML fields. However, not all Web Parts will be checked, and the page's properties, such as Title and Description, will need to be checked from the Page Settings page.
-
Preview In New Window Preview In New Window opens a pop-up window and displays the page without any editing interface.
-
Check for Unpublished Items The Unpublished Items Report outlines problems on the page with a red or orange border. Items in red are broken links, whereas items in orange are links that are out of date. A detailed report can be viewed by clicking on the Full Report link in the View The Full Report In A New Window message.
Note The Unpublished Items Report only checks links within your SharePoint site.
-
Version History Version History displays a summary of different versions of the page. Placing the mouse over the Modified date displays a drop-down menu, as shown in Figure 9-15. From the drop-down menu you can view, restore, or unpublish a version. When a version is restored, it also needs to be published to make it visible. When a version is unpublished, the latest version is displayed to page contributors, and nothing is displayed to users with read-only permissions.
-
Compare Text Changes Compare Text Changes displays the entire page, with differences between the previous and current versions color coded.
-
View Page Status View Page Status opens a pop-up window with a summary of information about the page.
-
View Recycle Bin View Recycle Bin opens the Recycle Bin, from which pages can be permanently deleted or restored.
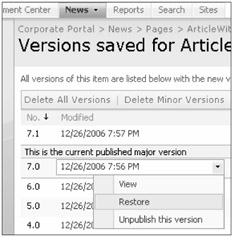
Figure 9-15: From the drop-down menu, available under Modified Date, you can view, restore, or unpublish a version.
Advanced Editing Using the Content Editor
The Content Editor, shown in Figure 9-16, allows pages to be customized in the browser using an interface similar to a word processor or Web page editor. With the Content Editor, you can create hyperlinks, images, lists, and table via the graphical user interface. A very useful feature is the ability to directly edit the content's HTML source code. Editing the HTML source gives you virtually unlimited control over what will be displayed on a page.

Figure 9-16: Clicking on the Edit Content link opens the Content Editor tool bar, which provides advanced editing capabilities within the browser.
Managing Content and Structure
SharePoint Server gives you the ability to view and interact with the entire portal through a hierarchical graphical user interface (GUI), as seen in Figure 9-17. Many of the actions available elsewhere can be initiated using the GUI. For instance, you can move sites and pages within portals and create new pages, sites, lists, and list items.
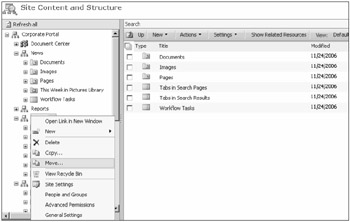
Figure 9-17: Manage Site Content And Structure allows you to copy and move between sites and to create new pages and sites.
Navigating to the Site Content And Structure Page
-
If available, select Manage Content And Structure from Site Actions.
-
If the link is not directly available, select Site Settings from Site Actions.
-
Click on Go To Top Level Site Settings under Site Collection Administration.
-
Click on Content And Structure under Site Administration.
View the Content And Structure Reports
-
Click on a site in the tree view on the left-hand side of the page.
-
In the list view on the right-hand side of the page, click on the drop-down menu labeled View and displaying the value Default View.
-
From the drop-down menu select one of the reports. The default reports are Checked Out to Me, Last Modified By Me, Pending Approval, My Tasks, All Draft Documents, Going Live Within Next Seven Days, and Expiring Within Next Seven Days.
Copying or Moving Items Using the Content And Structure Page
-
In either the tree view or the list view, rest the pointer over the name of the item that you wish to copy or move.
-
From the drop-down menu that appears next to the item's name, select Copy or Move.
-
Use the tree view in the pop-up window that appears to select a location for the item.
Deleting Items Using the Content And Structure Page
-
Rest the pointer over the name of the item you wish to delete.
-
Select delete from the dynamically generated drop-down menu.
-
Select OK from the confirmation dialog box.
Selecting Multiple Items Using the Content And Structure Page
-
In the list view on the right-hand side of the page, click the icon to the left of the Type column heading.
-
Uncheck the check boxes of any items that you do not wish to affect.
-
Select an action from the Actions drop-down menu.
Discarding Checkout Using the Content And Structure Page
If an item that requires modification is checked out, and the user who checked it out is unavailable to check it in, then the check out can be discarded. This option is only available when using the Site Content And Structure page and only to users with the appropriate permissions.
-
Find the object that is checked out using the Site Content And Structure page.
-
Select the object and choose Discard Check Out from the drop-down menu that appears when the pointer is held over the item's name.
Showing Related Resources Using the Content And Structure Page
The Site Content And Structure page provides a mechanism to determine what resources, if any, a page or site uses or references. Resources that are displayed include Cascading Style Sheets (CSS), links to other pages, links to the page from other pages in the site collection, and images.
-
Select an item from the tree view on the left-hand side of the Content And Structure page.
-
Select Show Related Resources from the list tool bar on the right-hand side of the page.
Using Internet Portals
The Publishing Portal allows you to make information visible to the broadest possible audience, the Internet. Using SharePoint's rich feature set, page editing and creation can be managed by workflows, allowing Internet content to be created by subject matter experts. Information managed for internal consumption can be filtered and re-purposed for the general public. Most Internet or Extranet access is via anonymous authentication or forms-based authentication. To create a new Internet or noncollaborative Intranet portal, you must create a Publishing site collection and enable anonymous authentication and/or forms-based authentication.
Creating an Internet Portal by Applying the Publishing Template
-
Create a new application in Central Administration.
-
Create a new site collection at the application's root, applying the Publishing Portal template.
Enabling Anonymous Access in Central Administration
-
Go to Central Administration.
-
Select the appropriate Web application from the Web application list.
-
Click on Authentication Providers under Application Security.
-
Select the zone on which to allow anonymous access.
-
Check the Enable Anonymous Access check box under Anonymous Access on the Edit Authentication page. While this can be set in IIS Manager, doing so in Central Administration writes this setting to the configuration database. If the setting is written to the configuration database, it will automatically be applied to servers as they are added to the farm.
-
Click Save.
Enabling Anonymous Access for a Site Collection
-
Verify that the site collection's web application has Anonymous Access enabled in Central Administration.
-
In publishing site collections, select Modify All Site Settings from the Site Actions drop-down menu.
-
Click on Advanced Permissions under Users and Permissions.
-
Select Anonymous Access from the Settings drop-down menu.
-
Select the option button labeled Entire Web Site. If you select the Lists And Libraries option button, anonymous access can be enabled for the site collection's lists and libraries. Enable only the items that require anonymous authentication; wikis and blogs are examples of standalone anonymous lists.
Enabling ASP.NET Forms-Based Authentication
Using ASP.NET pluggable authentication, SharePoint 2007 provides multiple authentication methods. Of particular interest when working with portals are ASP.NET forms and Web Single Sign-On (SSO). ASP.NET forms authentication is useful for authenticating against non-Windows authentication providers, such as SQL Server, other databases, or a Lightweight Directory Access Protocol (LDAP) provider. Forms-based authentication is also highly valuable for authenticating users via the Internet. Web Single Sign-On authentication provides a method for mapping credentials for third-party and back-end systems, for instance, line-of-business applications or databases. In addition to the default Microsoft SSO provider, Office SharePoint Server 2007 can use custom SSO providers.
EAN: 2147483647
Pages: 110