#21. Importing Text Since most people compose documents in word processors, InDesign makes it easy to import Microsoft Word files and other text files. When importing text, you can customize how the text is imported (with or without formatting, for example), and you have various options for flowing it through a document. You can pretty much do anything from importing raw text with no formatting to bringing in fully formatted text that includes inline graphics, tables, a table of contents, an index, and footnotes. Supported Text File Formats InDesign lets you import text files in .doc, .txt, and .rtf format. If you try to import a file from an unsupported version of Word, you will get an error message. Save the file as .rtf and reimport itmost of the formatting is still retained. InDesign also lets you import files from Microsoft Excel and in its own Tagged Text format. Tagged Text is exported from InDesign with proprietary tags that can be converted to actual formatting. Using Tagged Text is helpful for sharing formatted text among InDesign documents. |
Placing a Text File You can import text into an existing frame or type paththe frame doesn't even have to be a text frame because InDesign will automatically convert it. In addition, you can "load" the cursor with the imported text and create a new text frame. To import a text file: 1. | If you want to import the text into an existing frame or type path, click in it. To flow text into the master text frame, press Command+Shift (Mac OS) or Ctrl+Shift (Windows) to select it. Otherwise, make sure no objects are selected.
| 2. | Choose File > Place.
| | | 3. | In the Place dialog box (Figure 21), locate and select the Microsoft Word or text file.
Figure 21. The Place dialog box (File menu) lets you select Microsoft Word and text files to import. 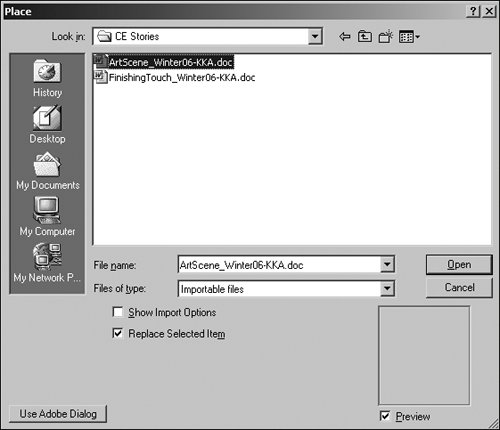
| 4. | To customize how the text is imported, check Show Import Options. This gives you control over how much formatting and other elements are imported with the text.
| 5. | If the selected frame contains text or a graphic and you want to replace it, check Replace Selected Item. If you uncheck this option, InDesign loads the cursor so you can create a new text frame.
| 6. | Click Open.
|
Exporting Text Files If you need to edit text outside InDesign, you can export it as Adobe InDesign Tagged Text, Rich Text Format, or Text Only. Using the Type tool, click in a story to export all of it or highlight the portions to export. Then, choose File > Export and select an option from the Format menu. |
If the Missing Font alert displays, you can generally click OK to bypass the alert since you will be using formatting specified in InDesign. If, however, you plan to use the formatting in the file, note which fonts are missing and activate them using your font manager. You can also use the Find Font button to replace the fonts with active fonts. Setting Import Options If you check Show Import Options in the Place dialog box, the Microsoft Word Import Options or Text Import Options dialog box displays. For Microsoft Word, you can use this dialog box to control whether the table of contents, inline graphics, formatting, and styles are imported along with the text and to resolve any style conflicts. For text files, you can clean up the text by removing extra paragraph returns and specify other options. Flowing Text Through a Document When you import text into a selected frame, the text in the file fills the frame and automatically flows into all the frames threaded to it. If you selected the master text frame, pages and text frames are added as necessary to contain all the text. Drag and Drop Importing In addition to using the Place command (File menu), InDesign lets you import both text and graphics files by dragging them from your computer desktop onto a page. If a frame is selected, the text or graphic is imported into the frame. If nothing is selected, a text frame is automatically created roughly where you drop the file. |
If no frames are selected when you import text, the loaded text icon displays  At this point, you have three options: At this point, you have three options: Click in a text frame or type path to flow the text into it. Click and drag to create a new text frame. Option+Shift-click (Mac OS) or Alt+Shift-click (Windows) to automatically create a text frame (within the margin guides) and flow the text into it. Any remaining text is overset. InDesign refers to this as fixed-page autoflow.
If all the text doesn't fit into the frameas indicated by a red plus sign in the lower-right corner of the text frameyou have overset text. To flow the overset text through the document, you have several options: Manual text flow: Click an out port on the text frame to load the cursor again, and then create another text frame or thread this one to an existing text frame (see #19 for more information). With manual text flow, you need to continually reload the cursor and create new text frames or threads until all the text fits. Semi-autoflow: Option-click (Mac OS) or Alt-click (Windows) the loaded text icon to automatically reload the cursor. Thread text frames until all the text flows through the document. Autoflow: Shift-click the loaded text icon to add pages and text frames (based on the master text frame) until all the text fits.
Once you flow text, you may need to bump certain paragraphs or sections to a different column or page. Rather than using extra paragraph returns to do this, use the options in the Type > Insert Break Character submenu (such as Column Break or Page Break). |