Chapter 2: System Configuration and Computer Hygiene
BIOS OVERVIEW
When a computer is first started, it needs some direction as to what to do. It needs to know where to find the OS’s startup files, how hardware is to be accessed by the OS, and what hardware is installed on the system, among other things. It is the job of the BIOS to perform these tasks. BIOSs are made by a number of different companies, often customized by the motherboard manufacturers or system builders for a particular motherboard or computer. Some common BIOS brand names are Phoenix™, AMIBIOS , Award™, IBM , and MR BIOS . They are in the form of CMOS chips that store the information.
Power On Self Test (POST)
On the CD The first event that happens when a computer is powered on is the POST, performed by the BIOS. The POST consists of a quick series of diagnostic tests, mostly to make certain that essential hardware is present and operating. The most essential hardware is the BIOS itself, processor, memory, video system, and a source of OS startup files (almost always a hard drive). The POST first checks the BIOS, and then the other items. If any of these are not operating correctly, the computer might not start or run correctly. As long as the BIOS program is not set to “Quiet Boot,” the POST will give a single beep to let you know that all the tests were successful. If the POST detects problems, it will give a beep code and/or a text message to let you know what is wrong. You can find a list of common beep codes on the accompanying CD-ROM.
Setup Program
The program run by the BIOS is usually called the setup program. Different motherboard manufacturers vary as to how to access the setup program. The most common method is to press a given key just after the first information appears on the screen after the computer is powered on. Often, the screen will give a prompt such as “Press Delete to access Setup.” <Delete> is the most common key. Others include <F2> on Dells and Hewlett-Packards, <F10> on Compaqs, and <F1> on some Gateways. Setup screens vary widely, so we will cover the most common and important BIOS settings.
| Note | Before you go into a setup program, make sure that you are ready to write down any changes you make. Some setting changes can render a computer unbootable, and if you don’t know which changes you made, you’ll have a difficult time finding the change that caused the problem. |
To help prevent changes from causing serious problems, BIOS manufacturers offer a way out. After you have changed BIOS settings, setup programs offer you a choice to accept or discard changes as you exit the program. Use this function if you are unsure of any changes you have made, or if you haven’t recorded those changes on paper. You can always go back and make the changes again. Figures 2.1 and 2.2 show examples of setup screens.
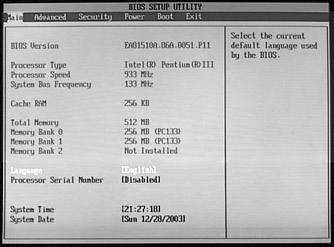
Figure 2.1: A sample of a setup screen.
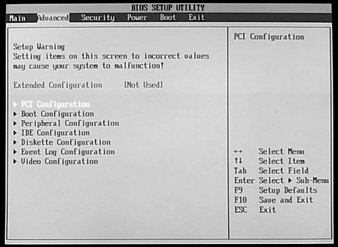
Figure 2.2: Another setup screen.
Important BIOS Settings and Information
Because there is so much variability among setup programs on different BIOSs, we will cover common and important items only:
System Date and Time: This can also be set in Windows.
BIOS version number: Sometimes it is necessary to update the BIOS. BIOS programs are delineated by version numbers; if the motherboard or computer manufacturer’s Web page shows a download with a higher number, that means a more recent BIOS is available. See Chapter 3, “Motherboards and their Components,” for more information on updating BIOSs.
Port assignments: If the computer has ports (serial, parallel, etc.) that are not being used, and it is necessary to free up their resources, you can disable them in the setup program. Conversely, if you need to use them and they are disabled, you can re-enable them in Setup.
Supervisor and user passwords: You can set passwords for the computer.
| Note | If you set a supervisor password and forget what it is, you can also forget about retrieving it, and you might not be able to finish booting the computer. Sometimes, there are steps you can take to reset the password. See Chapter 3 for more information. |
Power settings (Advanced Configuration and Power Interface, ACPI): Contains power use settings including those for hibernation, standby, and in battery-powered computers, power conservation settings. Often, BIOSs contain settings that allow proper shutdown of Windows just by pressing the power button on the computer or keyboard once. Some systems have different levels of standby types.
Boot order: Traditionally, a computer is set to boot first from the floppy drive, and then from the main hard drive (Drive C). This means that the computer will check the floppy drive first for boot files. If there is no disk in the floppy drive, the computer will then go to the hard drive to look for boot files. That is why if you leave a nonbootable floppy disk in the drive and try to boot up, you’ll get an error message such as “NTLDR is missing. Press any key to restart.” or “Non-system disk or disk error.” This can be changed to pretty much any order, including CD-ROM and DVD drives. It is useful when installing Windows on a new or just-formatted computer to set the computer to boot first from a CD-ROM drive, and then insert the Windows installation CD-ROM into that drive. This saves you from having to use boot floppies that might or might not come with the Windows CD-ROM.
Memory settings, DRAM Timing: Don’t change these unless so instructed by a support technician.
AGP Aperture Size: Don’t change this unless you are familiar with troubleshooting techniques and feel comfortable in this area. The main thing to remember here is that the AGP Aperture Size should almost always be set to at least 16MB and never to more than the actual physical RAM installed in the system. This setting will allow a possible increase in graphics (video) performance by permitting the graphics system to share system memory if needed. A higher setting often (but not always) means better graphics performance, so test the results of any change you make here by viewing the graphics performance.
CPU Frequency, Voltage Control, and other settings such as frequency (speed): On many BIOSs, this can be set automatically or manually. If you’re setting them manually, you have to know the exact settings for your CPU so you don’t damage your motherboard or CPU. Settings other than those specified by the CPU manufacturer should be made only by very experienced technicians.
PC Health: These include CPU and system temperatures at which warnings are made and shutdowns occur.
Integrated peripherals: These are items such as sound “cards” and network adapters that are part of the motherboard. The most common use of these settings is to disable these devices when additional peripherals of the same type are installed. For example, if the user installs an expansion sound card on a system that has onboard sound (because the onboard sound device has failed or because the user wants to upgrade to a better sound device), the onboard sound needs to be disabled to prevent problems that can occur with two active sound cards.
Interrupts (IRQs): These settings can also be changed in the Windows Device Manager (we provide more information later in this chapter).
Extended System Configuration Data (ESCD): If this setting is available, it should be enabled every time a new component is installed in the computer. Each time ESCD is enabled, the configuration resets at next boot. If a computer won’t boot after installation of a new component, enabling ESCD and rebooting the system can sometimes solve the problem.
IDE Detection: This is normally set to Auto for automatic detection of IDE disk drives. Disabling auto-detection on unused drive channels can speed the boot process. See Chapter 6, “Magnetic Disk Drives,” for more information on IDE drives.
Self-Monitoring Analysis and Reporting Technology (S.M.A.R.T.) drives: This technology, incorporated into most modern IDE hard drives, can alert the user of possible impending hard drive failure and most likely allow for data backup before this happens. Because of this, S.M.A.R.T. drive support should always be enabled in the setup program. Interestingly, computers are often delivered from the factory with S.M.A.R.T. drive support disabled.
Plug and Play (PnP) settings: We describe Plug and Play capability later in this chapter. PnP should be enabled in the vast majority of cases. Sometimes in Windows 95, you will have to disable Plug and Play support. There are certain other unusual situations that require you to disable Plug and Play, as you might find when researching certain problems or reading installation manuals.
Load defaults: Setup programs have default settings. Loading default settings is a good way to get your computer back to its original configuration. Do this only if all else fails. Before loading the default settings, go through each screen and write down every setting. Some devices might not work with the default settings.
EAN: 2147483647
Pages: 390