| Objective: Configure and manage user profiles and desktop settings. When a user logs on to Windows XP, Windows 2000, or Windows NT, the operating system generates a profile. This user profile comprises desktop settings, files, application data, and the specific environment established by the user. For example, a user named Joe logs on to Windows XP, changes his desktop wallpaper to a picture of his dog, edits the user information in Microsoft Word, configures a dial-up connection to his Internet service provider (ISP), and adjusts the mouse so that it is easier to double-click. When Gladys logs on to the same computer using her own account, she sees the default settings for Windows XP, not Joe's settings. When Joe logs on next, Windows XP finds Joe's existing profile and loads his settingsthe wallpaper, the Word data, the dial-up connection, and the mouse click settings. A user profile is not the same thing as a local policy, a group policy, or a hardware profile. These are other configuration systems that you can use to manage a computer running Windows XP. We look at group policies and local policies in Chapter 12, and review hardware profiles in Chapter 9. When Windows XP is connected to a Windows network, a user profile can be configured to roam the network with the user. Because the profile is stored in a file in the Documents and Settings folder on the %systemdrive%, the profile can be configured to be placed on a network drive rather than a local hard disk, and can be made accessible to the user regardless of which computer is being used. User profiles enable users to customize their own settings without impairing another user's configuration. User profiles were developed in response to organizations that routinely provided shared desktop computers. In cases where a user absolutely requires certain settings to use the computer comfortably, having to share a computer with another person who then removes the needed configuration can be frustrating, plus it causes a loss of productivity. Another advantage to user profiles is that when used in conjunction with network storage of data, the desktop computer is easily replaceableusers can use any computer on the network without having to perform extra tasks to customize the computer to suit their needs. To use profiles, each user must have a separate user account. The user account can be a domain account or a local account. There are four different types of profiles, which are detailed in Table 10.1. Table 10.1. Profile TypesProfile | Created For | How It Works |
|---|
Roaming | Users who log on to different computers on the network | The profile is stored on a server. When a user logs on to a network computer, the profile is copied locally to the computer. When the user logs off of the network, changes to the profile are copied back to the server. | Mandatory | Administrative enforcement of settings (this is applied to user accounts that are shared by two or more users) | The profile is stored on a server. When a user logs on to a network computer, the profile is copied locally to the computer. No changes are saved when the user logs off the server. Only an administrator can make changes to the profile. | Local | Every user at first logon | When the user logs on to a computer, whether it is connected to a network or not, a local profile is created and saved in the local Documents and Settings folder for that user. All changes are saved when the user logs off. | Temporary | Users that were unable to load their profiles | When an error condition exists that prevents users from loading their normal profiles, a temporary profile is loaded. When the user logs off, all changes are deleted. | All Users, Files and Folders | All users who log on to a computer | When a user logs on to a computer, the All Users, Files and Folders contents, which include desktop and Start menu items, are combined with the individual's profile. | Default User | Users who log on for the first time | When a user logs on for the first time, the default profile is used as a template to create a new profile for the user. |
User profiles consist of a Registry hive that incorporates the data typically found in NTuser.dat, saved as a file that is mapped to the HKEY_CURRENT_USER Registry node, and a set of profile folders. The files and settings located in the Registry hive and profile folders are listed in Table 10.2. The Registry consists of subsets of data contained in nodes, or hives. A Registry hive is a set of keys, subkeys, and their values that provide configuration data to the operating system. Table 10.2. Location of User Profile Files and SettingsFiles/Settings | Located in Registry Hive | Located in Profile Folder |
|---|
Network connection settings and network printer connections | X | | Windows Explorer folder options | X | | Control Panel configuration of mouse, desktop, and other devices | X | | Application-specific settings | X | | Taskbar settings | X | | Application component files | | X | OS component files | | X | Desktop icons and shortcuts | | X | Startup applications | | X | Documents | | X | Configuration files | | X | Internet Explorer files and folders for cookies and Favorites shortcut files | | X |
Windows XP Professional and Windows 2000 store user profile information in %systemdrive%\Documents and Settings. Windows NT 4.0 stores profiles in the %systemroot%\profiles folder. Using Roaming and Mandatory Profiles with Active Directory Roaming and mandatory profiles require a network server for implementation. Although it is recommended that you have a Windows Active Directory network for this, you can implement these profiles on other network servers. An Active Directory network is recommended for use with roaming and mandatory profiles because of the additional management features that are provided by Group Policy. For example, you can specify additional folders to include in the profile, as well as mark certain folders to exclude from the profile. Group Policy has enhancements that were created specifically for Windows XP. There is a new Group Policy object (GPO) that can prevent profile changes from copying back to the server. Another GPO enforces local profiles. An additional advantage to using Group Policy in conjunction with roaming profiles is that you can prevent users from running applications that you deem to be unacceptable, or allow a user to run only a short list of applications. Even if a user has installed the application and incorporated its data into the user's profile prior to the restriction policy, the GPO prevents the user from running it. When you use Group Policy together with roaming profiles, you can ensure that a user's Windows XP settings are exactly what you want the user to have. You can create a default user profile that includes the desktop icons, startup applications, documents, Start menu items, and other settings. Then, you can use Group Policy to manage the way that the user interacts with the network, such as preventing access to Control Panel and prohibiting a user from using the Run command. You can even use Group Policy to publish certain applications that the user is allowed to install, and you can redirect users' My Documents and Start menu folders to a network location. When a user logs on to the network the first time, the desktop will be configured with the settings that are appropriate for your organization. If the user makes changes to the profile, those changes are saved. The user can then log on to an entirely different computer the next day and automatically see the environment he configured for himself, plus have immediate access to his personal files, folders, and applications. |
The first time a new user logs on to a Windows XP computer that uses local profiles, the following process takes place: 1. | Windows XP checks the Registry in HKLM\SOFTWARE\Microsoft\Windows NT\CurrentVersion\ProfileList for a local profile for the user.
| 2. | If the computer is part of a domain, Windows XP checks for a domain default profile in the NETLOGON share of the domain controller. If one exists, the profile is copied from the domain controller. Otherwise, the default profile loads from %systemdrive%\Documents and Settings\Default User.
| 3. | A new folder is created below the %systemdrive%\Documents and Settings folder, and is named the same as the user's account name.
| 4. | The NTuser.dat file is copied from %systemdrive%\Documents and Settings\Default User to %systemdrive%\Documents and Settings\%username%.
| 5. | The %systemdrive%\Documents and Settings\%username%\NTuser.dat file is mapped to the Registry under HKEY_CURRENT_USER.
| 6. | The environment variable %userprofile% is changed to the %systemdrive%\Documents and Settings\%username%\folder location.
| 7. | During all subsequent logons, the NTuser.dat file is opened from %systemdrive%\Documents and Settings\%username% and incorporates any additional entries that are placed in %systemdrive%\Documents and Settings\All Users.
|
You can change the location in which Windows XP looks for a user's profile. When you do so, you must be logged on to the computer as a member of the Administrators group. Step by Step 10.1 explains the process. Step by Step: 10.1 Changing a User's Profile Location 1. | Right-click My Computer and select Manage.
| 2. | In the tree pane, navigate through Computer Management to System Tools, Local Users and Groups, Users (see Figure 10.1).
Figure 10.1. Profile information can be found in the Computer Management console. 
| 3. | Right-click a user account and select Properties from the shortcut menu.
| 4. | Click the Profile tab.
| 5. | Type the location of the profile in the Profile Path text box. This should be in the Universal Naming Convention (UNC) format of \\servername\share\Path_To_The_UserProfile.
| 6. | If there is no profile information in the path to the user profile location, the next time the user logs on, the default user profile loads for the user and is copied into the path location. When the user logs off, changes to this default profile are saved in the path.
|
|
Transferring Files and Settings Between Computers Installing, moving, adding, changing, and retiring are the processes that a desktop administrator conducts daily on an organization's network, and reflects the dynamic environment into which Windows XP Professional must fit. This constant movement of PCs around the network and between users demands a way to transfer files and settings from the "old" computer to the "new" computer. In a project that calls for the replacement of a large number of computers, the capability to quickly transfer a user's data from the former computer to the new one is particularly important. The File and Settings Transfer Wizard is the tool available in Windows XP Professional specifically for this purpose. Using the Files and Settings Transfer Wizard, you can transfer settings for Outlook Express Dial-up connections Internet Explorer Display options Folder options Taskbar configuration options Specified folders including My Documents, My Pictures, and Favorites
To transfer the settings, both systems should be connected to the network simultaneously. If a network connection is not available, you can use a crossover cable between the two computers' network adapters, a null modem cable between their serial ports, or an infrared link. Step by Step 10.2 details the transfer process. Step by Step: 10.2 Transferring Files and Settings with the Wizard 1. | Click Start, All Programs, Accessories, System Tools, Files and Settings Transfer Wizard. (You can also click Start, Run, type migwiz.exe in the Open text box, and press Enter.)
| 2. | Click Next to bypass the Welcome screen.
| 3. | Select the computer on which you are currently working. For the purposes of this exercise, we selected the New Computer option, as shown in Figure 10.2. Click Next.
Figure 10.2. The Files and Settings Transfer Wizard functions from either the old or the new computer. 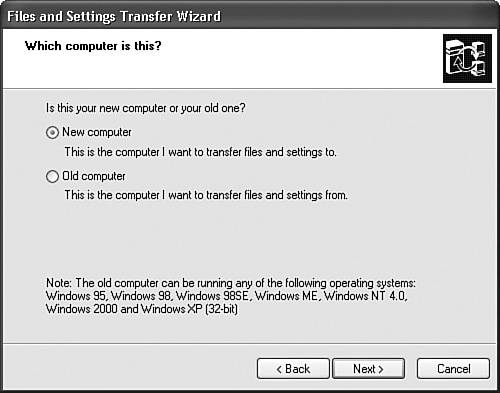
Note Older systems require a wizard disk to use the File and Settings Transfer Wizard When you transfer files and settings from an older Windows computer to Windows XP, you should start the Files and Settings Transfer Wizard on the new computer so that you can create the Wizard Disk you will need for the old computer. If you are transferring between two Windows XP computers, you should first collect the files and settings from the old computer before starting the wizard on the new computer.
| 4. | The resulting screen prompts you to create a Wizard Disk, use the wizard from the Windows XP CD, or to indicate that you don't need a Wizard Disk. If you are transferring between two Windows XP computers, you can simply run the wizard from the old computer the same as you did the new one, so select the final option (I Don't Need the Wizard Disk) and click Next.
| 5. | Go to the old computer and start the Files and Settings Transfer Wizard. If you created a Wizard Disk, take the floppy disk to the old computer and run Fastwiz.exe, which executes the migration process to collect settings.
| 6. | Click Next in the Welcome screen.
| 7. | Select the Old Computer option and click Next.
| 8. | Select Other to save the data to a local drive that is shared on the network. Click Next.
| 9. | Select Both Files and Settings and then select the Let Me Select a Custom List of Files and Settings When I Click Next (For Advanced Users) option. Click Next.
| 10. | You can add specific settings, files, file types, and folders by clicking the appropriate buttons depicted in Figure 10.3. You can also click a setting, file, file type, or folder in the wizard screen and click the Remove button to ensure that it will not be transferred. (You do not have this choice when you apply the settingsonly when you save them.) Make your changes and click Next.
Figure 10.3. The wizard enables you to select which settings, files, and folders to transfer. 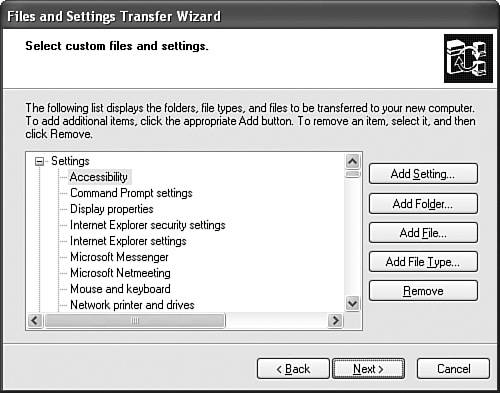
| 11. | After all the data is collected, the wizard displays the final screen. Click Finish.
| 12. | Go back to the new computer. The Where Are the Files and Settings screen, shown in Figure 10.4, asks you to select the type of connection between the two computers. If you are using an infrared port, you should be able to select Direct Cable. If you're using a different connection type, select Other and type the path to the location where you saved the settings from the old computer. Click Next.
Figure 10.4. There are several ways to connect two computers when transferring files and settings. 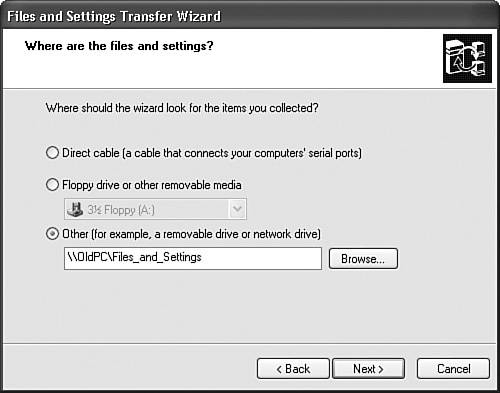
| 13. | The wizard connects to the network drive and applies the settings to the new computer. After the settings have transferred, click Finish.
|
|
Exam Alert Menu and folder views The exercises throughout this book discuss how to navigate the menus and folders as they appear in Windows XP by default, rather than the Classic style menus and folders found in earlier Windows graphical user interfaces (GUIs). The 70-270 exam does not test you on your knowledge of the Classic View, except in the cases where you are tested on how to change to Classic View or back to Category View.
You can transfer the following settings: Control Panel Accessibility, mouse, keyboard, regional settings, sounds and multimedia, network printers, and drives Interface Command prompt configuration, display properties, and taskbar settings Applications Internet Explorer, Microsoft Messenger, NetMeeting, Outlook Express, Media Player, and Windows Movie Maker
The wizard, by default, transfers the following folders: Desktop Fonts My Documents My Pictures Shared Desktop Shared Documents
If you have more than 2GB of data, after compression, the wizard's .dat file generates successive files. This should not, however, cause any problems for the transfer process. If you have transferred files and settings from an older Windows computer to Windows XP, you may not receive all the files and settings that you collected on the old computer. If any file or setting fails to transfer, you see a list showing which could not be restored. The data that may not transfer include device drivers for a device that is not installed on the new Windows XP computer, or network printers that are not available on the network for the new Windows XP computer. When you conduct an enterprise migration, you will find that the User State Migration Tool (USMT) is able to collect and transfer files and settings. USMT may be preferable to the Files and Settings Transfer Wizard because administrators can tailor specific settings in the USMT, even those in the Registry. USMT functions only on a network with at least one Windows domain. Implementing Roaming Profiles Local profiles cause an administrative headache when users roam around the network, and when computers are routinely exchanged throughout the network. For example, if Joe logs on at PC1 and saves a file that holds key information for his job on this desktop, and later on Joe logs on at PC2 because PC1 was replaced with new hardware, he is likely to have a panic attack to discover that his file is missing. Roaming profiles overcome this problem. Note Folder redirection helps manage personal data For optimum management of users' personal data on a network, use folder redirection. Folder redirection is found in Group Policy and functions on an Active Directory network. You can select folders, such as My Documents, and redirect them to network locations. When users log on to various workstations around the network, they always have their own data provided to them.
When a user with a roaming profile logs on for the first time, the following process takes place: 1. | Windows XP checks for the path to the user's roaming profile.
| 2. | Windows XP accesses the path and looks for the profile. If no profile exists, Windows XP generates a folder for the profile.
| 3. | Windows XP checks for a cached copy of the profile listed in HKLM\SOFTWARE\Microsoft\Windows NT\CurrentVersion\ProfileList. If a local profile is found, and the computer is a member of a domain, Windows XP looks in the domain controller's NETLOGON share for a default profile for the domain. The default domain profile is copied to the local computer folder %systemdrive%\Documents and Settings\%username%. If there is no domain default, Windows XP copies the default local profile to the same location.
| 4. | The NTuser.dat file is mapped to the Registry's HKEY_CURRENT_USER key.
| 5. | Windows XP updates the user's %userprofile% environment variable with the new location of the profile.
| 6. | When the user logs off, the local profile is copied to the network path configured in Windows XP.
| 7. | The next time the user logs on to the same computer, Windows XP opens the locally cached copy of the user's profile and compares it with the copy on the domain server. Windows XP merges the contents of the two profiles.
|
You can make changes to whether a computer uses local or roaming profiles in Control Panel. To do so, right-click My Computer and select Properties from the shortcut menu. The System Properties dialog box opens. (You can also open this dialog box by double-clicking the System applet in Control Panel under the Performance and Maintenance category.) Click the Advanced tab and then click the Settings button in the User Profiles section, as displayed in Figure 10.5. Figure 10.5. You can access user profile settings in the System Properties dialog box. 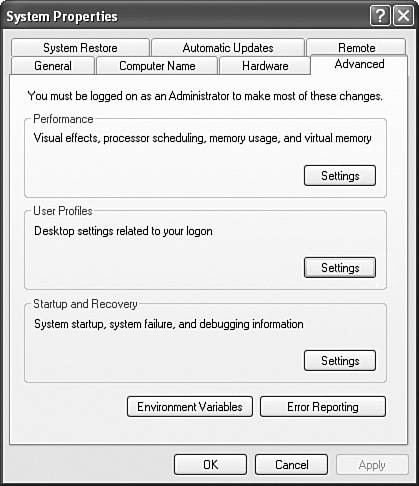
After you click Settings, the User Profiles dialog box opens, as shown in Figure 10.6. In this dialog box, you can delete a profile for a user, which is useful when you are moving a computer to a different user. You can copy an existing profile, which is also useful when you want to use the same settings for multiple users of the same computer. Plus, you can click the Change Type button to change the profile from a local profile to a roaming profile or vice versa. Figure 10.6. Some profile management options are to copy, delete, or change the type of user profile for specific users. 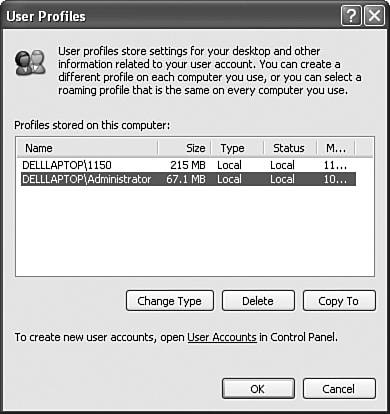
To separate the profiles from other data that is copied across the network (and also to separate it from data that may require stricter permissions), you should designate a subfolder named PROFILES or a similar name that describes its contents. The permissions for this folder should be Full Control for each computer's local Users group. Because the local Users group is automatically made a member of the Domain Users group, you need to apply the permission only once. With the share created and appropriate permissions applied, you next need to apply the profile path to the user account on each affected computer (if using a local account) or on the domain (if using a domain account). It is highly recommended that you use only domain accounts. As stated earlier, the profile is configured in the Computer Management program, under the Local Users and Groups node, under Users. The Properties dialog box of each user account has a Profile tab, and you input the path to the roaming profile in the Profile path box. You also need to change the local profile to a roaming profile in the System applet in Control Panel. To fully configure roaming profiles using Active Directory, follow the process in Step by Step 10.3. Step by Step: 10.3 Using Active Directory to Configure a Roaming Profile 1. | Select a server to contain your Profiles directory. On the server, configure a folder to contain the profiles and share it. You should make this share hidden by naming it with a $ following the share, for example, hidden$. This prevents users from accidentally browsing through personal information.
| 2. | Grant all users Full Control of the folder and the share.
| 3. | Open Active Directory Users and Computers.
| 4. | Navigate to each domain user's User object.
| 5. | Right-click the User object and select Properties.
| 6. | Click the Profile tab.
| 7. | In the Profile path text box, type the share and folder path that you created in step 1, in the format of \\servername\share\folder.
| 8. | After the user logs on for the first time, a subdirectory named after the user account appears in the profile directory. To restrict outside access to private information, you should restrict all users from accessing the profile, other than the user and necessary administrators.
|
|
If you have difficulty applying a profile, whether local or roaming, you should first review the Event Viewer Application event log. For roaming profiles, you should verify that the user has the Full Control permission for his own profile directory. By this point you should be able to discern how to use profiles. Challenge 10.1 provides a scenario that requires these skills. Challenge You are the network administrator for Junior Black, a restaurant chain with 250 restaurants connected via Integrated Services Digital Network (ISDN) lines. Each restaurant contains several point-of-sale (POS) computers, a management computer, and a Windows Server 2003 network server. At Junior Black's headquarters, you have four Windows Server 2003 Active Directory domain controllers, 20 Windows Server 2003 member servers, and 1,000 desktop computers and users. A single domain controller and 14 desktop computers are located in a warehouse. All desktop computers and POS computers in every location, except for the warehouse, run Windows XP Professional. The desktop computers in the warehouse run Windows 98. A problem recently occurred in which settings for the POS computers were accidentally changed, which caused data to be lost regarding the sales made in those restaurants. You have been assigned the task of enforcing a way for those POS computers to automatically load the same settings every time they are booted up, regardless of what settings have been reconfigured by a user. 1. | How do you accomplish the task of enforcing standard desktop settings on the POS computers?
| 2. | What type of profile should you use?
| 3. | Your boss informs you that the warehouse desktop computers are all being replaced with brand new Windows XP computers. Many of the warehouse users have special configurations for their particular usage. What do you recommend for configuring the new computers?
| 4. | You run Fastwiz.exe on a Windows 98 computer at the warehouse. The settings are saved in a local folder. You are unable to place both the Windows 98 and Windows XP computers on the network at the same time. How do you move the settings to the new computer?
| 5. | After completing the file and settings transfer, a user asks why the virus-checking configuration is different from the way the Windows 98 computer was configured. He had expected the settings to be identical, because both computers use the same manufacturer's virus software. How do you respond?
| 6. | You have been asked to install Office 2003 on 100 desktops in the accounting department. The application should not be installed on any other department's computers, even if an accounting user logs on to another department's computer. Currently, all computer objects in the Active Directory are contained in an organizational unit (OU) named All Network Desktops and have a GPO assigned to them. How can you accomplish this?
|
Try to resolve the problems on your own. If you have difficulty, refer to the following steps: 1. | On a correctly configured POS computer, save its NTuser.dat file to a network share. You should then rename the NTuser.dat file to NTuser.man. Finally, you should configure the Active Directory user account to point to the network share that contains this profile.
| 2. | You should use a mandatory profile.
| 3. | You recommend using the Files and Settings Transfer Wizard on the new Windows XP computers to move the desktop settings to the new computers.
| 4. | You run the Files and Settings Transfer Wizard on the Windows XP computer with the two computers connected via a null modem cable, pointing the wizard to the folder on the Windows 98 computer.
| 5. | Third-party manufacturers' software applications that are so specific to the operating system that they cannot be run on both computersvirus checkers being an examplecannot have their configuration settings copied through the Files and Settings Transfer Wizard.
| 6. | Create an OU for the accounting computers that is contained within the All Network Computers OU. The existing GPO will flow down the hierarchy and apply to the subcontainer's contents. You should then create a GPO in the accounting computers' OU for installing Office 2003 and assigning the Windows Installer package to the computers.
|
|
Caution Disk quotas can conflict with roaming profiles Disk quotas can cause problems with user profiles because users tend to save all their documents in the My Documents folder, which is then saved to the profile. You should review any disk quotas that are applied to a roaming profile.
Establishing Mandatory Profiles A mandatory profile is a roaming profile that the user can't change. You create and configure mandatory profiles using the same steps you use for a roaming profiles. However, after a profile has been configured and saved as the NTuser.dat file in the user's profile path on the network, you simply need to rename the file to NTuser.man. When the NTuser.dat file is renamed with the .man extension, it is treated as though it is a read-only file. At user logon, the file is read the same way as a roaming profile. However, if a user makes any changes to the environment, the changes are discarded when the user logs off. A mandatory profile is helpful in managing the desktop environment for users who unpredictably and accidentally delete items from their desktop and Start menu, or make other unintended changes. A mandatory profile is not useful for users who need a dynamic environment for running a variety of applications. When you configure a mandatory profile to be used in an organization to be shared by a variety of users or computers, and when a single user moves around a network to use different computers, the profile's graphical presentation should be made to run at a level that all the computers can support. For example, if you have some computers that support a maximum 800x600 resolution, you should not create a profile with a 1024x768 resolution setting because it will not display correctly on some of the computers. If you need to make changes to a mandatory profile, rename the profile back to NTuser.dat, log on as the user, and configure the computer. When you have completed the changes, you should log off so that the changes are saved to the profile. Then, after logging on as an administrator, you can rename the file as NTuser.man. If this is a profile that should be used by multiple people, you can replace the other users' NTuser.man files with the new version. |