Configuring a High-Speed Connection


If you're using an Ethernet network adapter to connect your computer to a DSL or cable Internet service, the installer may set up your computer for you. "Self-install" providers will give you a set of instructions specific to your service. In the next several sections I'll give you a general idea of what's required.

You will start by installing and configuring a network adapter to connect to the modem, or plugging in a USB-based modem, and then setting up the connection with the New Connection Wizard. Configuring the network adapter will go something like this:

  1. If your computer has a built-in Ethernet network adapter that you're not already using for a home or office LAN, you can use the built-in adapter to connect to your broadband modem, so you can skip ahead to step 3. Otherwise, you'll have to install an additional plug-in Ethernet adapter. This may be provided by your ISP, or you may have to purchase one.

  2. For an internal adapter, you'll shut down the computer, insert the card, turn the computer back on, and log on as a Computer Administrator. In most cases, Windows will automatically install and configure drivers for the adapter. For an external or PCMCIA (PC Card) adapter, just log on as a Computer Administrator and plug it in.

  3. Configure the network adapter according to the instructions given by your ISP. In most cases you can leave it with all the default settings, although in some cases you may need to configure a specific IP address as described in the later section titled "Setting Up Dynamic IP Addressing (DHCP)."

CAUTION

If your broadband service uses a network adapter (that is, an Ethernet adapter) to connect to a cable or DSL modem, you must take these additional steps to secure your computer from hackers.

1.

Open the Network Connections window. You can get to this from the Control Panel by clicking Network and Internet Connections, then Network Connections.

2.

Locate the icon that corresponds to the network adapter that connects to your DSL or cable modemit's probably labeled Local Area Connection. Right-click it and select Properties.

3.

Under This Connection Uses the Following Items, only QoS Packet Scheduler and Internet Protocol (TCP/IP) should be checked. If any other entries have check marks, click the check marks to remove them.

4.

Double-check to be sure that neither Client for Microsoft Networks nor File and Printer Sharing for Microsoft Networks is checked.

5.

Click OK, then OK again, and then close Network Connections.

While I strongly recommend that you read the Windows Firewall section in Chapter 21, if you don't, at least be sure to take these steps.


When the adapter has been configured and attached to the DSL or cable modem with a network cable, you'll configure the connection. The procedure depends on whether your ISP uses PPPoE or an always-on connection. The procedures are described in the next two sections.

Configuring a PPPoE Broadband Connection

Most DSL and some cable Internet providers use a connection scheme called PPPoE (Point-to-Point Protocol over Ethernet). This is a technology that works a lot like a standard dial-up connection, but the "call" takes place through the DSL circuit or TV cable rather than over a voice connection. Windows XP has PPPoE software built-in, but the setup process will vary from provider to provider. They should give you clear instructions.

NOTE

Some Internet service providers give you a CD-ROM with installation software that does the next setup procedure for you. I intensely dislike this practice, as who knows what other softwareincluding adware and "customer support" spywarethey're installing. Personally, I lie to them, tell them I'm installing the connection on a Macintosh or Linux computer and can't use their software, and ask for the information needed to perform the setup manually. Sometimes this works, and sometimes it makes life very difficult. Southwest Bell DSL, for instance, requires you to set up the service account through a special Web site, so if you want to shun their software you need Internet access to set up your Internet access.


If you perform the procedure manually, the steps should look like this:

1.

Open the Network Connections window, by clicking Start, My Computer, My Network Places, View Network Connections. Be sure that the "Local Area Connection" icon for the network adapter that connects to your DSL modem says "Firewalled." Be sure to read the cautions on page 297 and 298.

2.

Click Create a New Connection. Select Connect to the Internet and click Next.

3.

Select Set Up My Connection Manually and click Next.

4.

Select Connect Using a Broadband Connection That Requires a User Name and Password, and click Next.

5.

Enter your ISP's name and click Next.

6.

Enter the username and password assigned by your ISP, and click Next, then Finish.

At this point, you'll be prompted to sign on. The procedure for signing on and off is the same as for dial-up Internet service, and is described later in this chapter under "Making and Ending a Dial-Up Connection" (page 303).

Installing an "Always-On" Broadband Connection

If you have "always-on" DSL or cable service, your ISP will provide different installation instructions. You'll most likely perform these steps:

1.

In the New Connection Wizard, select Set Up a Connection Manually, and click Next.

2.

Check I Connect Through a Local Area Network and click Next.

3.

Uncheck Automatic Discovery of a Proxy Server, click Next, and then Finish. These steps tell Windows it doesn't need to dial a modem connection.

Now, you might need to configure the Ethernet card using information specified by your ISP. Your ISP will tell you whether your network card must be manually configured or whether the DHCP protocol is available through its service.

NOTE

Installing a network adapter to connect to a broadband modem doesn't give you a local area networkit's just a way of connecting to the modem. If you want to set up a LAN in addition to an Internet connection, please see Chapter 19.


Setting Up Dynamic IP Addressing (DHCP)

In most cases, your ISP will use the DHCP protocol to configure client network adapters. This is the default setting for all new network adapters. To confirm the setting

1.

Log on as a Computer Administrator. Open the Network Connections window, for example, from Start, My Computer, My Network Places, View Network Connections.

2.

Right-click the icon for the Local Area Connection that corresponds to the adapter connected to your DSL or cable modem, and select Properties.

3.

Highlight Internet Protocol (TCP/IP) and click Properties.

4.

Ensure that Obtain an IP Address Automatically and Obtain DNS Server Address Automatically are selected.

Some ISPs will require you to give them the MAC Address of your network adapter. This is an identification number built into the hardware that uniquely identifies your particular network adapter. To find this number, follow these steps:

1.

Open a Command Prompt window by clicking Start, All Programs, Accessories, Command Prompt.

2.

Type ipconfig /all and press Enter.

3.

You may need to scroll back, but find the title that reads something like "Ethernet Adapter Local Area Connection." Look for the name of the adapter that goes to your broadband modem. This might be Local Area Connection 2, if you've installed an extra adapter. Ignore any entries that mention the word "Miniport." If you have multiple adapters and can't tell which is which, unplug the network cable from all but the one that goes to the modem and type the command again.

4.

Find the line titled Physical Address…. It will be followed by six pairs of numbers and letters, like 00-03-FF-B9-0E-14. This is the information to give to your ISP.

Alternately, you might be instructed to set your computer's name to a name provided by the ISP. To do this

1.

Log on as a Computer Administrator. Click Start and right-click My Computer. Select Properties.

2.

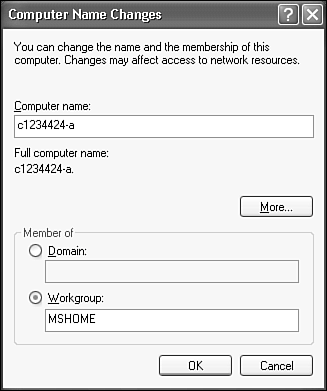
Select the Computer Name tab and click Change.

3.

Enter the computer name as supplied by your ISP, as shown in Figure 8.9

Figure 8.9. Specify a required computer name in the Computer Name Changes dialog.


4.

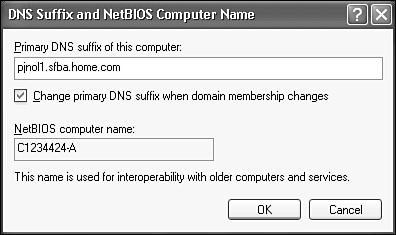
Click More, and enter the domain name specified by your ISP, as shown in Figure 8.10.

Figure 8.10. Enter your ISP's full domain name in the DNS suffix dialog box.


When you close all of these dialog boxes by clicking OK, you will need to let Windows restart. When it restarts, your Internet connection should be up and running.

Setting Up a Fixed IP Address

In some cases, your ISP will require you to set your LAN adapter to a fixed IP address. This may be required with either PPPoE or "always-on" service. To set the address, follow these steps:

1.

Log on as a Computer Administrator. Choose Start, Control Panel, Network and Internet Connections, Network Connections.

2.

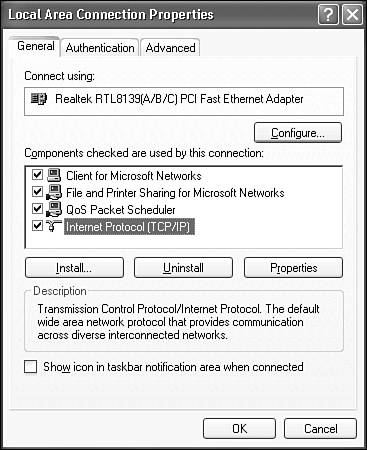
Right-click the Local Area Connection icon, and select Properties. View the General tab, as shown in Figure 8.11.

Figure 8.11. Select Internet Protocol and click Properties to set the LAN adapter's IP address and network information.


3.

Select Internet Protocol and click the Properties button.

4.

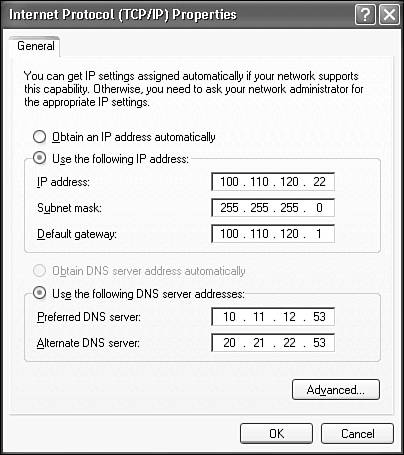
Select Use the Following IP Address, and enter the IP address, Subnet mask, and Default gateway information provided by your ISP, as shown in Figure 8.12.

Figure 8.12. Here, you can add the network address, subnet mask, and DNS information supplied by your ISP.


TIP

If you use your computer at work and at home, and have a fixed IP address at home, leave the IP address and DNS settings set to Obtain Automatically for work, and make the fixed IP address entries for home on the Alternate Configuration tab that appears when Obtain Automatically is selected.

TIP

When you're entering TCP/IP dotted-decimal numbers like 1.2.3.4, the spacebar advances the cursor across the periods. This technique is much easier than using the mouse to change fields.

5.

Select Use the Following DNS Server Addresses, and enter the two DNS addresses provided by your ISP.

6.

Click OK to return to the Local Area Connection Properties dialog.

When you have completed this procedure, return to the PPPoE setup steps, or, if you have always-on service, open Internet Explorer to test-drive your new connection.


Special Edition Using Microsoft Windows XP Professional
Special Edition Using Microsoft Windows XP Professional (3rd Edition)
ISBN: 0789732807
EAN: 2147483647
Year: 2003
Pages: 450

flylib.com © 2008-2017.
If you may any questions please contact us: flylib@qtcs.net