5.4 The Basic Structure of a Component
As you progress through the book you'll notice a common look and feel to all the components . We'll now build a template from scratch for a simple component structure and explain the parts .
One of the simplest structures would be an enumerated type wired to Case Structure. We'll wire the enumerated type through the shift register of a While Loop. This will allow us to write a bit of self-initializing code. Figure 5.10 illustrates this.
-
The component should initialize itself.
Figure 5.10. Basic component.
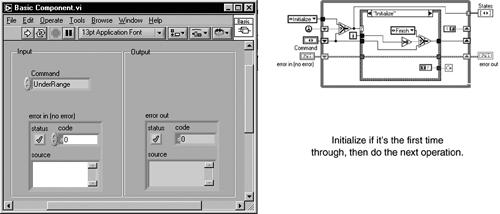
The structure of the component allows it to auto-initialize using the very handy "First Call?" function found in the Advanced>>Synchronization Palette. The "First Call?" function is the small, round effort on the left of the While Loop. The first time a subVI is called from another VI it returns a TRUE, which causes the Initialize element of the enumerated type to be passed to the Case Structure. In the Initialize case would be file loads, array size setting, instrument setup, or any other Initialization duties you can think of. From then on the "First Call?" function passes FALSE. Be aware that if you run the Basic Component VI from its Front Panel it will always return a "First Call?" of TRUE. The Initialize case then passes the Command enumerated type to the shift register and iterates another time.
If your component doesn't need initializing, just leave that particular command out.
-
Errors are handled by the component.
-
Inputs and Outputs should verify themselves .
As seen in Figure 5.11, for this template all the cases either Finish and exit or just exit. The UnderRange and OverRange Cases protect the bounds of the enumerated type, and they should be used to throw an error complaining that they've been called. For this example the error-trapping consists purely of passing the errors through. There is no reason that the error conditions shouldn't be separate cases or that part of the Finish case has the capability to check for errors and act accordingly .
Figure 5.11. Component states.
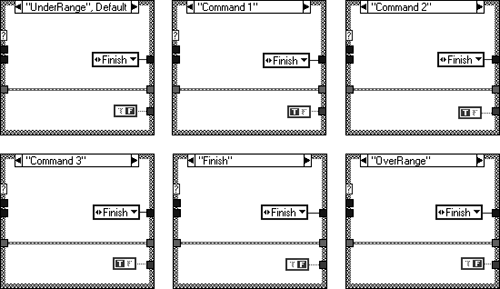
The Finish case could be used for postcondition checking, and you could even employ a Start case to check for preconditions. Pre- and postconditions are described in detail in Chapter 6 on complementary techniques.
-
We should be able to add/delete/modify our component's actions simply.
-
Any modifications should have little effect on the overall software design.
To add new functionality to the component simply add the function name to the enumerated type and duplicate or add a new case to the Case Structure. All you need to do then is add the new actions. When deleting functionality it is worth removing the obsolete cases before removing the elements from the enumerated type.
-
All of the components, public functions, and data should be accessible via a simple interface.
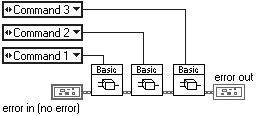
The public interface to the component is shown in Figure 5.12, and you must agree that it is very simple. This component is obviously very simple because it has no real inputs and outputs. That aside, if you want to access any of the functions of the component all you need to do is right-click on the Command input, and a Strictly Typed enumerated constant will be created, listing all of the functionality available for the component.
-
The component stores its own state locally and persistently.
Figure 5.12. Basic component public interface.
Our example only uses its shift registers to contain data when it is running; it has no need to store any local data between calls. If it did, as does the stack-queue component described later in the book, then you would see one or more shift registers initialized by the Initialize case.
| |
| Top |
EAN: 2147483647
Pages: 66