Working with the Database Interface Wizard
| In the previous section, you learned how to display existing records in a database using FrontPage. FrontPage also offers the ability to edit, add, and delete records from a database using the Database Interface Wizard. The Database Interface Wizard will add all the pages necessary for you to display records from your data source, edit those records, add new records, and delete existing records. It will even provide a password protected editing interface so that only those users you choose can edit your data source. The Database Interface Wizard is a Web site wizard. Therefore, you can either create a new Web site with the Database Interface Wizard or you can add the Database Interface Wizard to an existing Web site. It is usually most convenient to add it to an existing Web site because you will then have the option to use an existing database connection. Let's add a Database Interface Wizard to your existing Web site and create some pages that will allow you to edit your database. Creating a Site with the Database Interface WizardTo insert the Database Interface Wizard, follow these steps:
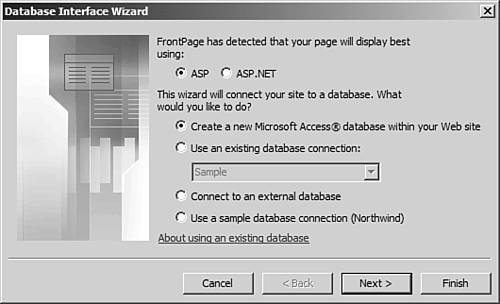
Choosing ASP or ASP.NETAs with the Database Results Wizard, you can choose between ASP and ASP.NET. Choose ASP and select the Use an Existing Database Connection option. Make sure that the Sample database connection is selected and click Next to proceed to step 2 of the wizard.
Configuring the Record SourceIn step 2, select Employees from the dropdown so that the Database Interface Wizard will connect to the Employees table just as you did with the Database Results Wizard. FrontPage chooses a location for your Database Interface Wizard files using the <connection_name>_interface/<record_source> naming convention. You can change this if you want, but for now, leave it as the default and click Next. TIP The Database Interface Wizard places all of its files in the folder specified in step 2. If you decide to remove the Database Interface Wizard from your Web site, simply delete that folder and it's gone. Formatting Your DataStep 3 of the Database Interface Wizard is where you choose the order of the columns in your record source and how they are configured. The EmployeeID field has an asterisk next to it to indicate that it is the primary key, a field in the database that must be unique for every record. If you leave it configured as is, when a user enters a new employee, she will have to enter an employee ID for that person. It would be preferable if the number could be generated automatically so that the user of your page doesn't have to worry about entering a number that already exists. To set that up, do the following:
The EmployeeID field now shows a column type of Autonumber and the form field type is empty, as shown in Figure 37.24. This will cause the Microsoft Access database to automatically assign the next available employee ID to newly entered employees. Because the form field type is empty, the EmployeeID field will not display to users of your site, which is exactly the way it should be. Click Next to move to step 4. Figure 37.24. The EmployeeID field has been modified so that it is an autonumbered field.
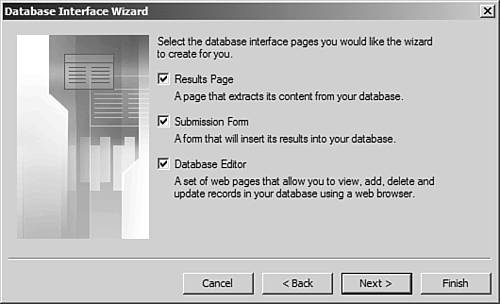
Choosing the Pages for Your SiteIn step 4 of the Database Interface Wizard, you choose what pages you want the Database Interface Wizard to generate for you, as shown in Figure 37.25.
Figure 37.25. The Database Interface Wizard allows you to choose which pages to include.
Select all three check boxes and click Next to move to step 5. Specifying a Username and PasswordIn step 5, you can specify a username and password that will be required to access your database editor. If you password protect your editor, the only page that people can view without the correct username and password is the results page, results_page.asp. Any editing, deletion, or addition of records requires the correct username and password. Enter the username and password of your choice and then click Next and Finish to insert your Database Interface Wizard pages.
Content Added by the Database Interface WizardAfter the Database Interface Wizard has finished adding pages to your site, you will have a new folder named whatever you specified in step 2 of the wizard. Inside that folder, you will have folders and files that will differ, depending on which pages you chose to have inserted, as shown in Figure 37.26. Figure 37.26. The Database Interface Wizard inserts many pages in to your site, depending on the options chosen in step 4.
CAUTION Even though the Database Interface Wizard uses Database Results regions, don't ever edit the pages with the Database Results Wizard. If you do, it will break the functionality of the Database Interface Wizard pages. Assuming that you checked all three check boxes in step 4 of the Database Interface Wizard, the following pages will be added to your site:
The entry point for a Database Interface Wizard site is usually results_page.asp. From there, a user can access all the other pages in the editor. TIP The Database Interface Wizard can also create a new database in your Web site. In step 1 of the Database Interface Wizard, select the Create a New Microsoft Access Database Within your Web Site radio button to have a new database created for you in the fpdb folder of your Web site. Using the Database Interface PagesNow you can check out your database editor in action. Browse to the results_page.asp that the Database Interface Wizard created, and you should see a page similar to the one shown in Figure 37.27. In the upper-right corner of this page are links to the Submission Form and the Database Editor. The Submission Form allows you to add new records to the database. You can also add new records from the Database Editor in addition to editing and deleting existing records. Figure 37.27. The Results Page generated by the Database Interface Wizard contains links that will allow you to edit your database.
Click the Database Editor link. You should be prompted to log in as shown in Figure 37.28. Enter your username and password and click Login to log in to the Database Editor. When the Database Editor appears (see Figure 37.29), you can add a new record by clicking the Add New Record button, delete one or more records by selecting them and clicking the Delete Selected Records button, or edit a record by selecting that record and then clicking the Edit button at the bottom of the page. Figure 37.28. The login page protects access to the Database Editor.
Figure 37.29. The Database Editor provides all the functions necessary to maintain the records in your database.
Click the Add New Record button. Fill in information for yourself and click the OK button to add yourself to the database. After you have been added, click the next page button (the > button) at the bottom of the top frame to go to the next page. Your record will appear last in the list (see Figure 37.30) because the list is ordered by the EmployeeID field, and since you are the last employee entered in the database, you have the highest employee number. Figure 37.30. A new record has been added with the information entered.
Click your employee number to display details on yourself. The bottom frame will refresh with the details on your record. At the bottom of the details page are Edit button and Delete buttons. From here, you can edit or delete your record. You can also remove one or more records by checking the box next to the record in the top frame and clicking the Delete Selected Records button. As you can see, building a full-featured database editing system is very easy with the Database Interface Wizard, and you can do it all without writing a single line of code. |
 To see how to use the Database Interface Wizard's password protection on any page you prefer,
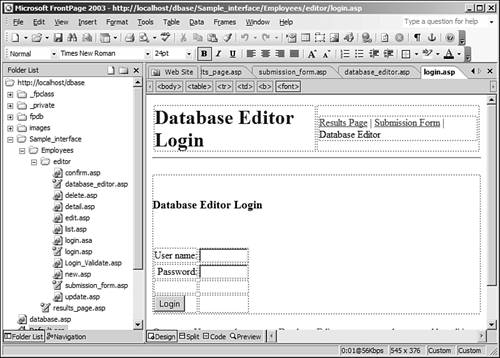

EAN: 2147483647
Pages: 443