2.3. A First Look at a Course On the left side of the main screen, you'll see a block that includes a list of all the courses you are teaching or taking as a student. You can access your courses by clicking on the course name in the block, as shown in Figure 2-8. Figure 2-8. Main screen course list 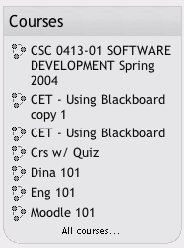
Let's start with the upper lefthand corner of the course screen, as shown in Figure 2-9. There you'll see the name of your course as entered when the course was created. Either your system administrator entered your course name by hand or she got it from your institution's course database. (Read the "Course settings" section below if you need to change the name.) Figure 2-9. Course layout 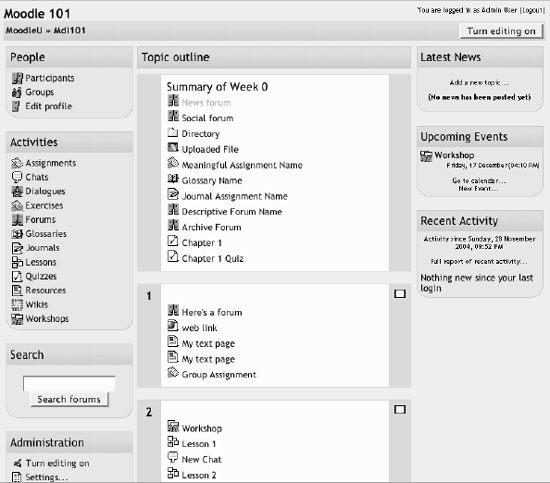
Below the course name is a bar that fills with the hyperlinked names of pages as you navigate from one page to another. Also known as "breadcrumbs," these links track where you are in the course and allow you to easily to find your way back to where you started or to return to a page. Frequently, the best way to return to the course main page is to click on the course ID in the breadcrumb trail. For example, in Figure 2-9, you would click on Mdl101 to go back to the course main page from another page in the course. Below the navigation bar are three columns, which are also shown in Figure 2-9. The far-left and far-right columns contain tool blocks, while the center block contains your course content and activities. The topmost tool block on the left is the People block. From here, you and your students can view the individual profiles of other participants in the course and check who is a member of student workgroups. Beneath the People block is the Activities block. As you add forums, quizzes, workshops, assignments, and other activities to your course, the activity types will be listed here. By clicking on the activity type, students can view all of the activities of that type that are currently available to them. For example, if you gave a quiz every week, each content block would list a quiz, and all of the quizzes would also be listed under the quiz link in the Activities block. Next in the column is the Search block. The single text-entry field currently allows only you or your students to search the forums. As I write this, a more general course search is currently under development. Below the Search block is the Administration block (see Figure 2-10), from which you can set your course options, manage your roster, perform backups of the course, and manage student grades. In this chapter, we'll cover the first two tools, "Turn editing on" and "Settings," and we'll cover the rest in detail as they arise throughout the book. Figure 2-10. Administration block 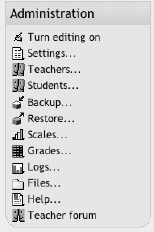
The far-right column contains three blocks that report on activity in the course. The Latest News block lists the latest items added to the News forum, such as important news stories that pertain to the subject you're teaching. The Upcoming Events block lists events you've created in the calendar, such as exams and holidays. At the bottom of the block are links to view the calendar and add new events. Finally, there's the Recent Activity block, which lists the recent forum postings and uploads by you and your students. The middle column is where the action is. This is where you add all of your content and activities, such as forums, quizzes, and lessons for students to access. Before we get to that, however, you need to make a choice about the format in which your course will be presented. 2.3.1. Course Formats Unlike some CMSs that force you into one format, Moodle provides you with a number of options for the general format of your course. You can choose to order your course chronologically by week, conceptually by topic, or socially with a big forum as the central organizing principle.
Weekly format With this format, you specify a course start date and the number of weeks the course is to run. Moodle will create a section for each week of your course, as shown in Figure 2-11. You can add content, forums, quizzes, etc. in the section for each week. If you want all your students to work on the same materials at the same time, this would be a good format to choose. Figure 2-11. A course in weekly format 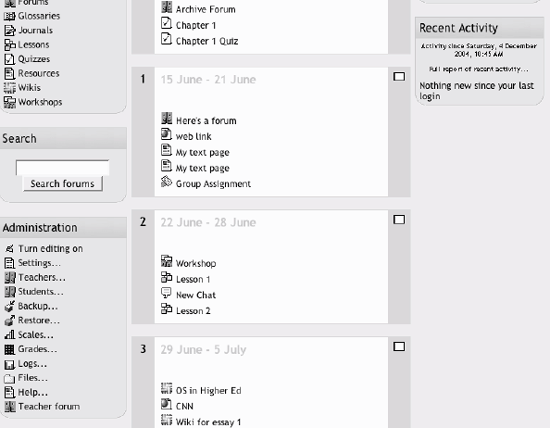
Topics format When you create a course using the topics format, you start by choosing the number of topics you will cover in your course. Moodle then creates a section for each topic, as shown in Figure 2-12. You can then add content, forums, quizzes, and other activities to each topic. If your course design is concept-oriented, and students will be working through a range of concepts but not necessarily according to a fixed schedule, this is a good choice. Figure 2-12. A course in topics format 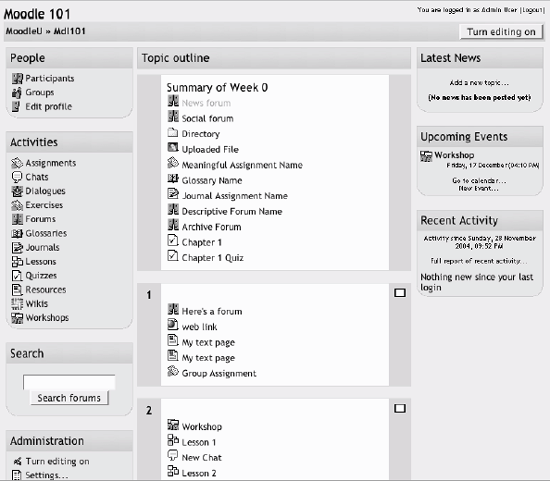
Social format The social format is based on a single forum for the whole course as shown in Figure 2-13. It's useful for less formal courses, or non-course uses, such as departmental sites. Figure 2-13. A course in social format 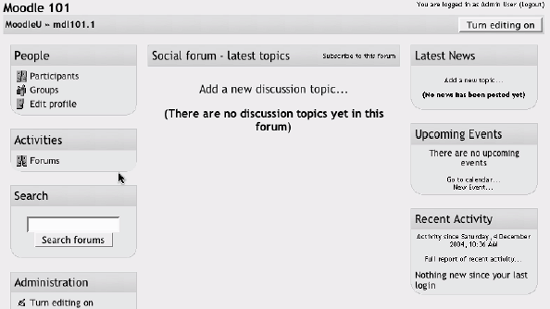
To set the course format: Click Settings in the Administration block. Select the course format from the dropdown list just below the course summary block (see Figure 2-14). Enter the parameters for your course: For the weekly format, set the start date and the number of weeks. For the topic format, set the number of topics. For the social format, set the course start date. You don't need to worry about the number of weeks or topics.
Figure 2-14. Course settings screen 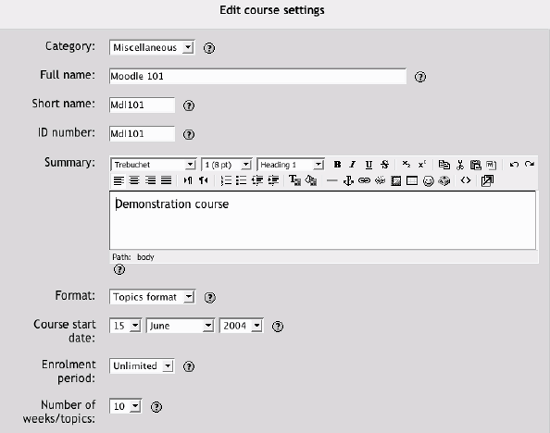
Moodle allows you to switch between formats if you find that a given format isn't working for you. Simply follow the instructions above and select a different format. You can also add or remove topics or weeks at any time. So you don't have to worry too much about locking yourself into a format before you really understand the system. 2.3.1.1. Course settings The settings area where you set the course format (see Figure 2-14) also gives you access to a number of important course options. You'll find it is important to take a moment to review the settings for your course to ensure that it behaves the way you want. To change your course settings: Click Settings in the Administration block. Review each of the settings options to ensure they are correct for your course:
Category Your system administrator may have created course categories, such as department or college labels, to help students and teachers find their courses. Depending on how your system is set up, you may be able to categorize your course by department, subject, or other organizational principle.
Full Name This is the name that is displayed on the top header of every screen in your course. The name should be descriptive enough so students can easily identify the course in which they are working, but it shouldn't be too long. For example, use "English 400 Beowulf" and not "ENG400 Beowulf and the heroic poems of the ancient world."
Short Name Enter the institutional shorthand for your course. Many students recognize Eng101, but not Introduction to Composition. The short name also appears in the breadcrumbs bar at the top of the screen.
Summary The summary will appear in the course listings page when other users scan the course catalogs. A good one-paragraph summary will help communicate the essence of your course to your students.
Course Start Date The start date is the day the course is first active.
Enrollment Period The enrollment period is the number of days after the start of the course during which students are enrolled. After the enrollment period, all of your students will be unenrolled from the course.
Warning: Be very careful when using the enrollment period setting. When we first started using Moodle, we thought the enrollment period was how long a student had to enroll in a course, not how long she would stay enrolled. After 14 days, hundreds of students were suddenly unenrolled from their courses, causing headaches for weeks.
Group Mode Moodle can create student workgroups. We will cover workgroups extensively in Chapter 13. For now, you need to decide if you want your groups to work independently or to be able to view each other's work. You can also set the group mode separately for many activities or force the group mode to be set at the course level. If everything in the course is done as part of a group, or you are running cohorts of students through a course at different times, you'll probably want to use the group mode to make management easier.
Availability Use this setting to control student access to your course. You can make a course available or unavailable to students without affecting your own access. This is a good way to hide courses that aren't ready for public consumption or hide them at the end of the semester while you calculate your final grades.
Enrollment Key A course enrollment key is a code each student enters when they attempt to enroll in a course. The key makes it more difficult for students who aren't officially in the class to gain access to your Moodle site. Create the key here and give it to your students when you want them to enroll in your Moodle course. They will need to use the key only once when they enroll.
Guest Access You can choose to allow guests to access your course, either with an enrollment key or without it. Guests can only view your course and course materials; they can't post to the forums, take quizzes, or submit any materials.
Hidden Sections When you hide an upcoming topic block to prevent your students from jumping ahead, you can choose to display the title as a collapsed section or simply hide the topic altogether. Displaying the collapsed sections will give your students a roadmap of the upcoming topics or weeks, so it's probably a good idea to leave this on the default setting.
News Items to Show Use this setting to determine the number of course news items displayed on the default page.
Show Grades This setting allows you to choose whether grades are displayed to students. If you are using the Moodle gradebook, I would recommend allowing students to view their grades. Checking grades has become one of the most popular features of CMS systems.
Show Activity Reports This setting allows students to view their activity history in your course. This is useful if you want students to reflect on their level of participation, or if they are graded on participation.
Maximum Upload Size This setting is used to limit the size of any documents you or your students upload to the class. The maximum size is set by your system administrator, but you can choose to limit students to files that are smaller than the system maximum. You can limit the amount of storage space each assignment can take or limit the size of picture or video files your students upload.
Your Word for Teacher/Teachers The next two settings allow you to enter the word you want Moodle to use for the singular and plural versions of the word that designates the teacher's role. You can call teachers instructors, facilitators, professors, etc.. Whatever you want to use, enter it here.
Your Word for Student/Students Again, you can choose the word you want Moodle to use for people in the student role, such as "participants" or "learners." Once you've made all your selections, click Save Changes.
2.3.2. Editing Mode Now that you've decided on a format and settings for your course, we'll look at how to add content to your course. To start the process, you'll first need to turn on Editing Mode (see Figure 2-15), which will allow you to add resources and activities to your course. On the left side of the screen of any course you are teaching, you'll see a link labeled, surprisingly enough, "Turn Editing Mode On." Clicking on this link will present you with a new array of options. Figure 2-15. Editing mode 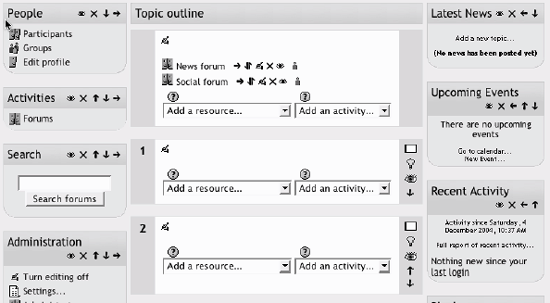
Starting at the top of the screen, let's look at what Editing Mode enables you to do. At the top of each block, you'll see an icon of a hand holding a pencil. When you click it, you are presented with a Summary text area. You can use this to label and summarize each topic or schedule blocks in your course. You should keep the summary to a sentence or two for each block to avoid making the main page too long. Click Submit when you've added your summary. You can go back and change it later by clicking the hand-and-pencil icon again. On the lefthand side, next to the label for the People block, you'll see the icons described in Table 2-1. Table 2-1. Block iconsIcon | Function |
|---|

| Show or hide item. If you want to keep an item in your course, but don't want your students to see it, you can use this to hide it from them. | 
| Delete item. Removes the item or block from your course. Items will be permanently removed; blocks can be added again using the Blocks menu. | 
| Move item. Clicking this will allow you to move an item to another topic or schedule block. | 
| Move right or left. You can move blocks to the left- or righthand columns. You can also use this to indent items in your content blocks | 
| Move up or down. Moves items and blocks up or down in their respective areas. |
You will use these icons throughout Moodle to customize the interface for your needs. In addition to the icons for manipulating the blocks, each content block in the middle column has two dropdown menus. On the left, the menu labeled "Add a resource..." gives you tools for adding static content, such as web pages and word-processing documents. On the right, the "Add an activity" menu gives you tools to add activities such as forums, quizzes, lessons, and assignments. The resource menu, shown in Figure 2-16, gives you access to tools for adding content. There are a number of ways you can create content directly within Moodle, or link to content you've uploaded. We'll cover each of these tools in depth in the next chapter.
Compose a text page From here, you can create a simple page of text. It doesn't have many formatting options, but it is the simplest tool.
Compose a web page If you want more formatting options, you can compose a web page. If you selected to use the HTML editor in your personal profile, you can simply create a page as you would using a word processor. Otherwise, you'll need to know some HTML for most formatting.
Link to a file or web site If you want to upload your course documents in another format, you can save them on Moodle and provide easy access for your students. You can also easily create links to other web sites outside your Moodle course.
Display a directory If you upload a lot of content, you may want to organize it in directories. Then you can display the contents of the entire folder instead of creating individual links to each item.
Insert a label You can use labels to organize the links in your course's main page. The only thing they do is provide a label within the content block. Figure 2-16. Resource menu 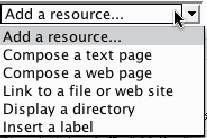
The Add Activity Menu, shown in Figure 2-17, allows you to add interactive tools to your course. The bulk of this book is dedicated to describing how each of these tools works and how to apply them in your course. Table 2-2 explains each tool very briefly. We'll learn more about these tools as they arise later in the book. Figure 2-17. Add Activity menu 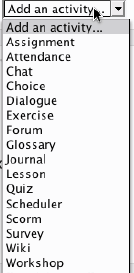
Table 2-2. Activity typesTool type | Description |
|---|
Assignment | A basic task with which you can describe what you want the students to do or record a grade. You can also have the students upload a response and score it later. | Attendance | Used to manually or automatically track student participation in the class. | Chat | A group chat room where people can meet at the same time and send text messages. | Choice | A simple poll displayed within a content block. | Dialogue | Like a chat, but allows for one-to-one communication between students and teachers. | Exercise | A variant of the assignment tool with which you give students an exercise and they upload their work and then assess themselves. You can grade their work and their self-assessments. | Forum | Treaded discussion boards. They are a powerful communication tool. | Glossary | Dictionaries of terms that you can create for each week, topic, or course. You can have your students participate in building them. | Journal | Self-reflection is an important idea in social constructivism. | Journals | are free-response opportunities for students to reflect on the course materials. | Label | A way to insert text or other HTML elements into the content area. | Lesson | A set of ordered materials that use questions to determine what content the student sees next. | Quiz | A good, old-fashioned web quiz with a lot of flexibility. | Resource | A file, web page, link, or other content for students to view or download. | SCORM | SCORM is an acronym for Sharable Content Object Reference Model. It's a packaging standard for educational content. Moodle now has tools to allow you to upload content packaged as SCORM. | Survey | Gathers feedback from students using pre-packaged questionnaires. | Workshop | A very nice tool for student peer assessment. Students upload their work and score their peers' work using a scoring guide you create. |
|