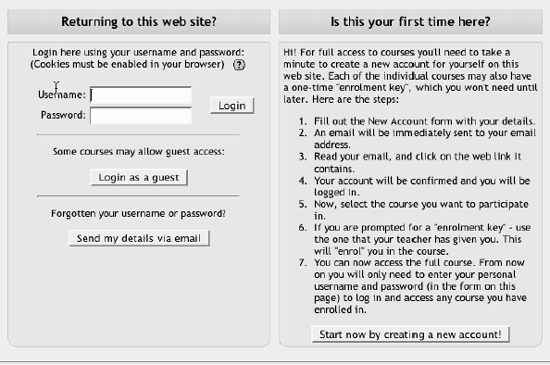
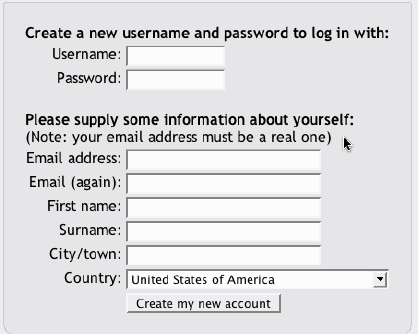
2.2. Creating an Account Right above the language selection list, you'll find a hyperlink that says "Login ." Click the link and Moodle will present you with the login screen, as shown in Figure 2-3. Your username and password will depend on how your system administrator set up the system. Moodle has a number of options for user authentication, including email authentication, or an LDAP (Lightweight Directory Access Protocol) server, or users can register their own accounts. Self-registration is the default method, and many sites use this. If you need to create your own account: Click the "Start now by creating a new account" button. Fill in the new account form by creating a username and password for yourself (see Figure 2-4). Enter a valid email address because the system will send you an email to confirm your account. You won't be able to log in again until you confirm your account. Click "Create my new account." Within a few minutes, you should receive an email at the account you specified on the form. Click the link in the email (or copy and paste it into the address window in your browser) to confirm your account.
Figure 2-3. Login screen 
You now have a verified account. Your account isn't automatically associated with the courses you're teaching. You'll need to find out from your system administrator how to enroll your account as an instructor in a course. By default, the system administrator will have to enroll you as an instructor in a course. 2.2.1. Editing Your User Profile Once you have successfully confirmed your account and logged in, you will find yourself back at the main page. As Figure 2-5 shows, your username will now be displayed at the top of the screen. Figure 2-4. New account screen 
Figure 2-5. Main screen after login 
If you look at the upper-right corner, you'll see that the "Login" link has changed. It now reads "You are logged in as" and whatever your username is, highlighted as a clickable word. Click on your username. Moodle will then present you with your user profile summary, like the one shown in Figure 2-6. You'll see your profile summary, and the last time you logged in. From this screen you can also edit your profile or change your password. Let's take a moment and edit your profile to customize the site and help other people get to know you. Figure 2-6. User profile page 
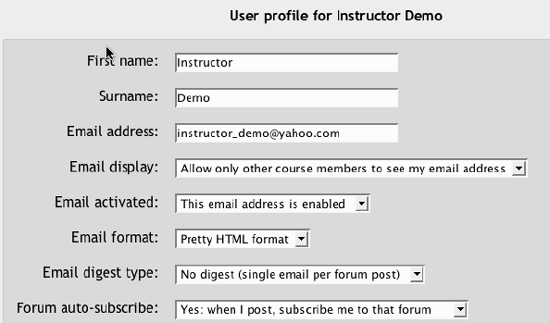
To edit your user profile: Start by click the Edit Profile button on the upper right hand side of the screen. Your user profile will look like Figure 2-7. Figure 2-7. Editing your user profile 
You'll see your username and a blank for your password. If you want to change either, do it here You can then change the real name the system has stored for you. The next four lines dictate how Moodle and other users can communicate with you through emails:
Email address Make sure this is an address you check frequently and that it is correct. Moodle has a lot of important email features, and I wouldn't want you to miss out because your email address had a typo or is not an address you check frequently.
Email display You can choose who can see your email address. Your choices are to hide your email from everyone, allow only the people in your classes to see it, or display it for everyone who logs in to the site. If you choose to hide your email from other people, they will not be able to send you email directly from Moodle.
Email format Here you can select whether mail sent from Moodle is formatted using HTML or is sent in plain text. Most modern email clients can receive and properly display HTML mail, although this may be a preference you have to enable in your email preferences. If you have a slow connection, or simply prefer your email plain and simple, the plain-text option is probably a good choice
Forum auto-subscribe Moodle forums are a powerful communication tool for classes. (We will discuss forums in great depth in Chapter 4. For now, I'll simply mention that you have the option of "subscribing" to forums, which means that new forum posts will be sent to you via email.) This is a great way of keeping current with your course discussions without having to log in and look at the forums every day. Of course, if your discussions really get cooking you'll end up with a lot of email, but at least it won't be spam. The next option, "When editing text:," lets you choose whether to use Moodle's native HTML editor to enter text or to use plain text. Moodle's HTML editor is an easy way to enter formatted text into your course site. We'll cover the specifics of how it works in Chapter 3. After setting your city and country, you can choose your preferred language. Setting your language here makes it your default language for all pages. The timezone setting can be very important, especially if you're working with an international audience or will be traveling and accessing the system. Be sure to set the time zone to your local time, not the server's local time. I almost missed a meeting because I didn't set my time zone. The Moodle server we were using was in another country and I had left my profile setting on the default server's local time. The meeting was set for 11 p.m., which seemed odd to me. Then I realized I had the wrong time zone. When I changed the setting, I realized the meeting was scheduled for 8 a.m. my time! The description box gives you a place to tell your Moodle community a little about yourself. If you don't feel comfortable writing a description, just put a couple of characters in here and the system won't complain. The remaining optional fields allow you to include personal details about yourself, including your photo or a representative image, and contact information. Your picture will appear by your postings in the forums, in your profile, and in the course roster. To upload a new picture, follow these steps: Prepare the picture you want to use by converting it to a gif or jpeg if you haven't already. It should be smaller than the maximum upload size (see Chapter 3 for more details). Click the Browse button and locate your prepared picture. Then click Choose in the dialogue box. Then click Update Profile at the bottom of the screen. Moodle will crop your picture into a square and shrink it to 100-by-100 pixels.
Moodle provides you with a number of ways to personalize your experience and share information about yourself with other people. |


