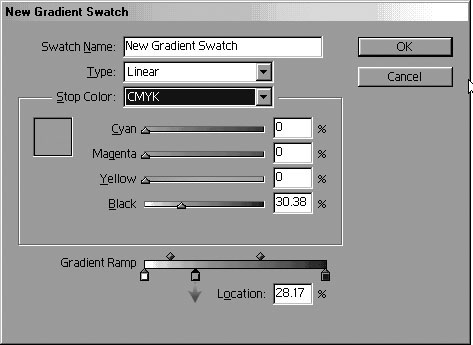
| Gradients are blends that change from one color into another. InDesign creates gradients as swatches that can then be applied to objects. (See Chapter 6, "Styling Objects," for information on applying gradients.) To define a gradient: 1. | Choose New Gradient Swatch from the Swatches palette menu. The New Gradient Swatch dialog box appears  . .
Use the New Gradient Swatch dialog box to define a gradient of blended colors. 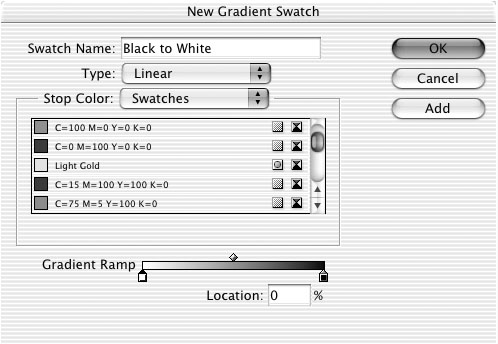 | 2. | Enter a name for the gradient in the Swatch Name field.
| 3. | Choose Linear or Radial in the Type field  . .
A linear gradient changes colors along a line. A radial gradient changes colors in a circular pattern. 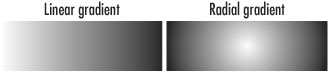 | 4. | Click a color stop on the gradient ramp to define a color in the gradient  . .
Use the color stops and midpoint controls along the gradient ramp to modify the gradient. 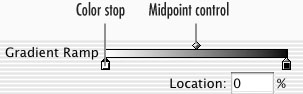 Tip You must select a color stop in order to see the Stop Color list. | 5. | Choose the type of color for the selected stop from the Stop Color list  : :
Swatches shows you the list of colors in the Swatches palette. LAB, CMYK, or RGB displays the sliders that let you define the color using the LAB, CMYK, or RGB values.
Use the Stop Color menu to choose the format for the colors used for the color stops. 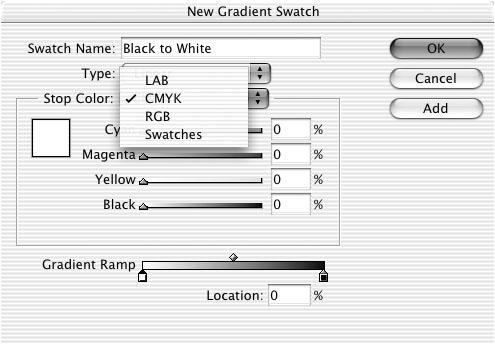 | 6. | Click the other gradient stop to define a color for it.
| 7. | Adjust the midpoint control to change the position where the two colors blend equally.
| 8. | Click OK to add the gradient to the Swatches palette  . .
Gradients are stored in the Swatches palette. 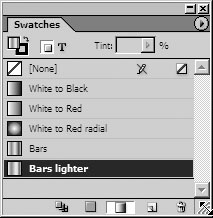 or
Click the Add button to add the current gradient to the Swatches palette and continue defining additional gradients.
Tip If you don't see the gradient listed in the Swatches palette, click either the Show All Swatches or Show Gradient Swatches icon at the bottom of the Swatches palette. |
All gradients must have at least two colors. However, you can easily add more colors to a gradient by using the color stops. To add gradient color stops: 1. | Open the New Gradient Swatch or the Gradient Options dialog box.
| 2. | Click the area below the gradient ramp. This adds a color stop to the ramp area  . .
Click under the gradient ramp to add a color stop to the gradient. 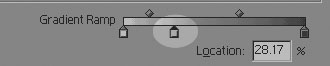 | 3. | Make whatever changes you want to the color stop.
| 4. | If necessary, move the color stop to a new position.
| 5. | Click OK to apply the changes to the gradient swatch.
|
To delete a gradient color stop: To modify a gradient swatch: 1. | Select the gradient swatch and choose Swatch Options from the Swatches palette menu. This opens the Gradient Options dialog box.
or
Double-click the gradient in the palette.
Tip Use the Preview checkbox to see how the changes affect the gradients in the document. | 2. | Adjust the midpoint, color stops, or gradient type.
| 3. | Click OK to apply the changes.
|
Process and Spot Colors in Gradients A gradient that's defined using process colors is separated onto CMYK plates. A gradient that contains two tints of the same spot color will be separated onto the single spot color plate. If you want the gradient to fade to white, create a gradient between the spot color and a 0% tint of the spot color. You can create a gradient between two spot colors. However, to avoid moiré patterns in the gradient, you must assign different screen angles to those spot colors in the Inks dialog box. For instance, if you had a gradient of spot red to spot yellow, you would want to make sure each color had a screen angle that was 45 degrees different from the other. Ask your print shop for details on setting the screen angles for spot colors. A gradient that contains both spot and process colors will be separated onto both the spot and process color plates. |
Just as you can create unnamed colors, you can also create unnamed gradients. These are gradients that are created only within the Gradient palette and are not stored in the Swatches palette. Tip Like unnamed colors, I don't recommend working with unnamed gradients.
To work with the Gradient palette: 1. | If the Gradient palette is not visible, choose Window > Gradient to open the palette  . .
Use the Gradient palette to create unnamed gradients. 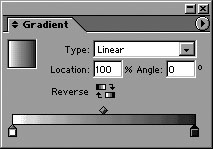 or
If the Gradient palette is behind other palettes, click the Gradient palette tab.
| 2. | Choose Show Options from the Gradient palette menu to see all the controls in the palette.
Tip If the color stops are not visible, click the area under the ramp to display the color stops in the Gradient palette. |
To create unnamed gradients: 1. | Use the Type pop-up list to choose between Linear and Radial.
| 2. | Select a color stop and adjust the sliders in the Color palette to define the color at that position.
or
Hold the Opt/Alt key and click the name of a swatch in the Swatches palette.
| 3. | Select another color stop and use the sliders in the Color palette to define the color at that position.
| 4. | Set the angle of the gradient in the Angle field.
Tip Click the Reverse icon to reverse the positions of the color stops. |
Once you have a defined a gradient in the Gradient palette, you can store it as a swatch. To store an unnamed gradient: 1. | Create the gradient in the Gradient palette.
| 2. | Click the New Swatch icon in the Swatches palette.
or
Drag the preview of the gradient from the Gradient palette into the Swatches palette.
| 3. | Double-click the name of the gradient in the Swatches palette to rename it.
|
|