| The transform tools resize and distort objects. You can transform the object itself or the object as well as any content. How you select objects changes the effect of the transform tools. To control the effect of the transform tools: - Select the object using the Selection tool. This type of selection causes the transform tools to affect both the object and any text or images inside it
 . .
Objects selected with the Selection tool have both the object and its content transformed by the transform tools. 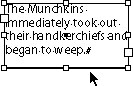 or
Hold the Opt/Alt key as you click the frame with the Direct Selection tool. This causes the transformation to affect only the object, not any text or images inside the object  . .
Objects selected with the Group Selection tool have only the object transformed by the transform tools. 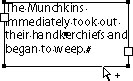 Tip The plus (+) sign next to the Direct Selection tool indicates that the tool is the Group Selection tool.
All the transformations take place in relation to a transformation point. Each object has a default transformation point, but you can change it if necessary. To control the transformation point: 1. | Select the object to be transformed.
| 2. | Choose one of the transform tools. A transformation point appears inside the object.
| 3. | Move the cursor near the transformation point. A small icon appears next to the cursor that indicates you can move the transformation point  . .
The indicator that the transformation point can be moved to a new position. 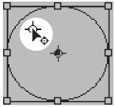 | 4. | Drag the transformation point to a new position.
or
Click to position the transformation point in a new position.
|
The Scale tool lets you increase or decrease the size of objects. To scale objects visually using the Scale tool: 1. | Select the object or objects.
| 2. | Choose the Scale tool in the Toolbox  . .
The Scale tool in the Toolbox is used to change the size of objects.  | 3. | If necessary, change the position of the transformation point (see previous page).
| 4. | Move the cursor away from the transformation point, and drag to scale the object  . .
The arrowhead appears while scaling an object.  Tip Hold down the Shift key to constrain the tool to horizontal, vertical, or proportional scaling. Tip To see a preview of the image as you scale, press and hold the mouse button for a moment before you start to drag. Tip Hold down the Opt/Alt key to copy the object as you scale it. |
If you prefer, you can enter the resize objects numerically using the Scale command. To scale objects using the Scale command: 1. | Select the object or objects.
| 2. | Choose Object > Transform > Scale. This opens the Scale dialog box  . .
The Scale dialog box lets you scale objects using numerical values. 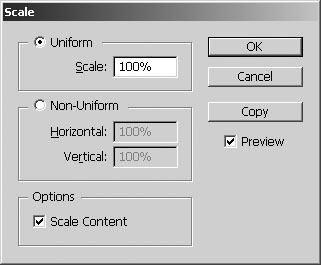 | 3. | Use the Uniform Scale field to scale the object proportionally.
or
Use the Non-Uniform Horizontal and Vertical fields to scale the object non-proportionally.
| 4. | Check Scale Content to also scale any graphics that are placed inside it (see Chapter 8, "Imported Graphics")  . .
When Scale Content is turned on, the placed image scales along with the frame. 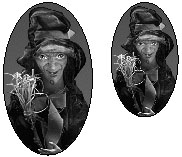 | 5. | Click OK to scale the object.
or
Click Copy to create a scaled copy of the object.
|
To scale objects numerically using the Scale tool: 1. | Select the object or objects.
| 2. | Choose the Scale tool in the Toolbox.
| 3. | Hold the Opt/Alt key and click to designate the position of the transformation point. This opens the Scale dialog box .
| 4. | Set the dialog box controls as described in the previous exercise.
|
The Rotation tool changes the orientation, or angle, of the object on the page. To rotate objects visually using the Rotate tool: 1. | Select the object or objects.
| 2. | Click the Rotation tool in the Toolbox  . .
The Rotate tool in the Toolbox is used to change the orientation of objects.  | 3. | If necessary, change the default transformation point (see page 91).
| 4. | Move the cursor away from the transformation point, and drag to rotate the object  . .
Rotating an object around its transformation point.  Tip Hold down the Shift key to constrain the rotation to 45-degree increments. Tip Hold down the Opt/Alt key after you start the rotation to copy as you rotate. |
To rotate objects using the rotate command: 1. | Select the object or objects.
| 2. | Choose Object > Transform > Rotate. This opens the Rotate dialog box  . .
The Rotate dialog box lets you rotate objects using numerical values. 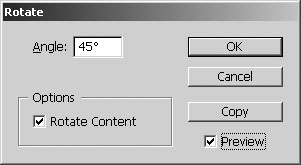 | 3. | Use the Angle field to set how much the object should rotate.
| 4. | Check Rotate Content to also rotate any graphics placed inside the object  . .
When Rotate Content is turned on, the placed image rotates along with the frame. 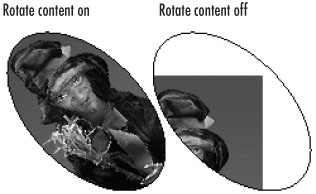 | 5. | Click OK to rotate the object.
or
Click Copy to create a copy as you rotate the object.
|
To rotate objects numerically using the Rotate tool: 1. | Select the object or objects.
| 2. | Choose the Rotate tool in the Toolbox.
| 3. | Hold the Opt/Alt key and click to set the position of the transformation point. This opens the Rotate dialog box .
| 4. | Set the dialog box controls as described in the previous exercise.
|
The Shear tool distorts the shape of objects. To shear objects visually using the Shear tool: 1. | Select the object or objects.
| 2. | Click the Shear tool in the Toolbox  . .
Use the Shear tool in the Toolbox to distort objects.  | 3. | If necessary, change the transformation point by dragging it to a new position (see page 91). The cursor indicates the transformation point can be moved.
| 4. | Move the cursor away from the transformation point, and drag to shear the object  . .
Shearing an object around the transformation point.  |
To shear objects using the Shear command: 1. | Select the object or objects.
| 2. | Choose Object > Transform > Shear. This opens the Shear dialog box  . .
The Shear dialog box lets you distort objects using numerical values. 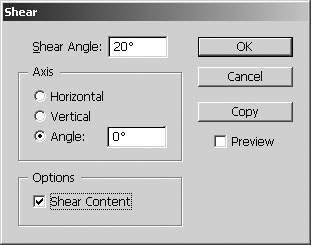 | 3. | Use the Shear Angle field to set the amount of distortion.
| 4. | Check one of the Axis options:
Horizontal shears along the horizontal axis. Vertical shears along the vertical axis. Angle shears along a specific angle.
| 5. | Check Shear Content to also distort any graphics placed inside the object  . .
The difference between shearing an object with Shear content on and off. 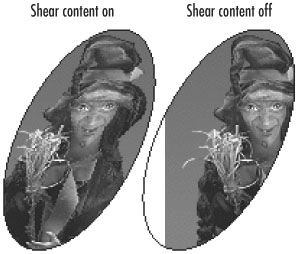 | 6. | Click OK to shear the object.
or
Click Copy to create a sheared copy of the object.
|
To shear objects numerically using the Shear tool: 1. | Select the object or objects.
| 2. | Choose the Shear tool in the Toolbox.
| 3. | Hold the Opt/Alt key and click to set the position of the transformation point. This opens the Shear dialog box .
| 4. | Set the dialog box controls as described in the previous exercise.
|
Rather than switching between the Scale and Rotate tools, you can use the Free Transform tool to both scale and rotate. To scale using the Free Transform tool: 1. | Select the object or objects.
| 2. | Click the Free Transform tool in the Toolbox  . A bounding box appears around the object. . A bounding box appears around the object.
Choose the Free Transform tool in the Toolbox to both scale and rotate objects.  | 3. | Place the cursor on one of the handles of the bounding box. The cursor changes to a double-headed arrow  . .
The double-headed arrow indicates that the Free Transform tool is in the scale mode.  | 4. | Drag to increase or decrease the size of the object.
|
To rotate using the Free Transform tool: 1. | Select the object or objects.
| 2. | Click the Free Transform tool in the Toolbox . A bounding box appears around the object.
| 3. | Place the cursor outside one of the handles of the bounding box. The cursor changes to a curved double-headed arrow  . .
The curved double-headed arrow indicates that the Free Transform tool is in the rotation mode. 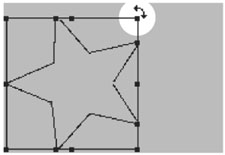 | 4. | Drag to rotate the object clockwise or counter-clockwise.
|
|