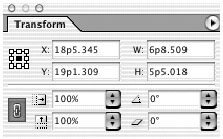
| The Transform palette allows you to move, scale, rotate, and shear objects precisely, using numerical values. Tip When you have objects selected, the Control palette displays many of the controls that are found in the Transform palette. (See the section "Using the Control Palette for Objects" on page 110.)
To open the Transform palette: As you work with the Transform palette, it is important to know the reference point on the object. This is the same as the transformation point used with the transform tools. To set the Transform palette reference point: 1. | Select the object or objects that you want to transform.
| 2. | Click the reference point control on the Transform palette to choose the point around which the object moves  . .
The Reference point controls where in the object the transformation occurs. 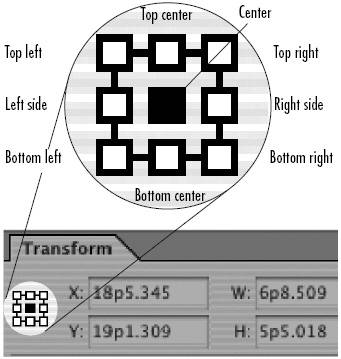 |
You can use the Transform palette to move objects numerically. To move an object with the Transform palette: 1. | Select the object or objects that you want to move.
| 2. | To move the object horizontally, enter an amount in the X field  . .
The X and Y fields in the Transform palette control the position of an object.  Tip As you increase the numbers, the object moves to the right. | 3. | To move the object vertically, enter an amount in the Y field .
Tip As you increase the numbers, the object moves down. | 4. | Press Enter or Return to apply the changes.
|
You can use the Transform palette to resize an object numerically. This does not change the scaling amount applied to the object. To resize with the Transform palette: 1. | Select the object or objects.
| 2. | If necessary, change the reference point as explained on the preceding page.
| 3. | To change the width of the object, enter an amount in the W field  . .
The W and H fields in the Transform palette control the width and height of objects. 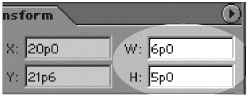 | 4. | To change the height of the object, enter an amount in the H field .
| 5. | Press Enter or Return to resize the object.
|
You can resize proportionally even if you know the size for only one side of the object. To resize proportionally: 1. | Select the object or objects.
| 2. | Enter the new size in the W field or H field .
| 3. | Do not change the amount in the other field.
| 4. | Hold Cmd/Ctrl as you press Enter or Return. The amount in both the W and H fields changes proportionally.
|
You can also scale objects using the Transform palette. To scale with the Transform palette: 1. | Select the object or objects.
Tip Use the Selection tool to scale the object and its contents. Use the Direct Selection tool to scale only the object. | 2. | If necessary, change the reference point as explained on the preceding page.
| 3. | To change the horizontal size, enter a percentage in the Scale X field  . .
The Scale width and height fields in the Transform palette let you apply percentage amounts to scale objects. 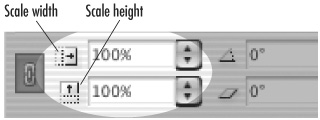 | 4. | To change the height of the object, enter a percentage in the Scale Y field .
Tip The Scale X and Y fields also have pop-up lists from which to choose the amount of scaling. | 5. | Press Enter or Return to apply the changes  . .
The difference between scaling an object or scaling an object and its content. 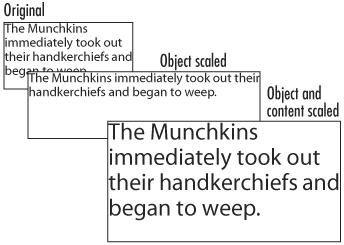 Tip You can also scale text within a text frame by dragging on the edge of the frame while holding the Cmd/Ctrl key. Hold Cmd/Ctrl-Shift and drag by a corner point to scale proportionally. This also applies to text frames in groups. |
To scale proportionally with the Transform palette: 1. | Select an object or objects.
| 2. | If the Link icon is in the open state, click to close it  . .
The Link icon in the closed state forces both the Scale X and the Scale Y fields to the same amount. In the open state, you can enter different amounts for the Scale X and Scale Y fields. 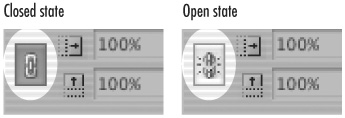 | 3. | Enter an amount in either the Scale X or Scale Y fields. You do not have to enter an amount in both fields. The closed Link icon forces both fields to display the same amount.
| 4. | Press Enter or Return to apply the changes.
Tip Hold the Cmd/Ctrl key as you press the Enter or Return key to scale proportionally even if the Link icon is in the open state. |
You can also rotate objects using the Transform palette. To rotate with the Transform palette: 1. | Select the object or objects.
Tip Use the Selection tool to rotate the object and its contents. Use the Direct Selection tool to rotate only the object. (See page 85 for more information on selecting objects.) | 2. | If necessary, change the transformation point, as explained on page 91.
| 3. | Enter the amount of rotation in the Rotation field  . .
The Rotation Angle field in the Transform palette lets you change the angle of objects. 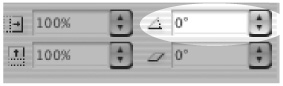 Tip The Rotation Angle field also has a popup list from which to choose the amount of rotation. | 4. | Press Enter or Return to apply the changes  . .
The difference between rotating an object or rotating an object and its content. 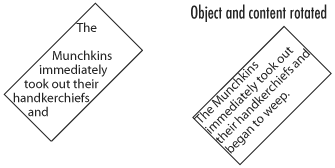 |
You can also shear objects using the Transform palette. To shear with the Transform palette: 1. | Select the object or objects.
Tip Use the Selection tool to shear the object and its contents. Use the Direct Selection tool to shear only the object. | 2. | If necessary, change the transformation point, as explained on page 91.
| 3. | Enter the amount of distortion in the Shear field  . .
The Shear field in the Transform palette lets you distort the shape of objects. 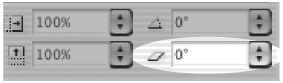 Tip The Shear field also has a pop-up list from which to choose the amount of shearing. | 4. | Press Enter or Return to apply the changes  . .
The difference between shearing an object or shearing an object and its content.  |
|