| After you work on a document for even a little while, you must save your work to a hard drive or disk. This is vital so that you don't lose important information should your computer crash in a power blackout or you do something stupid. To save and name a file (Win): 1. | Choose File > Save or File > Save As. This opens the Save As dialog box  . .
The Save As dialog box (Win). 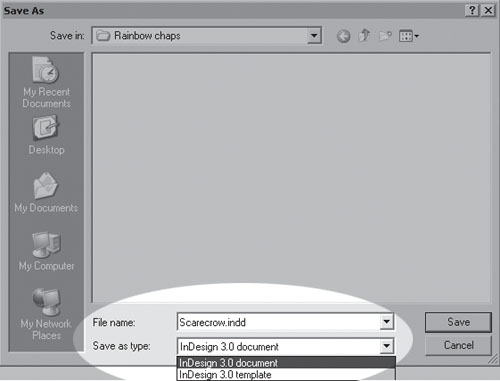 | 2. | Use the Save In field to choose a destination disk and folder for the file.
| 3. | Use the File Name field to name the file.
| 4. | Use the Save As Type field to choose between an InDesign document and an InDesign template.
| 5. | Click Save to save the file and close the dialog box.
|
To save and name a file (Mac): 1. | Choose File > Save or File > Save As. This opens the Save As dialog box  . .
The Save As dialog box (Mac). 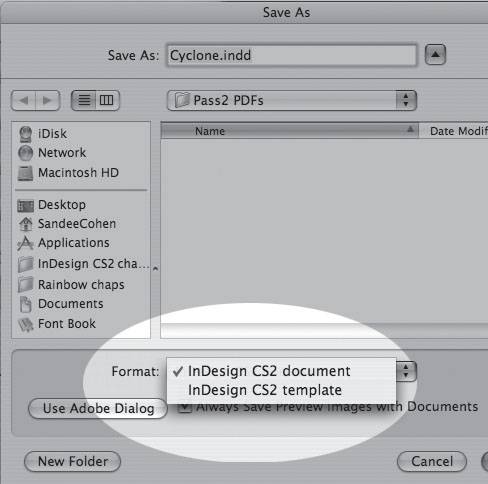 | 2. | Use the Macintosh navigational elements to choose a destination disk and folder for the file.
| 3. | Use the Name field to name the file.
| 4. | Use the Format pop-up list to choose between an InDesign document and an InDesign template.
Tip The template format saves the file so that each time it is opened, it opens as an untitled document. This protects the document from inadvertent changes. | 5. | Click Save to save the file and close the dialog box.
|
OS or Adobe Dialog Box? There's an option in the Save and Open dialog boxes to use the Adobe dialog box or the OS (operating system) dialog box. The Adobe dialog box is another way of displaying the information in your computer. You should also choose the Adobe dialog box if you are using Version Cue. However, for this book I will use the OS dialog boxes. |
The Three Different Save Commands The first time you look under the File menu you may be a little confused by the three different commands for saving documents. What are the differences between Save, Save As, and Save a Copy? The first time you save an untitled document, there is no difference between choosing File > Save and File > Save As. Both commands bring up the Save As dialog box. Once you have named a file, the Save command adds new work to the file without changing the file's name. The Save As command will always open the dialog box where you can change the file's name or location. I use the Save command almost all the time. That way I only have to remember one keystroke combination: Cmd/Ctrl-S. The only time I use the Save As command is if I want to change the name of a document or save it somewhere else. The File > Save A Copy command is different. When you save a copy, you can save the file under a new name. However, unlike the Save As command, you continue to work on the file you were working on. I use the Save a Copy command when I am about to do something strange or bizarre to my work. The Save a Copy command lets me create a version of the file that I know I can fall back on. |
As you work, you may want to spin off a copy of your document under another name. The Save a Copy command makes this easy to do. To create a copy of a document: 1. | Choose File > Save a Copy. This opens the Save As dialog box.
| 2. | Use the same steps as described in the two previous exercises to save the file.
| 3. | Click Save. The copy of the document is saved while you can continue to work on your current file.
|
There may be times when you want to revert to the previously saved version of a document without saving any changes. To go back to the saved version of a document: - Choose File > Revert. The file closes and then reopens to where it was when last saved.
To undo the steps you have done: To redo the steps you have done: - Choose Edit > Redo [Action].
To close a document: - Choose File > Close.
or
Click the Close box in the document window.
It happens someday, somehow your computer will crash, a blackout will hit your city, or you will be forced to restart the computer without saving your work. Fortunately, InDesign has an automatic recovery option that can save your work. To recover a file: 1. | Restart the computer after the crash or data loss.
| 2. | Start InDesign. Any files that were open when the crash occurred will be automatically opened.
| 3. | Choose File > Save As to save the file with a new name and destination.
Tip The restored data is a temporary version of the file and must be saved in order to ensure the integrity of the data. |
InDesign gives you options for opening and closing files. To open a file within InDesign: 1. | Choose File > Open.
| 2. | Use the navigation controls to select the file you want to open.
Tip You can also open a document by double-clicking its icon. |
To open recently saved documents: 1. | Choose File > Open Recent and then choose one of the files listed in the submenu.
Tip InDesign lists the ten last-opened documents in the submenu. |
Opening QuarkXPress or PageMaker Files InDesign can convert documents and templates from QuarkXPress 3.3 (or later) and Adobe PageMaker 6.5 (or later). Simply choose File > Open and choose the file. InDesign converts the file into a new InDesign document. How good is the conversion? It's great for templates that consist of the layout without any text. All the master pages (see page 269) are converted along with the style sheets (see page 378) and colors (see Chapter 5, "Working in Color"). This lets you use your old templates to produce new work in InDesign. Graphics that were pasted via the clipboard into QuarkXPress or PageMaker and not placed using the Place or Get Picture commands are not converted. The conversion may change documents with lots of text. For instance, InDesign arranges type with a very sophisticated composition engine (see page 401). This means that text could move to new lines when it appears in the InDesign document. If you need to make just one or two small changes to an old document, you're better off opening the file in QuarkXPress or PageMaker and making the changes to the original files. However, if you need to completely redo a document, export the text from the file, and then use InDesign to convert the template into an InDesign file. You can then use that template for all new documents. |
Installing Adobe Bridge Don't panic if you can't remember installing Adobe Bridge. Bridge is installed automatically when you install InDesign or any of the other CS2 applications. |
|