| Buttons go much further than links. Links let you move to destinations or open Web pages. Buttons contain the code that can send you to destinations, flip pages, open Web pages, play movies, show and hide other buttons, and other tricks. The first thing you want to do is create a button and assign a simple action. To create a button manually: 1. | Select the Button tool in the Toolbox  . .
The Button tool in the Toolbox.  | 2. | Drag across the page to create the button object. The button appears on the page with a button icon and name  . .
A Button object displays a button icon and a button name. 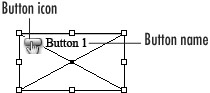 TIP The entire frame is considered the button, not just the little button icon in the frame. TIP Buttons are drawn like any other object. Use all the same modifier keys and techniques that you use when drawing objects. (See Chapter 4,"Working with Objects,"for more information on drawing objects.) |
To create a button numerically: 1. | Select the Button tool in the Toolbox.
| 2. | Click with the Button tool on the page. This opens the Button dialog box  . .
You can use the numerical controls in the Button dialog box to set the size of a button. 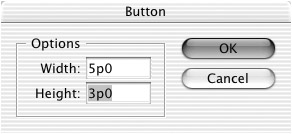 | 3. | Enter the width and height for the button.
|
You can also convert any existing object into a button. This makes it easy to turn images or text into buttons  . .
An example of how a button can contain text or an image. 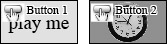 To convert an object into a button: 1. | Select the object that you want to make into a button.
| 2. | Choose Object > Interactive > Convert to Button. The button icon and name appear inside the converted object.
|
You can also add content, such as text or images, to existing buttons. To type text in a button: 1. | Move the Text tool over the button. The cursor changes to curved edges  . This indicates that text can be added to the button. . This indicates that text can be added to the button.
The curved text cursor indicates that you can click to add text to a button. 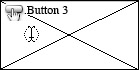 | 2. | Click the Text tool. A blinking insertion point indicates that you can type text in the button.
To import text into a button:
|
1. | Select the button.
| 2. | Choose File > Place and select the text file you want to import. The text flows into the button  . .
Text can be imported into a button. The overflow symbol lets you flow the text out to another text frame.  TIP The text inside a button is in a separate text frame that has been pasted into the button frame. Use the Direct Selection tool to access the text frame. |
To add an image to a button: 1. | Select the button.
| 2. | Choose File > Place and select the image file you want to import. The image appears inside the button  . .
An image can be imported into a button.  TIP You can also click with a loaded cursor to add an image to a button. |
|