| In addition to setting the controls for the entire table, you can also make settings for individual cells. You can customize the arrangement of rows and columns by merging or splitting cells. You may want to merge cells to fit more text within a cell. You can also change the space of text within a cell. To merge cells: 1. | Select the cells you want to merge.
| 2. | Choose Table > Merge Cells. The dividers between the cells are deleted  . .
The results of using the Merge Cells command. 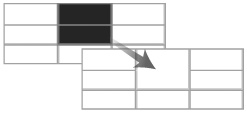 Tip If the merged cells contain text, the text will be divided into paragraphs. |
To unmerge cells: 1. | Select the cells you want to unmerge.
| 2. | Choose Table > Unmerge Cells.
|
To split cells: 1. | Select the cell you want to split.
| 2. | Choose Table > Split Cell Horizontally or Table > Split Cell Vertically  or or  . .
The results of using the Split Cell Horizontally command. 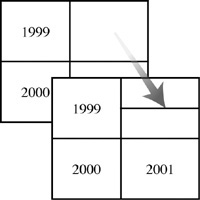
The results of using the Split Cell Vertically command.  |
You can also control how text is positioned horizontally and vertically with each cell. Tip These settings also control how inline graphics are positioned within frames.
To set the cell options for text: 1. | Select the cells you want to adjust.
| 2. | Choose Table > Cell Options > Text. This opens the Cell Options for text controls  . .
The Text area of the Cell Options controls how text is positioned within each cell. 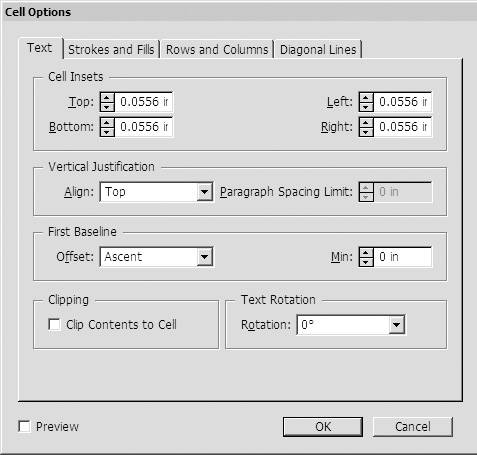 | 3. | Use the four Cell Insets fields to adjust the amount of space between the text and the top, bottom, left, and right sides of the cells  . .
The Cell Insets controls let you specify how far away text sits from the edge of the cell. 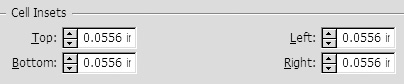 | 4. | Choose one of the four settings from the Text Rotation menu to rotate the text in 90° increments.
|
You can also set the vertical alignment for where the text is positioned in the cell. To set the text vertical alignment: 1. | Select the cells you want to adjust.
| 2. | Choose Table > Cell Options > Text. This opens the Cell Options dialog box for text controls.
| 3. | Use the Vertical Justification Align menu to choose one of the four alignment options as follows:
Top positions the text at the top edge of the cell. Center positions the text in the middle of the cell. Bottom positions the text at the bottom edge of the cell. Justify distributes the lines of the text evenly so that it extends from the top to the bottom of the cell.
Tip The Justify setting overrides any leading applied to the text. |
If you choose Justify for the vertical alignment, you can then control the space between the lines or paragraphs. To set the vertical justification spacing: 1. | Select the cells you want to adjust.
| 2. | Choose Table > Cell Options > Text. This opens the text controls for the cells.
| 3. | Choose Justify from the Vertical Justification list.
| 4. | Set an amount for the Paragraph Spacing Limit  . .
When the Justify option is chosen in the Vertical Justification Align menu, the Paragraph Spacing Limit control is available.  Tip Increase the value for the paragraph spacing to avoid increasing the space between the lines within the paragraph. |
Just as you can control where the first baseline of text appears in a text frame, you can also control the position of the text baseline within a cell. To control the first baseline in a cell: 1. | Select the cells you want to control.
| 2. | Choose Table > Cell Options > Text. This opens the text controls for the cells.
| 3. | In the First Baseline area, use the Offset menu to choose a setting  . .
The First Baseline controls let you set the position of the first baseline of text within a cell. 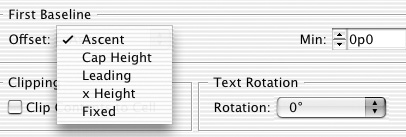 | 4. | In the Min field, set the minimum amount of space for the first baseline.
|
|