Setting Up, Turning On, and Enabling Version Cue
| Version Cue CS2 files are installed on your computer as part of the default installation of Adobe Creative Suite 2 you don't have to set them up. But before you can begin working with Version Cue, first you need to set up a Version Cue workspace, turn on Version Cue in Acrobat if you're using that application in your projects, and enable preferences. Then you're ready to go to work. This section describes these steps, and how to view a Version Cue workspace. Setting up Version CueInstalling Version Cue automatically creates a Version Cue workspace a file storage area that contains all versions and XMP metadata for all files in a project and that maintains the relationships between the files. A Version Cue workspace can contain many projects (Figure 13-9). Figure 13-9. Version Cue workspace with current projects.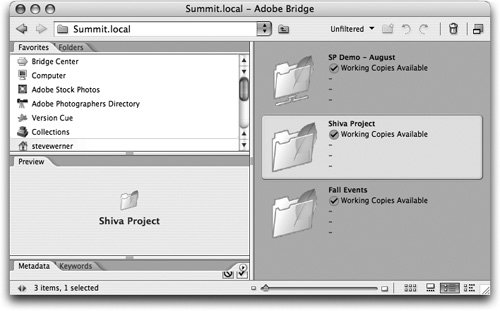 By default, Version Cue is turned on and requires no special setup. However, if you're part of a workgroup, you (or your administrator) might set up a configuration different from the default for example, installing Version Cue on a server instead. Version Cue supports three common workflow scenarios: a single user on a personal workstation, a small group of users with files on individual computers, and a larger group of users using a server as a local area network. Whether you're an individual user or a member of a workgroup with the proper permissions, you can define whether a project is private (for your use only) or shared with others, and who has privileges to access a shared project. (A project is a top-level folder in a Version Cue workspace that contains related files, grouped as you wish and following any kind of file/folder hierarchy.) If you're an individual user, you can also define whether an entire Version Cue workspace is public or private. If you intend to collaborate with other Creative Suite users, make sure that the Version Cue workspace is available on a computer that everyone can access on a network and that the collaborative projects are kept in that workspace. (See "Collaborating on a Project" later in this chapter.) Single User WorkflowIndividual users of Adobe Creative Suite 2 are ready to go after installing Creative Suite 2, and can immediately begin setting up Version Cue projects. Individuals can access projects from a computer other than their own that's on a local network on which Creative Suite is installed. Workgroup with Files on Computers WorkflowIn a small workgroup, installing Adobe Creative Suite on each workstation in the group also installs a Version Cue workspace on each workstation. Each member of the workgroup can set up a Version Cue project on his or her hard drive, share the project on that hard drive over the local network, and decide which projects are private and which can be shared. Workgroup with Files on Server WorkflowFor a more structured workgroup, installing Version Cue on a server accessible to the members of a workgroup may make more sense. When a Version Cue workspace is on the server, typically it will almost always be available. (On an individual workstation, the Version Cue workspace is unavailable when the computer is put to sleep or shut down.) Installing Version Cue on a server, as opposed to on an individual computer, has other advantages. On a server, Version Cue typically has a larger file capacity due to the server's large-capacity drives; backup normally is automatic and scheduled; and performance is usually not an issue. In comparison, when Version Cue is installed on an individual computer, file capacity is limited to the computer's hard drive, and backup depends on when a user backs up projects. To install Version Cue on a server, install from the Creative Suite 2 CD directly to the server's hard drive. Your license for a single copy of the Adobe Creative Suite allows you to install Version Cue on a server, even if other CS2 components are installed on a different workstation. Once installed, the Version Cue workspace on the server broadcasts its presence on the local network; thus, generally, it's unnecessary to configure the server in a special way. By default, Version Cue is turned on when the computer starts, which is necessary in case the server must be rebooted. Tip: Restart Version Cue Once a Week It's a good practice to restart Version Cue periodically Adobe recommends once a week. When Version Cue is restarted, it performs an integrity check and makes necessary repairs to its internal structure if required (a very rare event). Getting Access to Version Cue ProjectsIf you have license to only one component of Creative Suite 2, you will not have your own Version Cue workspace. If you have created a Version Cue project and set it to be shared (which you can do only if you have installed the full Creative Suite), it will be accessible to anyone on your local area network who has installed Adobe Creative Suite 2, as well as to anyone who has a copy of individual CS2 applications InDesign, Illustrator, Photoshop, GoLive, or Acrobat 7.0 Professional and who has permission to access the project. Participation in a shared project gives you access to the full Version Cue feature set. The user of an individual Creative Suite component like InDesign can use the same Bridge and Adobe dialog box interface as someone who is licensed to use Creative Suite (see the sidebar "The Adobe dialog box"). They can even create a project in someone else's Version Cue workspace if they have access to it. You can also view and open the files remotely if you have access to a Version Cue workspace. When you need to access a project on a different subnet (a computer outside your local area network), you can use the IP (Internet Protocol) address of the computer to access the Version Cue workspace. See "Collaborating on a Project" later in this chapter. Turning off Version Cue in CS2 ApplicationsVersion Cue is turned on in the Creative Suite 2 applications by default (with the exception of Acrobat 7.0 Professional, which requires that you turn on Enable Version Cue workgroup file management in General Preferences). Even if you're not using Version Cue, it's a good idea to leave it turned on; doing so gives you access to the Adobe dialog box. However, if you think you'll never use Version Cue, you can turn it off in CS2 applications by deselecting the Enable Version Cue Workgroup File Management option. (This option is in the File Handling preferences in Photoshop and InDesign, and in the File Handling & Clipboard preferences in Illustrator.) Then, in Version Cue CS2 preferences, turn off Version Cue and reboot your computer. As a last step, deselect Version Cue in the Favorites Items section in the Adobe Bridge preferences. Version Cue can't be removed from the Folders pane or the Version Cue submenu of the Bridge Tools menu. Enabling Version Cue Preference SettingsWhen you set up Version Cue for the first time, it is set up for an individual working with both print and web projects. The default memory setting is 128 MB of RAM for the workspace (in addition to the 196 MB of RAM required to run any single CS2 application). You can adjust these settings in Version Cue preferences for your particular needs. To adjust the Version Cue preferences, on the Macintosh, click the Version Cue icon on the menu bar and choose Version Cue CS2 Preferences. In Windows, double-click the Version Cue icon on the system tray at the bottom right of the screen. Adobe Version Cue CS2 Preferences appears (Figure 13-10). Figure 13-10. Version Cue CS2 Preferences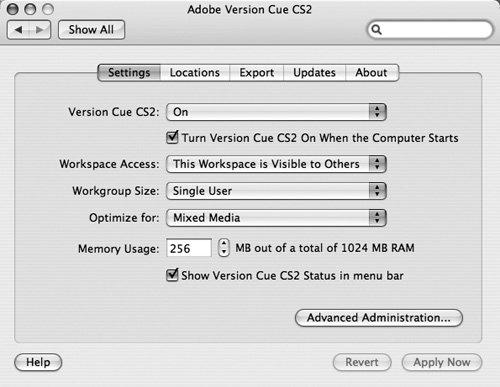 Depending on the number of users and the kinds of projects you work on, you may want to change a few preferences:
Viewing Version Cue WorkspacesIt's easiest to view a Version Cue workspace in Adobe Bridge. Clicking Version Cue in the Favorites panel of Bridge initially displays an icon labeled Workspaces in the content area (Figure 13-11, left). (Later, as you start to work on projects, aliases or shortcuts of those projects will also appear at this level of your file hierarchy.) Double-clicking the Workspaces icon displays the Version Cue workspace on your own workstation, marked with the name of the workstation and My Computer. If your local network has other Version Cue workspaces, icons will also appear with the name of the workstation and Adjacent Computer (Figure 13-11, right). Figure 13-11. Click Version Cue on the Adobe Bridge Favorites panel to display Version Cue workspaces (left); Version Cue workspaces visible on a local network (right).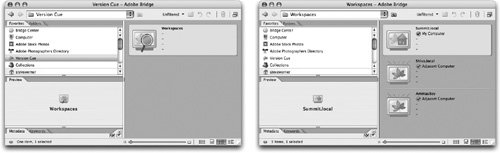 When you view Version Cue workspaces in Adobe Bridge, icons indicate the workspace status, as shown in Table 13-1.
Tip: If You Don't See Version Cue... If Version Cue doesn't appear in Adobe Bridge, you may have turned off the display of Version Cue in the Favorites panel. Go to Bridge General Preferences and check Version Cue in the Favorites Items section. Version Cue workspaces also appear in the Adobe dialog box when choosing the Open, Save, Save As, Place, Import, and Export commands of InDesign, Illustrator, and Photoshop (see the sidebar "The Adobe Dialog Box.") However, Version Cue workspaces aren't easily accessible when browsing in your operating system's file hierarchy or when using your operating system's Open or Save dialog box.
|

EAN: 2147483647
Pages: 192