Anatomy of a Version Cue Project
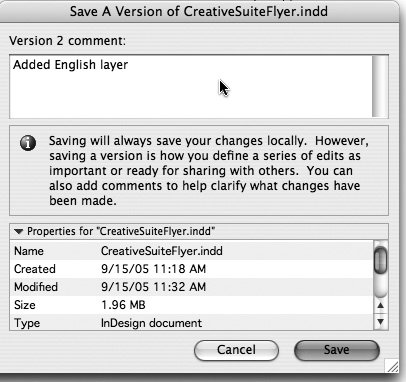
| Here's an example of a typical Version Cue project and one possible scenario of a workflow within a group of designers. Even if you're a single user, working on your own, you can follow this workflow. Imagine that a team of designers Mary, Bob, and Carol is working on a product flyer describing the features of Adobe Creative Suite (Figure 13-1). Mary is designing this flyer in InDesign CS2 with three language editions English, French, and Spanish. Bob is creating a layered Photoshop CS2 file that displays the Adobe Creative Suite logo on a 3D box, with layers and layer comps for each language edition. Bob also created the screen captures for each language edition. Carol is working in Illustrator CS2 on a graphic for the flyer that lists the different Creative Suite components, with layers for each language. Each designer has a copy of Adobe Creative Suite installed on his or her own computer. Mary will host the collaborative Creative Suite flyer project on her workstation. Figure 13-1. A product flyer put together by a team of designers using Version Cue.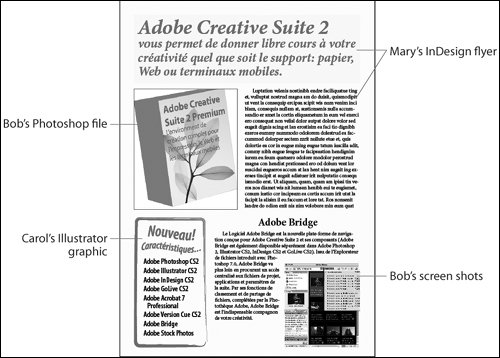 Create the ProjectMary starts by opening Adobe Bridge. She clicks Version Cue on the Favorites panel. She double-clicks the Workspaces icon, and then double-clicks the icon with her computer name (labeled My Computer) to open her workspace (Figure 13-2, left). The opened workspace is empty. Then she chooses Tools > Version Cue > New Project (Figure 13-2, right). In the New Project dialog box, she chooses her computer from the Location menu as the project location, names the project, and enters a short description to provide information to her collaborators and so the information can be included in a search. She checks Share This Project With Others so that Bob and Carol will see it when they navigate to her workspace. Figure 13-2. Clicking Version Cue on the Adobe Bridge Favorites panel reveals icons for Version Cue workspaces on your computer and on other computers on the local network (left). When creating a new project, there is an option to share it (right). Import and Create AssetsMary starts to import project assets that are ready. She chooses File > New Window to duplicate the existing Bridge window. Then she uses the Bridge Folders panel to navigate to the folder on her Desktop where she has stored screen captures from Bob and an Illustrator PDF from Carol. Mary selects the files she wants and simply drags them into the project (Figure 13-3). Copying all the assets associated with the project into the Version Cue workspace makes the files available to everyone working on the project. (Alternatively, she could drag the files directly from the Desktop into her Bridge window showing the project.) Figure 13-3. Adding existing assets to a project by dragging them from another Adobe Bridge window. With some of the graphics completed, and Bob still working on his layered Photoshop file, Mary is ready to begin her page layout in InDesign. She begins creating elements common to the different language editions. After working a bit, she saves her file into the Version Cue project she's already created by choosing File > Save As. She clicks the Use Adobe Dialog button in the Save As dialog box to navigate to the Version Cue workspace (described in detail in the sidebar "The Adobe Dialog Box" later in the chapter). In the Adobe dialog box, she clicks the Version Cue icon in the Show Places pane on the left. It reveals the Workspaces icon and a new alias to the project she's created. Whenever Mary or her co-workers create or access a project, an alias is automatically created to make it easier to get into the project later. Double-clicking the alias to the project displays the graphics already in the project (Figure 13-4). Figure 13-4. When using the Adobe dialog box to save a file, adding a comment saves metadata that can be searched later.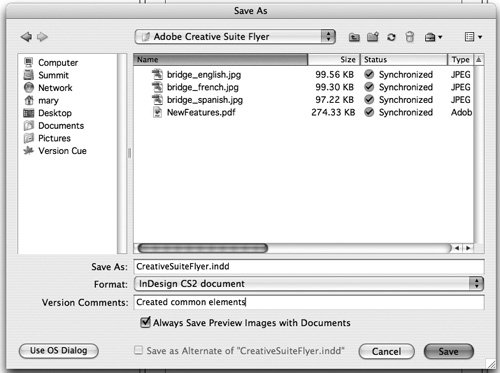 Mary names her layout, enters a comment in the Version Comments field to add information for the file version she'll create, and clicks Save. The saved file is added into the Version Cue project, and a second working copy is saved to her hard drive. (Version Cue always saves two copies of your files; see "Using Working Copies" later in this chapter.) The File Status field at the bottom of the InDesign window read Synchronized; Open, because the copies in the Version Cue workspace and the working copy match. Create File VersionsMary continues to build her layout, adding a new layer for the English text. She chooses File > Save to save the layout changes to her working copy, but not yet as a newer version in the Version Cue project for others to access. (As we explain next, you can save versions to your hard drive until you reach a milestone a new version you wish to make available to others to access from the Version Cue project.) The File Status field in InDesign reads In Use By Me; Open. If Carol or Bob were to view the Version Cue project in Adobe Bridge or the Adobe dialog box at this time, they would know that Mary is editing the file by the status In Use By Mary. Save a Version MilestoneMary places the Illustrator file that Carol has created by choosing File > Place and using the Adobe dialog box to select the graphic. Because this is a milestone for the file, Mary saves a new version of the file and adds a comment much as mountain climbers scaling a tall mountain would set up a base camp they could return to. Mary chooses File > Save A Version. In the Save A Version dialog box, she adds a comment that indicates the new milestone, "Added English layer," and clicks Save. Version Cue updates Mary's own working copy and then adds it to the master project for others to access from the Version Cue workspace, synchronizing the file (Figure 13-5). Figure 13-5. Saving a new version of the InDesign file for the milestone of adding a new layer. In a similar manner, Mary adds layers for the French and Spanish versions, and chooses the Save A Version command to save a version of each of these steps, which are also milestones in the creation of the file. View, Delete, and Promote VersionsSaving versions of a file with Version Cue is easy because each is saved without having to specify a different file name for each version. At any time, you can view the versions you've created. (Viewing versions has some similarity to viewing Photoshop's History palette because you can use it to return to a previous file state, but Version Cue versions are stored in the file, while Photoshop's history is discarded when a file is closed.) If Mary wants to view the versions she has created, she clicks the pop-up menu to the right of the File Status field at the bottom of the window, and chooses Versions. The Versions dialog box displays thumbnails for each version, comments she has made, her name (as the creator of the version), and the date and time (Figure 13-6). When she selects a version, she can click View Version to view the version, or click Delete to delete it. If Mary later wants to work with one of the earlier versions because, for example, she wants to recover from a destructive change, she can bring any previous version forward by selecting that version and clicking Promote To Current Version. Figure 13-6. Using Versions dialog box to view other file versions, delete them, or promote them to current version.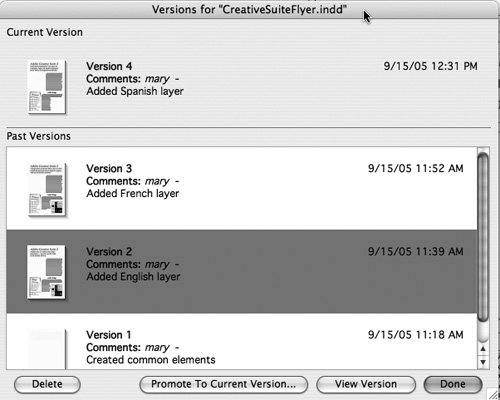 View the Project from the BridgeBob has now completed the Photoshop image of the 3D product box, and he's ready to save it to the project so that Mary can place the image in the layout. Bob uses Adobe Bridge to view the Adobe Creative Suite Flyer project in Mary's Version Cue workspace, and sees all files that have been added so far. In Bridge Thumbnails view, he can pause over each file and display a tool tip that shows the person who created it, the version number, and other status information (Figure 13-7). An icon next to each file also indicates its current status. (See Table 13-3 for the meaning of status icons.) Figure 13-7. Viewing a project in Adobe Bridge.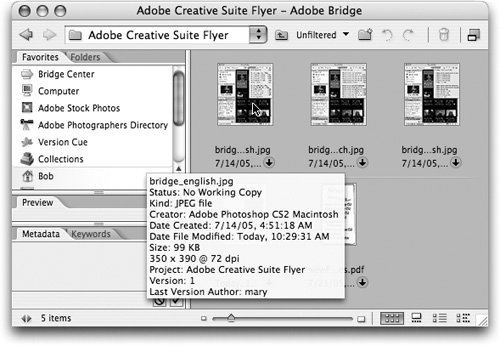 All files in the project are currently labeled No Working Copy, because Bob hasn't opened any file, nor synchronized the project. (He could create working copies of all project files by opening them, or by selecting the project and choosing Tools > Version Cue > Synchronize.) He's ready to save his Photoshop file into the project. In Photoshop CS2, he chooses File > Save As, clicks the Use Adobe Dialog button, and navigates to the Version Cue workspace on Mary's computer, where he sees the files Mary has been working on. Bob saves the 3D box file into the project for the first time, saving a version of the Photoshop file and including a comment with the version (Figure 13-8). Figure 13-8. Using the Adobe dialog box to navigate to the Version Cue project and save a version of the Photoshop file.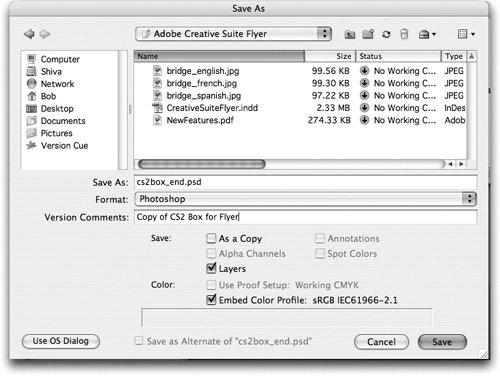 From Adobe Bridge, Mary sees that Bob's file is now in the project, marked with a No Working Copy icon. She synchronizes the file to create a working copy by selecting the file and choosing Tools > Version Cue > Synchronize; the icon changes to Synchronized. In her InDesign layout, she places the file on each layer, choosing the layer comp appropriate for each language layer. She saves another version of the InDesign file. The layout is now complete, and Mary creates a PDF proof of the file to send off for approval. She can create a browser-based review of the PDF file using the Version Cue Administration utility, as we describe in the "Using a Browser-Based Review (Version Cue)" section of Chapter 14, "Creating and Using PDF Files." |
EAN: 2147483647
Pages: 192