| Test Objective Covered: Configure NSS.
Configuring NSS is much simpler than its architecture suggests. All you have to do is design the NSS volume to identify its intended purpose and then create it. Well…it's not actually that easy. In fact, before you can create an NSS volume, you must first create a partition and a storage pool. It's a three-step process, as you'll learn in just a moment. Although NSS is installed and configured by default during NetWare 6 installation, you must configure additional volumes after the fact. You should follow the same general planning strategies for NSS volumes that apply to creating traditional volumes. In this lesson, we will explore the three steps necessary to configure NSS volumes. In addition, you will learn how to configure traditional volumes, how to convert traditional volumes to NSS, and how to install software RAID using NSS. In summary, the four sections of this lesson are NSS Preparation Before you can configure NSS partitions, storage pools, and volumes, you must ensure that your server meets these minimum system requirements: A server running NetWare 6 At least 10MB of free space to create an NSS storage pool and logical volume Sixty percent of server cache buffers available
Of all these NSS system requirements, server cache buffers are the trickiest. By default, NSS uses 60 percent of the server's cache buffers to temporarily store data files in RAM. By default, each cache buffer consumes 4KB of server memory. The good news is you can change the NSS cache buffer allocation at any time by using either integers (with a range from 256 to 1,048,576 cache buffers) or percentages (calculated as a percentage of server cache buffers). You should adjust your NSS cache buffer allocation according to the number of NSS volumes on your server. If most volumes on the server are NSS volumes, consider allocating the full 60 percent. Doing so optimizes server performance and leaves sufficient cache buffers available for non-NSS tasks. As a network administrator, you can configure NSS cache buffer allocation in one of three ways: MONITOR You can use the MONITOR server utility as shown in Figure 5.3 to configure the NSS cache buffer allocation. Simply choose Server Parameters and Novell Storage Services. The Cache Buffer Allocation parameter will then appear. Figure 5.3. NSS cache buffer allocation in MONITOR.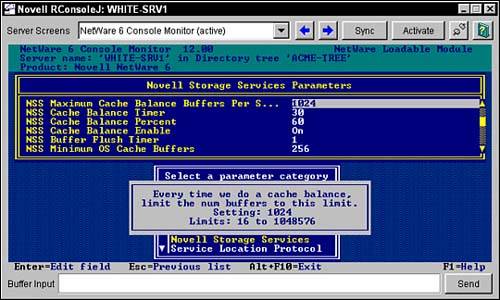
NSS Console Commands You can use the following NSS console commands to allocate NSS cache buffers at the server console: NSS /MinBufferCacheSize={value} NSS /CacheBalance={value} The minimum buffer cache size range is from 256 to 1,048,576. The cache balance range is from 1 to 99 percent. SET Console Commands You can use the following SET console commands to allocate NSS cache buffers at the server console: SET NSS MINIMUM CACHE BUFFERS={value} SET NSS CACHE BALANCE PERCENT={value} The minimum cache buffer size range is from 256 to 1,048,576. The cache balance percent range is from 1 to 99 percent.
After you have set the NSS cache buffers appropriately at the server console and met the minimum system requirements, it's time to configure your NSS volumes. NSS Volume Configuration If you wish to create an NSS volume from existing server disk space, you need to watch out for one particular caveat: physical hard disk space might already be allocated to existing DOS or NetWare partitions. Remember that NSS volumes are created from storage pools, which are created from NSS partitions. Later in this lesson, you will learn how to convert existing traditional volumes to NSS volumes and how to mount DOS partitions as NSS volumes. In this section, you will learn how to create an NSS volume from free server disk space (that is, storage deposits). NSS volume configuration is a three-step process: Create an NSS Partition Create a Storage Pool Create NSS Volumes
Create an NSS Partition As you recall from our NSS architecture discussion earlier in the chapter, NSS partitions are the grandparents of NSS volumes. Therefore, NSS partition configuration is the first step in creating an NSS volume. Follow these simple steps to create an NSS partition: Start ConsoleOne at a NetWare 6 workstation or server. Then authenticate as Admin (or an equivalent user with Admin privileges). In ConsoleOne, browse to your Server object, right-click it, and select Properties. Next, select Media and finally Partitions. A screen similar to Figure 5.4 should appear. Figure 5.4. Media Partitions window in ConsoleOne.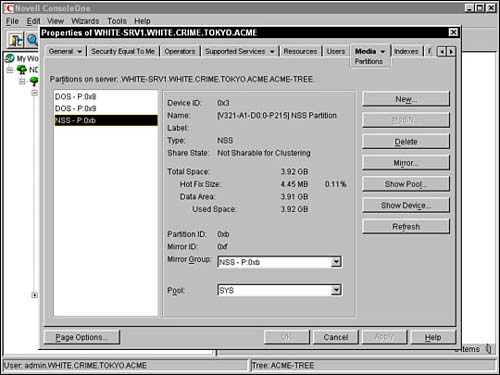
In the Media Partitions window (shown in Figure 5.4), select New. Then the Create a New Partition window should appear, as shown in Figure 5.5 Figure 5.5. Creating a new partition in ConsoleOne.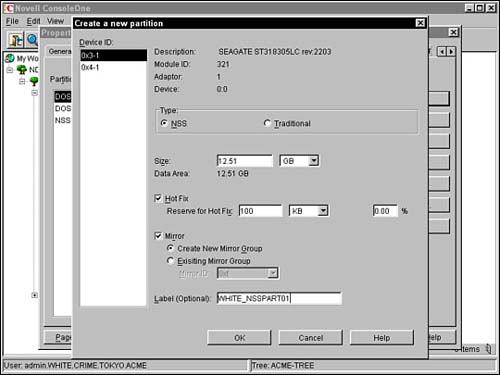
In the Create a New Partition window (shown in Figure 5.5), select a media device from the Device ID list on the left-hand side of the screen. After you have made your selection, the New Partition form requires the following five configuration details: Type Select the type of partition you want to create (either NSS or traditional). In the case of an NSS volume, select the NSS partition type. Size Enter the size of the partition in bytes (B), kilobytes (KB), megabytes (MB), or gigabytes (GB). Hot Fix Mark the Hot Fix box to activate NSS's Hot Fix Error Correction feature. Next, enter the size of the Hot Fix reserve as either a fixed integer or percentage. Mirror Mark the Mirror box to activate the NSS mirroring feature. You can choose to "Create a New Mirror" or add this NSS partition to an "Existing Mirror Group." Label Enter an optional label for this NSS partition. A naming syntax you may want to use is as follows: {server}_NSSPARTITION{number}. Using this strategy, the first NSS partition in the WHITE-SRV1 server would be named WHITE_NSSPART01.
To complete the form and create the NSS partition, select OK.
Create a Storage Pool If NSS partitions are the grandparents of NSS volumes, then storage pools are the parents. After you have created your NSS partition, it's time to subdivide it into storage pools. Follow these simple steps to create a storage pool within your new NSS partition: Start ConsoleOne at a NetWare 6 workstation or server. Then authenticate as Admin (or an equivalent user with Admin privileges). In ConsoleOne, browse to your Server object, right-click it, and select Properties. Next, select Media and NSS Pools. A screen similar to Figure 5.6 should appear. Figure 5.6. Media NSS Pools window in ConsoleOne.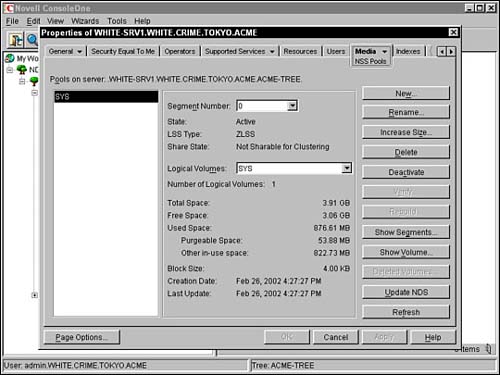
Select New in the NSS Pools window (shown in Figure 5.6) to create a new storage pool. The Create a New Pool window should appear. In the Create a New Pool window, enter a name for the new storage pool and then select Next. The storage pool name should be at least 2 characters and no more than 15 characters. Pool names can contain the following characters: A through Z, 0 through 9, and _*@#$%&[]. The pool name cannot begin or end with an underscore ("_") and cannot contain multiple underscores. You should use the same naming syntax for storage pools that you use for NSS partitions. For example, the first storage pool on the WHITE-SRV1 server could be named WHITE_NSSPOOL01. After you name the new storage pool, ConsoleOne responds with the Storage Information window (as shown in Figure 5.7). In this step, you must select the existing NSS partition or unpartitioned free space that you want to use for the storage pool. In the Used column, enter the amount of space you want to allocate from each NSS partition and select Next. Remember, a single storage pool can group disk space from multiple NSS partitions. Figure 5.7. Creating a new storage pool in ConsoleOne.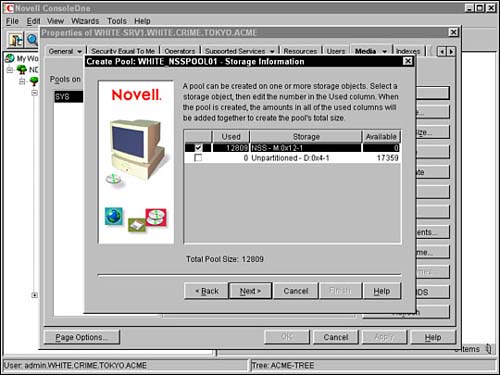
Select Activate on Creation. This activates your storage pool and any logical volumes when you create the pool. Select Finish to create your NSS storage pool and to return to the NSS Pools window of ConsoleOne.
TIP When you create storage pools, you can use partitioned or unpartitioned disk space. If you choose Unpartitioned Space in the Storage Information window (shown in Figure 5.7), then ConsoleOne automatically creates an NSS partition and makes the storage pool the same size as the partition. Cool, huh?!!!
Create NSS Volumes At last, we have made it to the target of this lesson: NSS volumes. After you have created a host storage pool, you can create any number of logical volumes within it. Remember that each NSS logical volume can be fixed in size or configured to expand according to the space available in the storage pool. Of course, the size of a single volume cannot exceed the size of the storage pool. Finally, remember NSS is compatible with DOS, Macintosh, Unix, and long-name spaces. Follow these simple steps to create a logical NSS volume within the new storage pool: Start ConsoleOne at the NetWare 6 workstation or server. Then authenticate as Admin (or an equivalent user with Admin privileges). In ConsoleOne, browse to your Server object, right-click it, and select Properties. Next, select Media and NSS Logical Volumes. A screen similar to Figure 5.8 should appear. Figure 5.8. Media NSS Logical Volumes window in ConsoleOne.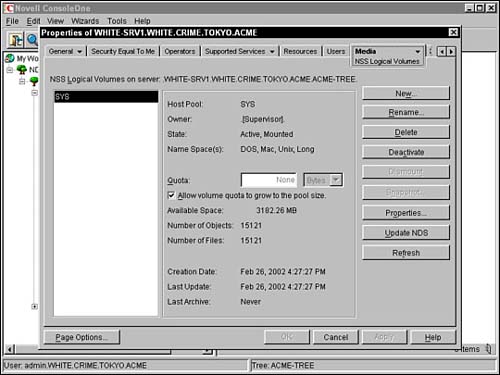
In the NSS Logical Volumes window select New (shown in Figure 5.8) to create a new volume. The Create a New Logical Volume window should appear. Notice from the figure that the default host pool is SYS. This storage pool is created by default when you install NetWare 6. In the Create a New Logical Volume window, enter a name for the volume and then select Next. This name should be at least 2 characters and no more than 15 characters. Logical names can contain the following characters: A through Z, 0 through 9, and _*@#$%&[]. The name cannot begin or end with an underscore ("_") and cannot contain multiple underscores. You should use the same naming syntax for logical volumes that you used for storage pools. For example, the first NSS volume on the WHITE-SRV1 server could be named WHITE_NSSVOL01. Next, the Volume Storage Information window will appear (as shown in Figure 5.9). This window lists all storage pools that are available to host your new NSS volume and their available disk space. Select the storage pool where you want to create the volume and input the volume size in the Volume Quota (MB) field. If you want the volume size to expand dynamically, mark Allow Volume Quota to Grow to the Pool Size. Select Next to continue. Figure 5.9. Creating a new NSS logical volume in ConsoleOne.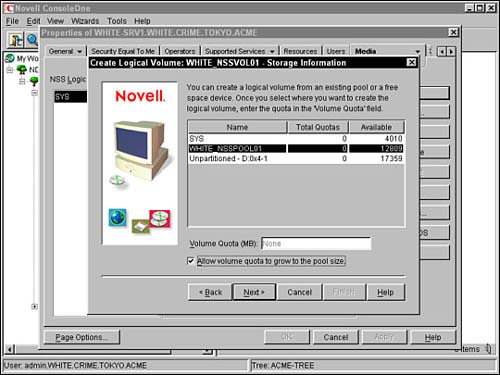
The Volume Attribute Information window will appear (as shown in Figure 5.10). Figure 5.10. NSS Volume Attribute settings in ConsoleOne.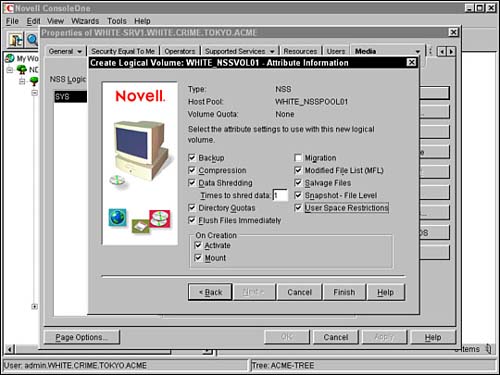
On the screen shown in Figure 5.10, you will select the attribute settings to use with your new NSS logical volume. The attributes shown are Backup Indicates whether the volume should be backed up. Mark this box if the volume contains data that you want to back up using third-party backup software. Consult your vendor to ensure compatibility with NetWare 6 NSS. Compression Activates file compression for the logical volume. If you choose not to activate compression at this time, you will have to re-create the volume later to activate it. Data Shredding Activates the data shredding security feature, which scrambles any data that you delete from the volume. Enter the number of times you want the data shredder to scramble your deleted files (from 1 to 7). Directory Quotas Activate this feature to restrict the amount of space a directory can use. The directory restriction settings are configured elsewhere in ConsoleOne. Flush Files Immediately Activates the File Flushing feature, which improves volume reliability, but decreases server performance. Refer to the "NSS Features" section earlier in this chapter for more information. Migration Activates the data migration feature for this volume. Modified File List (MFL) Activates the MFL tracking list for incremental backups. Consult your backup software vendor to ensure compatibility with NetWare 6 NSS. Salvage Files Activates the file salvage feature that tracks deleted files and allows you to retrieve them until the space is needed for other data. File Snapshot Activates the NSS snapshot feature at the file level. This allows a backup utility to capture a snapshot of the last closed version of every file. Please refer to the "NSS Features" section earlier in this chapter for more information. User Space Restrictions Activates the user space restrictions feature on this volume. User space restrictions can be configured later using ConsoleOne. On Creation You can choose to activate this volume as soon as you create it and/or mount this volume as soon as you create it.
Select Finish in the Volume Attribute Information window to complete the form and create your new NSS logical volume.
TIP When you create NSS logical volumes, you can use partitioned or unpartitioned space. If you choose unpartitioned space, ConsoleOne will automatically create a host NSS partition and a host storage pool. The new NSS logical volume size will be equal to the storage pool size, which is equal to the NSS partition size.
This completes the three-step NSS volume configuration process. After you have created the NSS family tree (partition grandparent, storage pool parent, and NSS logical volume), users can take advantage of the exciting new NSS file system. Of course, that's not to say that there's anything wrong with the traditional NetWare file system. In fact, there are many times when you may want to fall back on the traditional method of storing data files. Now let's take a step back in time and learn how to configure traditional NetWare volumes. Traditional Volume Configuration The traditional NetWare file system is much simpler than NSS but lacks many of NSS's sophisticated features. As you learned in Figure 5.2, the traditional file system architecture is composed of storage devices, partitions, and volumes. Traditional volumes are further organized into directories and files just as with the NSS file system. Although NSS is the default file system in NetWare 6, you may want to maintain traditional partitions and volumes on your server for legacy applications and users. Before you create traditional NetWare volumes, however, you should keep these caveats in mind: The NetWare 6 version of NWCONFIG is incompatible with traditional volumes. You must use ConsoleOne or Remote Manager to create, modify, and rename traditional volumes. The NetWare 6 versions of VERIFY and REBUILD are incompatible with traditional volumes. You must use VREPAIR to fix traditional volumes. You cannot create traditional volumes within an NSS storage pool. NetWare 6 traditional volumes cannot be mounted on servers running previous versions of NetWare. However, legacy NetWare servers can back up data from NetWare 6 traditional volumes.
Even with these shortcomings, NetWare 6 traditional volumes provide an excellent bridge to "cross the chasm" from legacy NetWare servers to NSS. Following are the steps for creating a traditional volume using NetWare 6: Start ConsoleOne at a NetWare 6 workstation or server. Then authenticate as admin (or an equivalent user with admin privileges). In ConsoleOne, browse to your Server object, right-click it, and select Properties. Next, select Media and Traditional Volumes. A screen similar to Figure 5.11 should appear. Figure 5.11. Media Traditional Volumes window in ConsoleOne.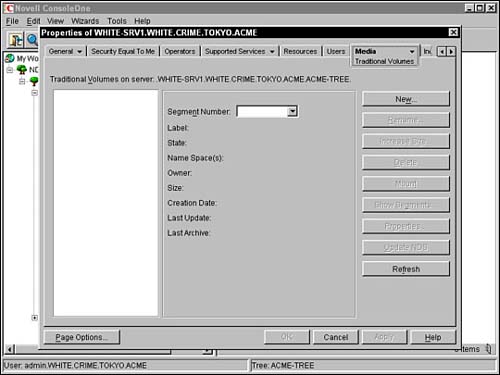
To create a traditional volume, select New in the Media Traditional Volumes window (shown in Figure 5.11). The Create a New Traditional Volume window should appear. In the Create a New Traditional Volume window, enter a name for the traditional volume and then select Next. This name should be at least 2 characters and no more than 15 characters. Logical names can contain the following characters: A through Z, 0 through 9, and _*@#$%&[]. The name cannot begin or end with an underscore ("_") and cannot contain multiple underscores. You should use the same naming syntax for traditional volumes that you used for NSS logical pools. For example, the first traditional volume on the WHITE-SRV1 server could be named WHITE_TRADVOL01. The Traditional Volume Storage Information window should appear. Select an existing partition (or unpartitioned space) to host the traditional volume. In the Used column, enter a size for the volume and select Next. The Traditional Volume Attribute Information window will appear (as shown in Figure 5.12). This window allows you to configure the following traditional volume attributes: Block Size Select a block size for data partitioning within the traditional volume. The default block size is determined by NetWare according to the overall volume size. The range is from 4KB to 64KB. Compression Mark this box to activate file compression for your new traditional volume. File compression increases available disk space by automatically compressing inactive files. Users can save up to 63 percent of the server's disk space when file compression is activated. Migration Mark this box to activate the migration feature on the new traditional volume. Data migration provides near-line storage by automatically transferring inactive files from your traditional volume to a tape drive or optical disk. Data migration is part of NetWare's High Capacity Storage System (HCSS). Suballocation Mark this box to activate block suballocation on your new traditional volume. Block suballocation increases available disk space by storing portions of multiple files in a single disk allocation block. This feature solves the inherent problem of wasted disk space by dividing partially used disk blocks into 512-byte suballocation blocks. Mount Volume on Creation Mark this box to mount the new traditional volume once the volume has been created.
Figure 5.12. Traditional Volume Attribute settings in ConsoleOne.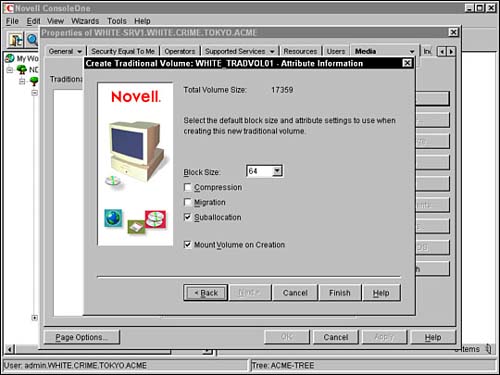
Select Finish in the Volume Attribute Information window to complete the form and to create your new NSS volume.
Now that you have created a traditional volume in NetWare 6, your server is fully prepared to accept new and old user data. Because traditional volumes have limitations, many network administrators prefer to stick with a single, more sophisticated file system NSS. Fortunately, NetWare 6 includes VCU.NLM, a utility to convert traditional NetWare volumes to NSS logical volumes. Keep in mind, though, VCU only converts existing volumes; it doesn't create new ones. The VCU.NLM conversion utility is not an in-place tool. It simply copies the data and directory structure from a traditional volume to an NSS logical volume in an existing storage pool. Therefore, you must have enough available disk space to transition from one volume to another. VCU affects server performance, so you should consider performing volume conversions only when server demands are low (such as late in the evening). To convert a traditional volume, load VCU.NLM at the NetWare 6 server console and specify the following two pieces of information: traditional volume name and host NSS storage pool. For example, to convert the WHITE_TRADVOL01 traditional volume into an NSS logical volume in the WHITESRV1_NSSPOOL01 storage pool, you would enter this command at the server console: VCU WHITE_TRADVOL01 WHITE_NSSPOOL01 Once the conversion is completed, the original volume is renamed WHITE_TRADVOL01_OLD, and the new NSS logical volume keeps the original volume name. Because this feature violates our naming syntax, you may want to rename the new NSS volume by dropping the "TRAD" from the name and adding "NSS". You should restart the NetWare 6 server to ensure that the volume converted properly. After you have verified that the conversion was a success, you can remove the traditional volume and return the empty disk space to your storage pool of choice. TIP Once you copy traditional volume data to a logical volume in NetWare 6, you cannot access the new NSS volume using previous versions of NetWare. This is particularly problematic if the traditional volume was being used for legacy users and applications.
The syntax for VCU.NLM is VCU /{attribute} {traditional volume} {storage pool} Following is a list of attributes supported by the VCU conversion utility: /p Do not print directory file names /l Do not write errors to a log file. By default, the conversion log file is placed in the root of the new NSS volume and given the name ERROR.OUT. /i Keep the COMPRESS_FILE_IMMEDIATELY_BIT file intact. /d If the conversion process is successful, delete the original traditional volume. Remember that the new NSS volume retains the name of the traditional volume, which means that you may want to rename the new volume after the fact.
TIP VCU.NLM will return an error if you use the /d attribute to delete the original traditional volume at the end of the conversion process. This is because the traditional volume has a hidden system file that cannot be copied or deleted. Do not worry about this error; it will not impact your users' ability to use the new NSS volume.
This completes our lesson in traditional volume creation and conversion. We hope that you have gained an appreciation for the value of traditional NetWare volumes as a legacy companion for NetWare 6's new NSS file system. Now let's complete the NSS configuration lesson with a detailed discussion of software RAID one of NSS's most exciting new features. NSS Software RAID Configuration Redundant Array of Independent Disks (RAID) is used industry-wide as a method for storing the same data in different places on multiple hard drives. Six different levels of RAID provide varying degrees of value, depending on the number of disks involved and the features enabled. Because the array of independent disks appears as a single hard drive, RAID systems appear fundamentally transparent to users. The two primary benefits provided by RAID are Increased Disk Performance By reading and writing data across multiple disks, data I/O processes can be dispersed and balanced, significantly improving the performance of your storage system. Increased Fault Tolerance Several RAID configurations support data redundancy on multiple hard drives. This creates a significant level of fault tolerance. For example, if one disk in the array fails, another disk, containing the same data, can take over.
Until now, RAID required one or more special disk controllers as well as firmware to perform multiple file writes across an array of independent disks. Fortunately, NetWare 6 provides an integrated software capability for emulating RAID hardware. NSS software supports two of the six levels defined by RAID: RAID level 0 (data striping) and RAID level 1 (disk mirroring). In this section, we will explore these two software RAID configurations and learn how to create a software RAID level 0 array. Software RAID Level 0 with NSS Software RAID level 0 is also known as data striping. Striping is the process of sequentially writing data across multiple disks in a RAID array (up to eight segments on each RAID array). With NSS, this process occurs at the software level instead of relying on RAID controller hardware. Data striping requires that you partition each drive into units ranging from 512 bytes (small stripe) up to several megabytes (large stripe). These stripes are interleaved and addressed in order. By definition, the RAID stripe size is the amount of data the file system places on a disk before moving to the next disk. The stripe size depends on the application for which the array is being used. Following are two examples of how small and large data stripe sizes operate in the real world: Small Stripe Size If your RAID system holds large files, such as graphics or digital video, the stripes should be small (around 512 bytes). A small stripe size ensures that a single file spans as many disks as possible. This increases disk performance. Large Stripe Size On the other hand, if your system will store small files (such as word processing documents), the stripes should be large (up to 1MB). A large stripe size ensures that each file will be stored on its own disk, increasing fault tolerance.
REAL WORLD Before implementing any level of RAID hardware or software technology, it's important to understand the various advantages and disadvantages associated with that level. For example, unlike other RAID levels that use data striping technology, RAID level 0 does not provide any redundancy. In other words if you are using RAID level 0 and one drive fails, all files are lost. Contact your hardware or software provider for more information on this topic. |
NSS allows you to configure software RAID level 0 for both logical and traditional volumes. To create a software RAID 0 array using ConsoleOne, follow these simple steps: Start ConsoleOne on a NetWare 6 workstation or server. Then authenticate as admin (or an equivalent user with admin privileges). In ConsoleOne, browse to your Server object, right-click it, and select Properties. Next, select Media and RAID Devices. A screen similar to Figure 5.13 should appear. Figure 5.13. Media RAID Devices window in ConsoleOne.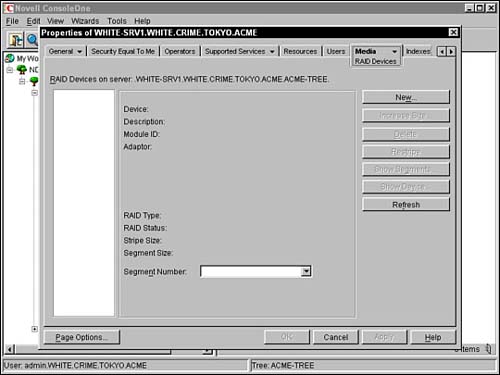
In the Media RAID Devices window (shown in Figure 5.13), select New to create a new RAID array. The Create RAID Device window should appear. In the Create RAID Device window, enter the size that each RAID segment will use from each hard disk in the array. A RAID segment is the amount of disk space used on a given independent drive. Because data striping writes files across multiple disks, the total amount of space available in the RAID array is calculated as follows: RAID segment size (MB) multiplied by the number of disks in the RAID array. For example, a RAID array with four disks and a 1,000MB segment size will yield a total of 4GB of disk space for users. In addition to defining the RAID segment size, you will need to mark all the devices that will be grouped into this RAID array. When you are done, select Next. The final RAID configuration window asks for the stripe size and RAID type. Although the default stripe size is 64KB, you can choose another size from the predefined list (choices range from 512 bytes to several MB). The RAID type should be set to "RAID 0." When you are done, select Finish.
REAL WORLD You can increase the size of a RAID array by adding segments from other storage devices. This process is relatively simple and involves the Media RAID Devices window in ConsoleOne. To add segments to an existing array, simply choose Increase Size from this window and mark Additional Devices in the Edit RAID Device form. After you have completed the array expansion, make sure to restripe the array using the Restripe option in the Media RAID Devices window of ConsoleOne. This creates stripes on the new device and redistributes the data across all disks. Remember that the restriping process takes some time to complete and should probably be scheduled after normal business hours. You should never place more than one RAID segment on a disk. This impedes file system performance and does not provide redundancy. |
Software RAID Level 1 with NSS RAID level 1 is known as disk mirroring. Disk mirroring stores the same data on separate disks using the same controller channel. This RAID feature improves fault tolerance by keeping a real-time backup of all files on a secondary disk. NSS supports software RAID level 1 (mirroring) on both logical and traditional volumes. Following is a list of requirements for mirroring disk partitions in NetWare 6: Mirrored partitions must be of the same partition type. That is, NSS partitions mirror to NSS partitions and traditional partitions mirror to traditional partitions. Mirrored partitions must also be the same size. One trick: you can adjust the hot fix redirection size to make the data area identical on different sized partitions in the mirror group. You can only mirror partitions. If you want to mirror an entire storage pool, you must mirror all of the partitions that the pool resides on. Mirroring must be enabled when you create a partition. You cannot enable mirroring after a partition is created. To do so, you must re-create the partition. If one partition in a mirrored pair has been marked shareable for clustering, the other partition in the pair must also be marked shareable.
This completes our lesson in NSS configuration. In this section, you learned how to configure an NSS volume in three simple steps: creating an NSS partition, creating an NSS pool, and creating an NSS logical volume. In addition, we explored traditional volume configuration and learned about the two levels of RAID that can be achieved using NSS software RAID. After you have configured NSS and created one or more NSS logical volumes, users can take advantage of this new, exciting file system. Of course, this means that you will have to learn more about how to perform some basic NSS management tasks. Fortunately, that's the topic of the next lesson. Lab Exercise 5.1: Configuring NSS In this exercise, you will learn to Create an NSS partition Create a storage pool Create NSS volumes
In this lab exercise, you will need the WHITE-SRV1 server created in Lab Exercise 2.2 with 2+GB free (that is, unassigned) disk space. Create an NSS Partition At the WHITE-SRV1 server console GUI screen, execute ConsoleOne. If necessary, authenticate as Admin. When the ConsoleOne window appears When the Properties of WHITE-SRV1 window appears, select the Media tab. When the Media page appears, select the Partitions subtab from the drop-down menu on the Media tab. When the Partitions page appears, select New. When the Create a New Partition window appears In the Type field, verify that NSS is selected. In the Size field, enter 2, and then verify that GB is selected from the drop-down menu to the right. Verify that Hot Fix is selected. In the Label field, enter WHITE_NSSPART01. Select OK.
Create a Storage Pool When the Media page reappears, select the NSS Pools subtab from the drop-down menu on the Media tab. When the NSS Pools page appears, select New. When the Create a New Pool window appears, enter WHITE_NSSPOOL01 in the Name field, and then select Next. When the Create Pool: WHITE_NSSPOOL01 Storage Information window appears, select the WHITE_NSSPART01 you created in step 1, then select Next. When the Create Pool: WHITE_NSSPOOL01 Attribute Information window appears, verify that Activate on Creation is selected, then select Finish.
Create NSS Volumes When the Media page reappears, select the NSS Logical Volumes subtab from the drop-down menu on the Media tab. When the NSS Logical Volumes page appears, select New. When the Create a New Logical Volume window appears, enter WHITE_NSSDATA in the Name field, then select Next. When the Create Logical Volume: WHITE_NSSDATA Storage Information window appears When the Create Logical Volume: WHITE_NSSDATA Attribute Information window appears Verify that Backup is selected. Select Compression. Select Data Shredding. Select Directory Quotas. Select Flush Immediately. Select Modified File List (MFL). Verify that Salvage Files is selected. Select Snapshot File Level. Select User Space Restrictions. In the On Creation section, verify that Activate is selected. In the On Creation section, verify that Mount is selected. Select Finish.
When the NSS Logical Volumes page reappears, close the Properties of WHITE-SRV1 window by selecting Cancel. Verify that the volume was created and mounted by entering VOLUMES at the server console prompt.
|