Managing NSS
| Test Objective Covered:
As the network administrator, you are responsible for maintaining the server's file system on a day-to-day basis. This involves ensuring that the file system is well organized, easily accessible to network users, and contains adequate storage space. In this final NSS lesson, you will hone your file system management skills by exploring various procedures within the following three categories:
NSS File ManagementFiles represent the bottom level of the NSS file system food chain. This granular storage unit hosts user data and/or network applications. This is where our NSS management lesson begins. Most NSS file management tasks focus on disk space usage and reliability. Specifically, NetWare 6 administrators must be able to
Enable File SnapshotFile Snapshot is an NSS backup reliability feature that supports third-party backup utilities. When you enable File Snapshot on a volume, NSS keeps an original copy of all open files. This allows the backup utility to copy information about each individual file, including owner, creation date and time, and modification date and time. NSS provides two methods for enabling File Snapshot at the volume level:
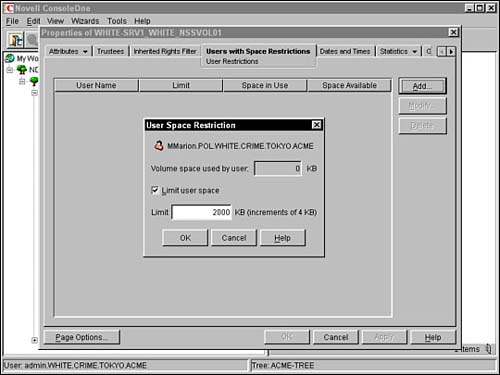
To disable File Snapshot, enter the following NSS command at the server console: NSS /NoFileCopyOnWrite Once you enable File Snapshot on your volumes, you must deactivate and then reactivate and remount them. This helps to ensure that there are no open files without a snapshot. TIP When enabling File Snapshot by using the NSS console command, you can use the all parameter in place of the volume name to enable File Snapshot on all volumes. Configure User Space RestrictionsIf disk space becomes a scarce commodity, consider restricting volume space usage. NSS allows you to restrict volume space according to two criteria: by user and/or by directory. User space restrictions are beneficial for networks that have a large number of users, such as students or contractors. These restrictions must be set independently for each volume. To do so by using ConsoleOne, right-click the volume on the browser screen and select Properties from the pop-up menu that appears. Next, select Attributes and NSS Attributes. Finally, when the NSS Attributes window appears, select User Space Restrictions and you'll be greeted with a screen similar to Figure 5.14. Figure 5.14. Configuring User Space Restrictions in ConsoleOne.
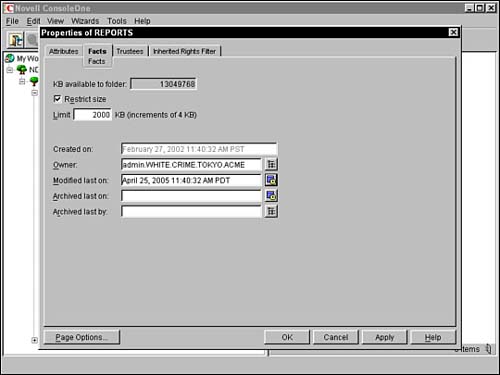
In the Volume Properties page (shown in Figure 5.14), select the Users with Space Restrictions tab and click Add. When the Select Object dialog box appears, browse to and select the context containing the user, select the user, and click OK. When the User Space Restriction dialog box appears, make sure the Limit User Space checkbox is marked, enter the correct size in the Limit (in KB) field, and then click OK. Finally, select Apply to save the user space restriction. Configure Directory Space RestrictionsIn addition to restricting disk space at the user level, you can configure limitations for directories and their subdirectories. To limit the total size of a directory, activate ConsoleOne and authenticate as your Admin user. Next, browse to the directory you want to establish restrictions for in the browser screen, right-click it, and select Properties. When the Properties dialog box appears, click the Facts page tab (as shown in Figure 5.15). When the Facts page appears, mark the Restrict Size checkbox and then enter the correct size in the Limit field (in increments of 4KB). Finally, select Apply to save the directory space restriction. Figure 5.15. Configuring Directory Space Restrictions in ConsoleOne.
NSS Volume ManagementNSS logical volumes represent the highest level of the user-accessible file system. In fact, volumes are a transition point between the two NetWare 6 directory trees: file system and eDirectory. This is because each volume is represented by two objects: a logical collection of disk space in the file system and a Volume object in the eDirectory tree. Because of this special distinction, volume management is a critical aspect of your NSS management responsibilities. As you know, NSS volumes are hosted inside storage pools. Therefore, we must include storage pools in our lesson of volume management. Following are the four main procedures that encompass NSS volume management:
Remember, volume management encompasses more than just NSS logical volumes. In this section, we'll explore storage pool management as well. Rebuild NSS Logical VolumesTo repair NSS storage pools and logical volumes, NetWare 6 includes two NSS console commands:
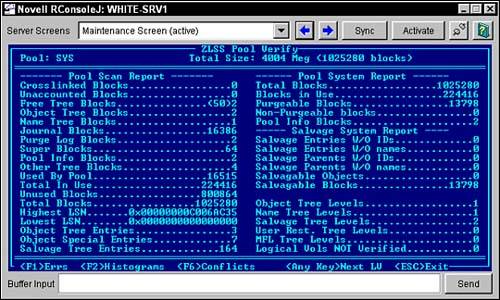
TIP One word of warning: Only use REBUILD as a last resort. If you use it to recover from data corruption, you can lose your data! To run VERIFY on a specific NSS storage pool, enter the following command at the server console: NSS /POOLVERIFY={pool name} During the VERIFY process, NSS will dismount all volumes within the pool automatically. When VERIFY is complete, a results screen appears (as shown in Figure 5.16). Make sure to remount all of the pool's volumes at the conclusion of the VERIFY process by typing MOUNT ALL at the server console. Figure 5.16. NSS VERIFY results screen.
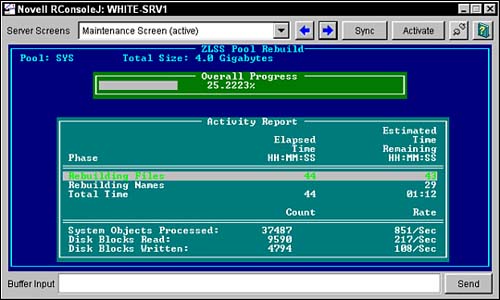
To perform a REBUILD on a specific NSS storage pool, enter the following NSS command at the server console: NSS /POOLREBUILD={pool name} During the REBUILD process, NSS will dismount all logical volumes in the pool automatically. A status screen appears (as shown in Figure 5.17) while the storage pool, and all of its host volumes, are being rebuilt. When the REBUILD process is complete, make sure to mount all of the storage pool's volumes by typing MOUNT ALL at the server console. Figure 5.17. NSS REBUILD status screen.
TIP NSS REBUILD is not equivalent to the traditional VREPAIR utility. While these two utilities seem to accomplish roughly the same task, they go about it in very different ways. Delete NSS Logical VolumesAs a network administrator, you have the power to delete anything that you create, but be aware that user data may be at stake. When you delete an NSS logical volume (or a traditional volume) from a storage pool, the pool and its host partition are still intact. This enables you to reassign the volume space to another storage pool or volume. Fortunately, NSS includes a restore feature that enables you to recover deleted data within two days of its deletion. To delete an NSS storage pool or logical volume in ConsoleOne, simply browse to the appropriate Server object, right-click it, and select Properties. Next, select Media and NSS Pools (or Logical Volumes). Finally, select a specific storage pool or logical volume and click Delete. It's that easy. Oops! What happens if you accidentally delete the wrong volume? That's where the NSS restore feature comes in. Let's take a closer look. Restore or Purge Deleted NSS Logical VolumesNSS will help you recover from volume management mistakes. If you accidentally delete a logical volume, the NSS restore feature enables you to "undelete" it for a specified amount of time this is called the Purge Delay Period. You must retrieve the logical volume before the delay time elapses; otherwise, the volume will be automatically purged from the system and you will be unable to restore it. The default setting for the Purge Delay Period is 2 days (or 172,800 seconds). You can change the Purge Delay Period by entering the following NSS command at the server console: NSS /LogicalVolumePurgeDelay={delay period in seconds} Remember that the Purge Delay parameter is lost if the server is restarted. To make this change permanent, you must add the command to the server's AUTOEXEC.NCF file. You can also manually restore or purge a deleted logical volume by using ConsoleOne. To do so, browse to the appropriate Server object, right-click it, and select Properties. Next, select Media and NSS Pools. Finally, in the Deleted Volumes window, select one of the following options:
TIP When you delete an NSS storage pool, you also delete all logical volumes in that pool. Unfortunately, Logical Volumes deleted at the pool level cannot be restored. Mount a DOS Partition as an NSS Logical VolumeNSS allows you to mount existing DOS partitions as NSS logical volumes. With this feature, users can gain access to the files stored on the server's local C: drive. To accomplish this, simply load the following module at the NetWare 6 server console: LOAD DOSFAT.NSS It is as simple as that. After DOSFAT.NSS is loaded, DOS partitions on the server are automatically mounted and made available as NSS logical volumes. The volume name displayed is DOSFAT_x, where x is the drive letter (for example, DOSFAT_C). The new logical volume is fully functional, including support for long filenames using the Windows 95/98 method, NetWare trustee rights via eDirectory security, and any client or server utility that manages NetWare volumes. This completes our lesson in NSS volume management. In fact, it completes our studies in fundamental NSS management procedures. So, we're done then, right? Wrong! We have one more lesson to go. Before we complete this chapter, we must journey into the mysterious land of NSS troubleshooting. After all, managing NSS volumes is the easy part. How things are handled when the storage system goes awry is the true mettle of a NetWare 6 CNE. NSS TroubleshootingOnce you have configured and managed your NetWare 6 storage system, it's time to focus on keeping it running NSS troubleshooting. The purpose of troubleshooting is to determine the cause of a given problem and to implement a timely solution. Remember that a problem is not considered solved until it no longer negatively impacts your users. From an NSS perspective, this means the problem is solved when user data is safe. And because data is the primary purpose of networking, NSS troubleshooting is one of your most important tasks. In this section, we will explore three of the most common NSS problems and provide some time-proven solutions:
Let's troubleshoot. NSS Does Not Recognize a DeviceNSS does not recognize a specific storage device in Media Manager. Remember that NSS can only use what the Media Manager recognizes. To solve this problem, you must first determine whether NetWare recognizes the storage device at all. To do so, enter the following two commands at the NetWare 6 server console: Scan for new devices List devices If the problematic storage device is not listed or is shown as an Unbound Object the device is likely malfunctioning or the proper .CDM device driver has not been loaded. If the storage device seems to be operating properly, the problem may be caused by a missing device driver. Make sure the appropriate board driver (*.HAM) and device driver (*.CDM) are loaded. NSS Does Not Allow You to Create a Storage Pool or Logical VolumeNSS does not allow you to create a storage pool or logical volume. This condition may occur as a result of any of the following three reasons:
NSS Does Not Allow You to Compress a FileNSS does not allow you to compress a file. Remember that file compression must be activated at the volume level when it is created. However, you can enable file compression on an existing NSS logical volume. To do so by using ConsoleOne, browse to the appropriate Server object, right-click it, and select Properties. Next, choose Media and NSS Logical Volumes. Highlight the specific volume you are interested in and select Properties, Attributes, NSS Attributes. At this point, ConsoleOne will return a screen similar to the one shown in Figure 5.10. Simply select the Compression option and click OK.
Congratulations! You have successfully traversed the new NetWare 6 storage system known as Novell Storage Services. NSS is a huge improvement over the traditional file system. However, with this increased sophistication comes a ton of complexity in architecture, configuration, and management. Fortunately, you have Novell's CNE Update to NetWare 6 Study Guide to teach you what you need to know. In this chapter, we explored the detailed architecture of NSS and learned about two new storage layers: NSS storage deposits and NSS storage pools. In addition, we discovered fifteen impressive NSS features in five different categories. Some of the most interesting features you learned in this chapter include overbooking, file flushing, clustering, data shredding, and software RAID support. With the NSS architecture firmly planted in our collective minds, we turned our attention to the three steps of NSS volume configuration. In step 1, you learned how to create an NSS partition and hot fix redirection area using ConsoleOne. Then, in step 2, you created a storage pool within an existing partition and configured its free space boundaries. Finally, in step 3, you created the NSS logical volume itself within the storage pool and enabled a plethora of attribute settings. In the final lesson of this chapter, "NSS Management," you learned some time-proven procedures for file management, volume management and NSS troubleshooting. Please keep this one important lesson in mind: Data is the ultimate purpose of networking. As a network administrator, you are the trusted keeper of all your users' data. Be sure to take this responsibility very seriously. Now that you are a certifiable NSS storage expert, it's time to explore NetWare 6's innovative access technologies. The next chapter covers four of the coolest new features in NetWare 6: Novell Native File Access Pack, iFolder, iPrint, and NetWare Web Access Gadgets. This is going to be a lot of fun, so hold on tight the ride is about to begin. Lab Exercise 5.2: Storing Data in NetWare 6 (Word Search Puzzle)
See Appendix C for answers. Lab Exercise 5.3: NetWare 6 Storage Services (Crossword Puzzle)
See Appendix C for answers. |


EAN: 2147483647
Pages: 128