Project 2. Cata-Doga-Saurus One of my younger brothers loved the Dr. Seuss characters. I remember wandering all over the neighborhood one time when my little brother was sick and the only thing that would make him feel better was reading Green Eggs and Ham. I managed to find a copy of it for him. I'm not sure how much it helped, but he did seem to feel better because of it. 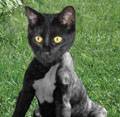 Although I wasn't as big a fan, I did like the names of the characters that Seuss used to come up with. This project is named in honor of the many wonderful Dr. Seuss character's names, and my brother Robbie. There are many ways in which this project can be tackled. In fact, if you asked a number of digital artists how they would tackle this project, you'd probably get as many different methods as artists you asked. The method I'll use in this project should, with some small modifications, work for just about any project of this type. There are a number of things that come up with this type of montage. Relative size of the two images is one issue; another is the lighting and color. We'll see how these issues can be solved so they can be dealt with in any similar projects later: 1. | Open a couple of photos in Paint Shop Pro X. I'll be using a photo of my boxer puppy, Sugrrr, for the first image. The second image I'll use for this project is one of a friend's cat, named Delia. Note that several other cats applied for this project, and they sent in many nice photos. Unfortunately, only one kitty could get the job. Delia's photo was chosen for a number of reasons. I'll explain why as we work through this project. The files I'll be using (sugrrr.tif and delia.tif) are available for download at the companion website. You can see Sugrrr's and Delia's photos in Figure 4.7.
Figure 4.7. Sugrrr and Delia. 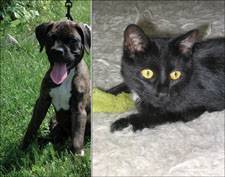
|
Is the Patient Ready? With both photos open, it's time to take the cat's head and place it over the dog's head. Note in Figure 4.7 that the head of the cat is larger than that of the dog. Of course, the zoom level is a little different, but even then it's obvious that the head of the cat is larger than that of the dog. One of the problems that comes up in this type of work is that the two objects being used might be of different sizes. When this is so, it's best to copy and subsequently resize the bigger of the two objects. With this project, that means copying the cat's head over that of the dog. 2. | Activate the image of the cat by clicking its title bar. If you're using your own photos, activate the image that contains the head you'll be transplanting… digitally speaking, of course, Dr. Frankenstein.
| 3. | Select the Freehand Selection tool and use it to draw a selection around the cat's head (see Figure 4.8).
Figure 4.8. Selecting the cat's head. 
As you can see in Figure 4.8, the selection is fairly close to the outside of the cat's head. Note that I've made an effort to grab some of the background so that I'm sure to get all of the foregroundthe cat's head, that is. You can see, too, that I've grabbed some of the area below the cat's chin. I've done so because in this particular case, I'll be blending that area into the chest area of the puppy's portrait.
| 4. | With the selection made, select Edit, Copy.
The Freehand Selection tool can be used in several ways to make selections. For one thing, you can choose from several selection types. The two that can be used to detect edges as you make your selection are Edge Seeker and Smart Edge. One selection type can be used freehand (aptly named Freehand), which is great if you have a steady hand and/or a graphics tablet. Last, but not least, is the Point to Point selection type. This last selection type enables you to click points around a polygon, which can be helpful if your hand is less than steady when using the Freehand type.
| 5. | Activate the image of the dog, or the image that contains the pet portrait that will be the recipient of the cat's head. Select Edit, Paste As New Layer to paste the cat's head into a layer over the portrait of the puppy (see Figure 4.9).
Figure 4.9. Pasting the cat's head over the puppy. 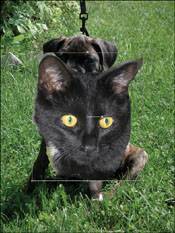
|
More Head's Are Gonna Roll Add the fact that the cat's head will be replacing the dog's head to the fact that the dog has a differently shaped head and you have a bit of a problem. When the cat's head is resized and put into place, some of the puppy's head will be showing. To take care of this, you must perform another head-ectomy. Work will also be required around the neck and chest areaand while we're at it, the leash could be removed, as well. 6. | Select the Pick tool, set its mode to Scale and use it to resize the cat's head so it looks pretty close to the final result you expect. You can see what I've done in Figure 4.10. Note that you should resize by clicking and dragging one of the corners of the bounding box. Doing so ensures that the width-to-height ratio stays the same. Of course, if you have a really bizarre sense of humor, you could shrink the head more in one direction than the other by dragging the side or top/bottom handles.
Figure 4.10. Resizing the cat's head with the Pick tool. 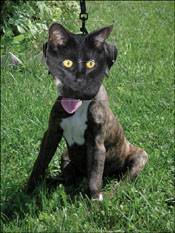
| 7. | Turn off the visibility of the newly added cat's head layer by clicking its small eye icon in the Layers palette. This enables you to work without the cat getting in the way, so to speak. Before you turn off the visibility of the layer, though, try to get an idea of where the cat's head will be so you can do a good job of covering the puppy's head. You could also temporarily change the Opacity setting of the layer with the cat's head so you can work and still see where the head lies (so to speak).
| 8. | Activate the layer with the puppy by clicking its layer in the Layers palette.
| 9. | Create a new raster layer by clicking the small icon on the upper-left corner of the Layers palette. This is the layer we'll paint to with the Clone Brush tool. By painting on a new layer, the image of the puppy remains untouched, so it will be easy to restart if necessary.
| 10. | Select the Clone Brush tool and use it to paint out any areas of the puppy's head and chest (along with the tongue) and the leash. You can see my result in Figure 4.11.
Figure 4.11. Removing parts of the puppy that will conflict with the cat's head. 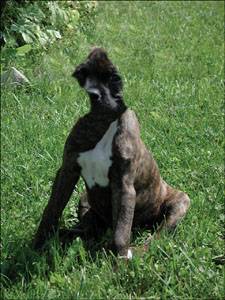
|
Placing the New Head Most of the hard work is already doneat least with the images I've chosen. You might find that you have to correct the color of one of the two images to match the other or that the light is on the wrong side of the newly pasted head. In fact, I would prefer that the head of the cat be reversed. It will be fairly easy to do so with the Pick tool, as you'll see in a moment. With photographs of people, that would be a problem because viewers would spot that there was something wrong with the photo. They might not be sure what it is, but it would bother them. In fact, it might be a problem with pet pictures if the people know their pets well enough or if they have an asymmetric or otherwise distinctive marking. 11. | Toggle the visibility of the layer with the cat's head back on, and make that layer active by clicking its layer in the Layers palette.
| 12. | Select the Pick tool and use it to reverse the cat's head by clicking and dragging one side completely past the other side. That is, if you select the middle right node of the bounding box, you'll click and drag it to the left so the image flips along vertical axis. Note that you could also simply select Image, Mirror, but then you'd miss out on the fun of learning a new use for the Pick tool.
| 13. | Use the Pick tool to move the head into place and do any final resizing (see Figure 4.12).
Figure 4.12. Flipping the cat's head and moving it into place. 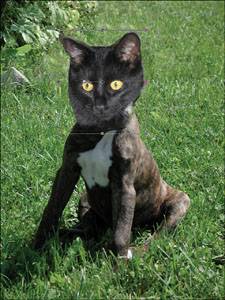
|
Adding (or Removing) the Final Touches With the head in place, you should take a look at the image to see whether any areas of the puppy's photo still show and need to be removed. You can also check to see whether any areas of the cat's head need to be blended in more or even be removed. To get the job done, you can use a soft eraser or the Clone Brush, or both. Zoom in first so you can get a better idea of what extra work is needed. 14. | Select the Zoom tool and zoom in around the cat's head, getting as close as you need to see the details of how the two images work together (see Figure 4.13).
Figure 4.13. Zooming in to see the details. 
|
From the zoomed-in vantage point, you can see that there's some extra material around the cat's ears and neck that should be removed or copied over. I'll use a soft eraser to get rid of the extra pixels. Here's how: 15. | Duplicate the layer with the cat's head so you can get back to this point quickly and easily. You can duplicate the layer by right-clicking its layer in the Layers palette and selecting Duplicate.
| 16. | Turn off the visibility of one of the two cat's head layers, and make sure the other cat's head layer is active by clicking its layer in the Layers palette.
| 17. | Select the Eraser tool and set a fairly large brush size. Also, set the hardness very low so you'll have a softer-edged brush.
| 18. | Use the Eraser to remove parts of the background from the cat's head. As you work, you might find that you reveal some parts pf the puppy. If this happens, use the Clone Brush to paint out those parts, making sure that you activate the layer that you did the previous cloning to.
|
The Grand Finale The biggest issue with pasting one head over anotherwhether it's cats and dogs or peopleis color. If the images you're working with don't match up correctly, you'll have to adjust the color of one of the two. To do so, select Adjust, Color Balance. The values of the settings in that dialog box enable you to adjust the colors so your two images match. Use small adjustments and turn on the Auto Proof so you can see the effect your changes have. Color theory and its practice is a large topic worthy of several tomes. If you go slowly, though, you'll get as close as you can and it will certainly be enough to fool people. If that doesn't seem to work well, you can cheat like I'm going to and turn the puppy's image to black and white. Because the cat's fur is such a lovely shade of black, I'll apply the effect only to the puppy and not the surrounding lawn, so the overall effect is one of a black-and-white cata-doga-saurus in a color photo. Here's how: Note If you like, you can easily turn the entire image into a black-and-white photo.
19. | Use your favorite selection method to isolate the puppy. If you need a refresher on how that's done, see Appendix B, "Paint Shop Pro X in a Nutshell." Also, whichever method you use, be sure that you apply a feather to the selection (choose Selections, Modify, Feather) before proceeding so the effect blends properly. Depending on the images you're working with, you should use between 2 and 8 for the Radius setting, with a value of 2 for screen-sized images and about 5 or so for images that will be 8''x10''.
| 20. | With the puppy isolated, select Edit, Copy and then Edit, Paste As New Layer to paste a copy of the pup over herself. You might have to use the Pick tool to move the copy into place.
| 21. | Select Adjust, Color, Channel Mixer to open the Channel Mixer dialog box (see Figure 4.14).
Figure 4.14. Turning one layer to grayscale. 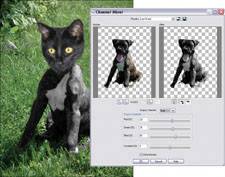
| 22. | Be sure you place a check mark in the Monochrome check box. Doing so turns the contents of the current layer to grayscale, or black and white in photography terms.
| 23. | Play with the settings for the three colors until you get a good balance for the black and white. Activate the Auto Proof so you can instantly get feedback about the changes you're making. I set the Red to 22%, the Green to 31%, and the Blue to 61%. Even though they add up to more than 100%, these are the settings that best reflect what I want to see.
| 24. | As a last bit of adjustment, I rotated the head slightly to the right with the Pick tool. You can see my final effort in Figure 4.15.
Figure 4.15. Run for your lives, it's a cata-doga-saurus. 
|
|